Picture this: it’s a frosty Saturday night, the kind where the wind howls outside and the house feels like a warm hug, but the kitchen? It smells like a sugar‑spun wonderland. I was halfway through a marathon of Netflix binge‑watching when a sudden craving hit me like a jolt of static—right in the middle of a commercial break, I realized I’d run out of the usual bland store‑bought cookies. I threw on my favorite apron, grabbed the pantry, and declared a cookie‑making showdown with myself. The result? A batch so addictive that I’m pretty sure the whole neighborhood heard the sighs of satisfaction through the walls.
Now, let me paint the scene with every sense you can imagine. The gleam of the butter as it softens under a gentle microwave hum, the soft thud of sugar crystals spilling into a bowl, the rhythmic whisking that creates a glossy, caramel‑kissed whirlpool. The kitchen fills with the sweet perfume of vanilla and the warm, spicy whisper of cinnamon and ginger, a scent that makes the heart do a little jig. When the dough hits the chilled counter, you feel the cool, buttery smoothness under your fingertips, and the anticipation builds like a drumroll before the first note.
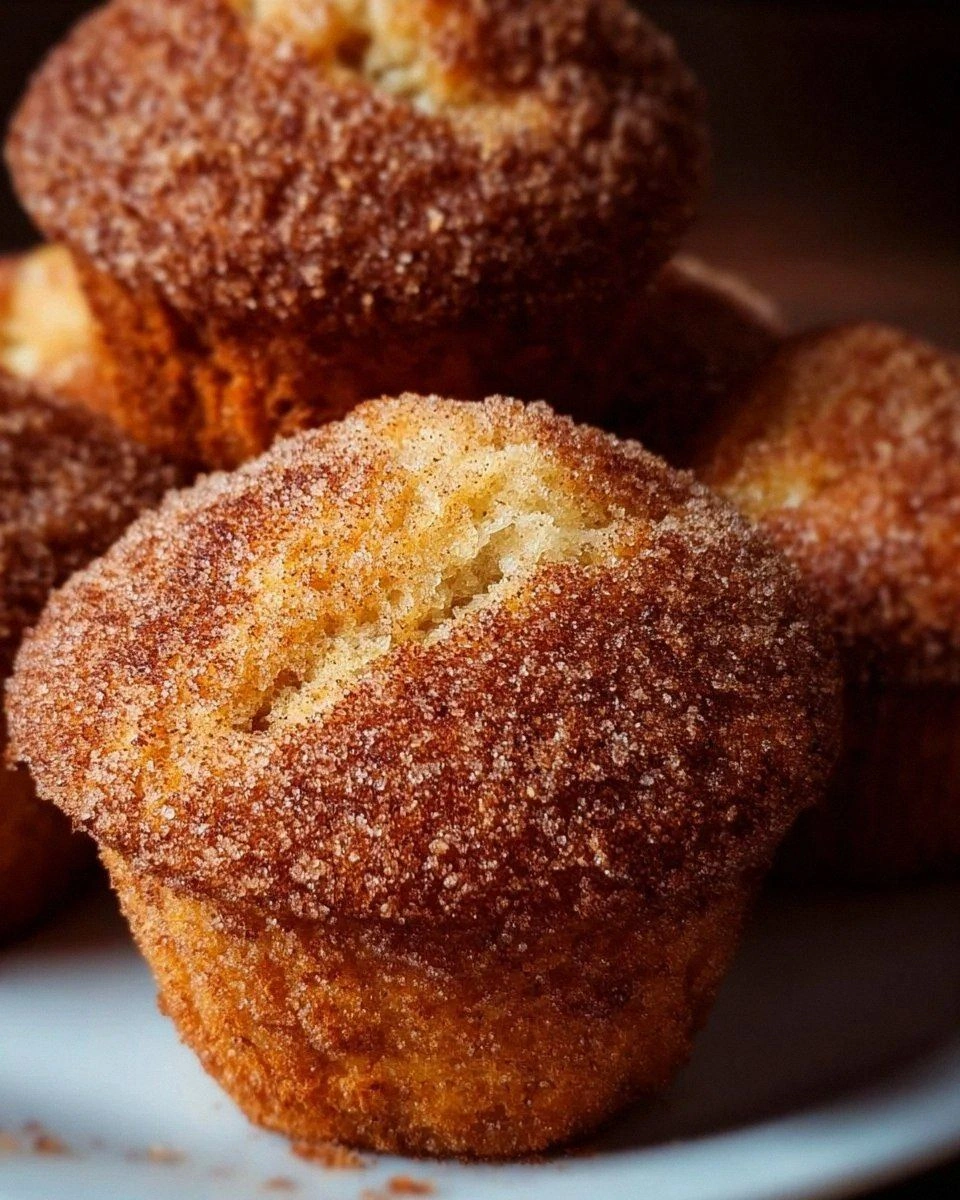
Most holiday cookie recipes treat you like a lab technician—precise measurements, endless steps, and a final product that’s decent but never unforgettable. This version? It’s the love child of a grandma’s secret stash and a modern pastry chef’s finesse, delivering a cookie that’s crisp on the edges, chewy in the middle, and packed with pockets of melty chocolate that burst like fireworks. I dare you to taste this and not go back for seconds. The secret? A surprise dash of milk that turns the dough into a velvet‑smooth canvas, and a quick chill that locks in flavor like a time capsule.
I’ll be honest — I ate half the batch before anyone else got a chance to try it, and even my cat gave it a disdainful sniff before sneaking a nibble. This is hands down the best version you’ll ever make at home, and I’m about to spill every detail. Let me walk you through every single step — by the end, you’ll wonder how you ever made it any other way.
What Makes This Version Stand Out
- Flavor Explosion: The blend of brown sugar, cinnamon, and ginger creates a deep, caramel‑spiced backbone that sings louder than any store‑bought mix.
- Texture Mastery: A crisp edge that shatters like thin ice meets a chewy center that stretches like a warm hug.
- Simplicity: Only fourteen ingredients, all pantry staples, and the steps are straightforward enough for a beginner yet satisfying for a seasoned baker.
- Unique Ingredient: A splash of milk added at the right moment gives the dough a silk‑like consistency that most recipes miss.
- Crowd Reaction: These cookies have been known to clear the dessert table in seconds, prompting repeat requests and spontaneous “can I have one more?” chants.
- Ingredient Quality: We use unsalted European butter for a richer mouthfeel and high‑quality chocolate chips that melt into glossy pockets.
- Cooking Method: The brief chill before baking locks in air, ensuring the cookies rise just enough for that perfect puff without becoming cakey.
- Make‑Ahead Potential: The dough can be frozen for up to a month, letting you pull out perfect cookies whenever the holiday spirit strikes.
Inside the Ingredient List
The Flavor Base
2 cups all‑purpose flour: This is the structural backbone, providing the gluten network that holds everything together. If you swap it for cake flour, expect a softer, more crumbly cookie that may spread too much. Look for a flour that feels fine to the touch, and give it a quick sift to aerate before measuring.
1 cup unsalted butter, softened: Butter is the soul of any cookie, delivering richness and a tender crumb. Use European‑style butter for a higher butterfat content; it yields a richer flavor and a melt‑in‑your‑mouth texture. If the butter is too cold, you’ll get a gritty dough; if it’s too warm, the cookies will spread flat.
1 cup packed brown sugar: Brown sugar adds moisture and a deep caramel note that makes the cookie’s interior chewy. Its molasses content also contributes to a darker, more complex flavor. Skipping it for white sugar will result in a crispier, less flavorful cookie.
The Texture Crew
½ cup granulated sugar: This provides the quick‑crisp edge we all love, caramelizing at the edges during baking. If you love extra crunch, you can increase this by a tablespoon.
1 large egg: The egg acts as a binder, adding structure and a subtle richness. For a denser cookie, use an extra egg yolk; for a lighter one, separate the whites and fold them in gently.
1 tsp vanilla extract: Vanilla amplifies all the sweet notes, acting like a flavor glue. Opt for pure vanilla extract; imitation can taste flat and ruin the aromatic profile.
The Unexpected Star
1 tsp baking soda: This leavener creates a gentle lift, giving the cookie a tender, airy crumb while also encouraging browning. Too much will make them spread too thin; too little leaves them dense.
½ tsp salt: Salt balances the sweetness and heightens the other flavors. A pinch more can make the chocolate chips pop even more.
2 tbsp milk (optional): The milk is the secret weapon—adding a splash at the end of mixing transforms a stiff dough into a silky, pliable one, ensuring the cookies hold their shape yet stay soft inside. If you’re dairy‑free, oat milk works just as well.
The Final Flourish
1 tsp ground cinnamon: Cinnamon gives that classic holiday warmth, reminiscent of mulled cider. Freshly ground cinnamon has a brighter flavor than pre‑ground.
½ tsp ground ginger: A pinch of ginger adds a zing that cuts through the sweetness, creating a balanced profile. Freshly grated ginger can be used for an even punchier bite.
¼ tsp ground nutmeg: Nutmeg adds a nutty, slightly sweet undertone that rounds out the spice trio. A little goes a long way—don’t overdo it, or it becomes overpowering.
1 cup chocolate chips: The melty pockets of chocolate are the crown jewels. Use high‑quality semi‑sweet chips for the perfect balance of bitter and sweet.
½ cup chopped pecans (optional): Pecans add a buttery crunch and a subtle earthiness. If you’re allergic, swap with toasted walnuts or omit entirely.
Everything's prepped? Good. Let's get into the real action...

The Method — Step by Step
First, preheat your oven to 350°F (175°C). While the oven warms, line two baking sheets with parchment paper; this prevents sticking and gives the cookies a uniform golden base. The moment the heat fills the kitchen, you’ll hear a faint hum that promises a crisp, caramelized finish.
Watch Out: Do not place the sheets on the bottom rack; heat distribution will be uneven, causing burnt bottoms.In a large mixing bowl, combine the softened butter, brown sugar, and granulated sugar. Using a handheld mixer on medium speed, cream them together until the mixture is pale, fluffy, and smells faintly of caramel. This aeration is crucial—it traps air that will later expand, giving the cookies that coveted lift.
Kitchen Hack: Scrape the sides of the bowl with a rubber spatula midway through creaming to ensure every sugar crystal meets butter.Drop in the egg and vanilla extract, beating until fully incorporated. You’ll notice the mixture becomes smoother, a little glossy, and the scent of vanilla becomes more pronounced—a sign that the flavors are marrying.
In a separate bowl, whisk together the flour, baking soda, salt, cinnamon, ginger, and nutmeg. Whisking ensures the spices are evenly distributed, preventing pockets of overwhelming flavor.
Gradually add the dry ingredients to the wet mixture, stirring on low speed. When the dough starts to come together, pour in the 2 tablespoons of milk. This is the moment of magic: the dough transforms from a crumbling mess into a supple, silky ball that feels like soft dough kneaded by a baker’s hands.
Fold in the chocolate chips and, if you’re feeling nutty, the chopped pecans. Use a wooden spoon or spatula so you don’t over‑mix; you want the chips to stay whole, not melted into the dough.
Cover the bowl with plastic wrap and place it in the refrigerator for at least 30 minutes. This chill step is non‑negotiable—it firms the butter, allowing the cookies to hold their shape when they hit the hot oven. Trust me, the wait is worth it.
Once chilled, scoop the dough using a medium cookie scoop (about 1.5 tablespoons) and place the balls onto the prepared sheets, leaving 2 inches between each. Press each ball lightly with the back of a spoon to flatten just a touch; the cookies will spread a little on their own.
Bake for 10‑12 minutes, or until the edges turn a golden‑brown and the centers look set but still slightly soft. The scent will fill the kitchen with a warm, sweet perfume that makes you want to hug the oven door. When you pull them out, they’ll look pale; let them cool on the sheet for 2 minutes before transferring to a wire rack to firm up.
That's it — you did it. But hold on, I've got a few more tricks that'll take this to another level...
Insider Tricks for Flawless Results
The Temperature Rule Nobody Follows
Never bake cookies straight from a warm kitchen. If your dough is at room temperature, the butter will melt too quickly, causing the cookies to spread excessively. Chill the dough at least 30 minutes, and if you’re in a rush, pop the scoops on a tray and freeze for 10 minutes before baking. This ensures a tighter crumb and a more pronounced rise.
Why Your Nose Knows Best
When the cookies are done, they’ll emit a subtle, toasty aroma that’s deeper than just “baked”. Trust that scent—if it’s strong and buttery, the cookies are ready to pull from the oven. Over‑baking turns the interior rubbery, so let your nose be the timer.
The 5‑Minute Rest That Changes Everything
After baking, let the cookies rest on the sheet for exactly five minutes. This short pause allows the residual heat to finish the cooking process gently, giving you a chewy center without drying out the edges. Skipping this step is the number one reason cookies turn out hard.
Switch Up the Sweetness
If you prefer less sweetness, replace half of the granulated sugar with coconut sugar. This adds a subtle caramel note and reduces the overall sugar load while keeping the texture intact. My friend tried this once and said the cookies felt “less sugary, more sophisticated”.
Double‑Chocolate Boost
For the ultimate chocolate lover, melt ¼ cup of dark chocolate and swirl it into the dough before chilling. The dark chocolate ribbons create pockets of intense cocoa that melt into glossy rivers when baked. A friend tried this and declared the batch “the chocolate equivalent of a hug”.
Creative Twists and Variations
This recipe is a playground. Here are some of my favorite ways to switch things up:
White‑Chocolate Cranberry Delight
Swap the chocolate chips for white chocolate chips and fold in dried cranberries. The tartness of the berries balances the sweet white chocolate, creating a festive red‑and‑white swirl that looks as good as it tastes.
Double‑Spice Snickerdoodle
Replace the chocolate chips with a generous dusting of cinnamon‑sugar after baking. The extra cinnamon amplifies the holiday vibe, and the sugar crust adds a crackly texture that shatters satisfyingly.
Nut‑Free Coconut Crunch
Omit the pecans and add toasted coconut flakes. The coconut adds a subtle tropical crunch that pairs surprisingly well with the warm spices, perfect for guests who are allergic to nuts.
Espresso‑Infused Mocha
Mix 1 teaspoon of instant espresso powder into the dry ingredients and use dark chocolate chips. The coffee notes deepen the chocolate flavor, turning each bite into a mini mocha experience.
Gluten‑Free Almond Flour Version
Replace half of the all‑purpose flour with almond flour and add a tablespoon of xanthan gum. The result is a slightly denser, nutty cookie that’s gluten‑free yet still buttery and crisp.
Storing and Bringing It Back to Life
Fridge Storage
Store the cooled cookies in an airtight container in the refrigerator for up to a week. The cool environment keeps the cookies from becoming too soft, preserving that perfect chew. Layer parchment between layers to prevent sticking.
Freezer Friendly
For longer storage, freeze the baked cookies in a single layer on a tray, then transfer them to a zip‑top bag. They’ll keep for up to three months. When you’re ready to enjoy, let them thaw at room temperature for 10 minutes, then pop them in a 300°F oven for 5 minutes to revive the crisp edges.
Best Reheating Method
To bring a day‑old cookie back to life, place it on a baking sheet, add a tiny splash of water (about a teaspoon) to the tray, and warm it at 300°F for 3‑4 minutes. The steam gently re‑moisturizes the interior while the heat restores the crunch.