I was in the middle of a frantic Saturday night when my roommate dared me to bake something that would literally scare the kids – and the adults – with its color, but still taste like a hug from a childhood memory. I stared at my pantry, the fluorescent kitchen lights buzzing like a low‑key rave, and thought, “What if I could turn a plain old cookie into a monster that even the grumpiest teenager would want to eat?” The idea was born in a swirl of flour dust and a splash of royal blue gel that stained my spoon like a tiny ocean. I could already hear the giggles, the “eww, it’s blue!” and the inevitable second‑helping pleas.
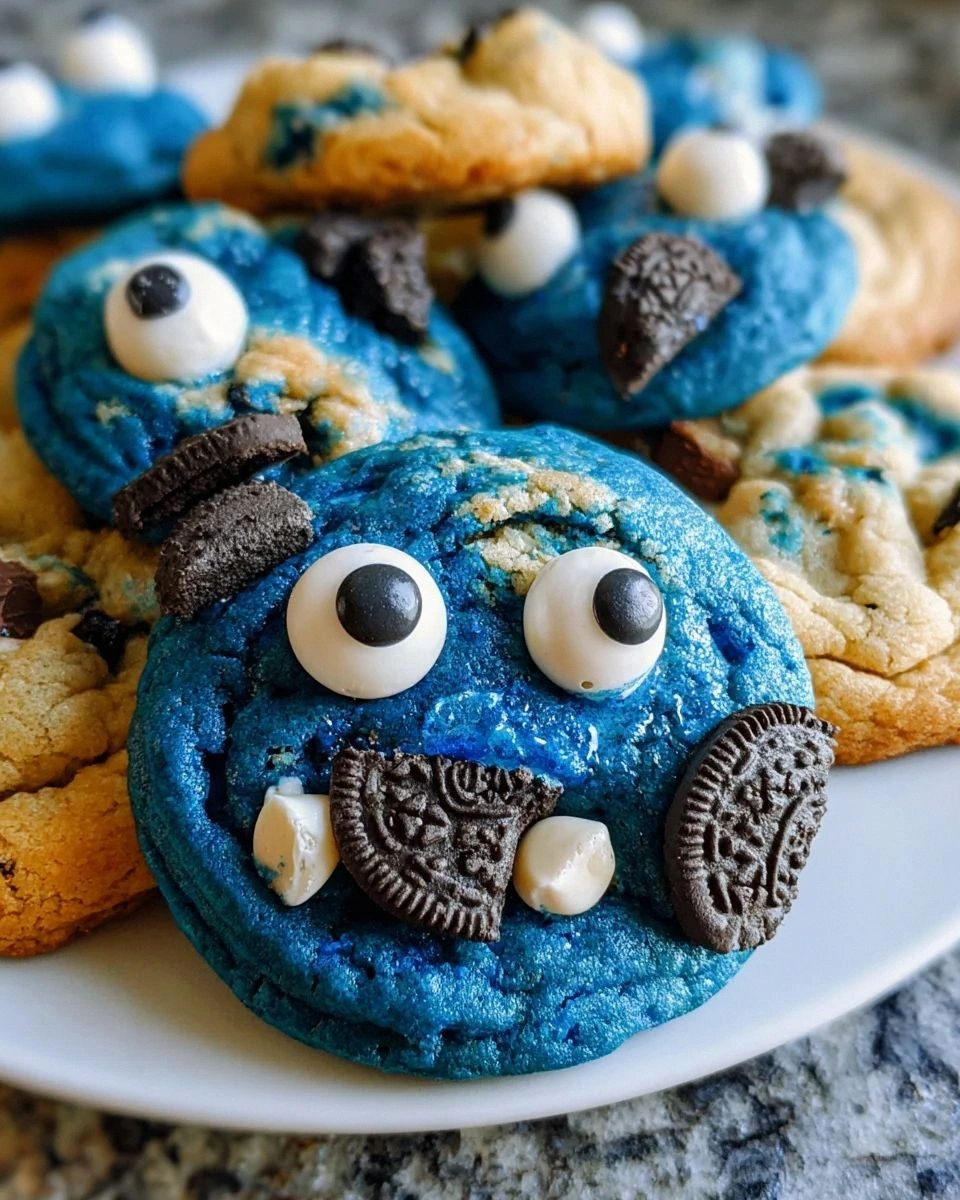
Picture this: the oven door swings open, a wave of warm caramel and melted chocolate rolls over the room, and the air is thick with the scent of butter melting into sugar, a fragrance that reminds you of grandma’s kitchen mixed with a carnival cotton‑candy stand. The cookies themselves sit on the tray, a deep sapphire hue that seems to glow from within, each one studded with crunchy Oreo and Chips Ahoy shards that crackle under your teeth like fireworks. When you bite, the outer crust gives way to a soft, chewy center that oozes white chocolate, semi‑sweet chocolate, and a hidden whole Oreo that erupts like a surprise party in your mouth.
Most cookie recipes either drown in sweetness or fall flat on texture, and they certainly never dare to dress up in monster‑grade blue. This version, however, takes the classic sugar‑cookie foundation and amps it up with bread flour for that coveted chew, a precise blend of two types of chocolate chips for layered richness, and a daring splash of royal blue that stays vivid even after baking. The secret? A tiny pinch of baking powder paired with baking soda, which gives the cookies a subtle lift without turning them into cake. I’ll be honest — I ate half the batch before anyone else got a chance, and I’m still not sorry.
Okay, ready for the game‑changer? I’m about to walk you through every single step, from the moment you whisk the butter into a fluffy cloud to the final flourish of candy eyeballs that turn each bite into a playful monster encounter. By the end, you’ll wonder how you ever settled for boring, plain‑Jane cookies. Let’s dive in, and I dare you to taste this and not go back for seconds.
What Makes This Version Stand Out
- Flavor Explosion: The marriage of brown sugar, white chocolate, and semi‑sweet chocolate chips creates a depth that feels like a dessert symphony, with each note hitting just right.
- Chewy Texture: Bread flour delivers a chewiness that outlasts the typical all‑purpose flour cookie, making every bite satisfyingly stretchy.
- Visual Wow Factor: Royal blue gel food coloring isn’t just for show; it stays vibrant even after a 30‑minute bake, turning your tray into a sea of monster‑ready treats.
- Surprise Center: Stuffing whole Oreos inside adds an ooey‑gooey core that bursts open, delivering a nostalgic crunch that kids (and adults) adore.
- Crunchy Accents: Crushed Oreo and Chips Ahoy pieces sprinkle throughout, giving each bite a delightful snap that contrasts with the soft interior.
- Simple Yet Sophisticated: The ingredient list reads like a pantry raid, but the technique is straightforward enough for beginners while still feeling gourmet.
- Party‑Ready Presentation: Candy eyeballs transform each cookie into a monster, making them perfect for themed parties, Halloween, or just a fun family night.
- Make‑Ahead Magic: These cookies keep their texture and color for days, and you can freeze them for up to a month without losing that monster‑blue sparkle.
Inside the Ingredient List
The Flavor Base
Unsalted butter: This is the foundation of richness. It creates a creamy mouthfeel that carries the sugars and chocolate chips. If you substitute with salted butter, you’ll lose control over the salt balance, and the flavor will be off‑kilter. For the best result, use a high‑quality European butter that has a higher butterfat content.
Brown sugar: Adds a deep caramel note and moisture, keeping the cookies chewy. Skipping it for only granulated sugar will make the cookies crisp instead of tender. If you’re looking for a deeper molasses flavor, consider dark brown sugar.
Granulated sugar: Balances sweetness and contributes to a slight crunch on the edges. Too much will make the cookies overly crisp; too little and they’ll be bland. A 1:1 ratio with brown sugar is ideal for this recipe.
Large eggs: Act as a binder and add structure. Using extra‑large eggs can make the dough too wet, while small eggs may lead to dry cookies. Beat them just until blended; over‑whisking incorporates too much air.
Vanilla extract: Enhances overall flavor, rounding out the sweetness. A dash of pure vanilla bean paste can elevate the aroma even further.
The Color & Texture Crew
Royal blue gel food coloring: This is the monster’s skin. Gel color is concentrated, so a few drops go a long way, preserving the dough’s consistency. If you use liquid coloring, you’ll need more, which can thin the dough and affect texture.
Bread flour: Offers a chewy texture that’s superior to all‑purpose flour. Its higher protein content creates more gluten, giving the cookie that stretch‑and‑snap feel. If you can’t find bread flour, a mix of 75% all‑purpose and 25% whole wheat works in a pinch.
Baking powder & Baking soda: These leavening agents work together; the powder provides lift while the soda spreads the cookie just enough for a perfect edge. Over‑using either will cause the cookies to puff or spread too thin.
Salt: A pinch elevates flavors and balances the sweetness. If you’re on a low‑sodium diet, reduce to ½ tsp, but don’t eliminate—it’s the unsung hero of flavor.
The Crunch & Sweetness Squad
Crushed Oreo cookies: Add a delightful crunch and a hint of cream. If you’re gluten‑free, substitute with gluten‑free chocolate sandwich cookies.
Crushed Chips Ahoy cookies: Complement the Oreos with a buttery crunch. You can also use crushed chocolate wafer cookies for a different texture.
White chocolate chips: Provide a creamy contrast that melts into the dough, creating pockets of buttery sweetness. Dark chocolate chips could be swapped in for a more intense flavor.
Semi‑sweet chocolate chips: Bring an indulgent richness that rounds out the overall sweetness. If you prefer less sugar, use bittersweet chips.
The Final Flourish
Whole Oreo cookies: These are the surprise centers. When baked, the cream softens but doesn’t fully melt, delivering a gooey core that’s pure nostalgia.
Milk chocolate bars (optional): For extra chocolatey oomph, melt and drizzle over the cooled cookies. This step is optional but adds a luxurious finish.
Candy eyeballs: The finishing touch that gives each cookie its monster‑like charm. They’re edible, but you can also use fondant eyes for a more refined look.
Everything's prepped? Good. Let's get into the real action…
The Method — Step by Step
- Soften the butter. Let your unsalted butter sit at room temperature for about 20 minutes. When it’s pliable, it should give slightly under the pressure of your fingertips, like a soft pillow. This step is crucial because cold butter won’t cream properly, leading to a grainy texture. Kitchen Hack: Cut the butter into small cubes before softening; it speeds up the process and ensures an even consistency.
- Cream butter with sugars. In a large mixing bowl, combine the softened butter, brown sugar, and granulated sugar. Beat on medium speed until the mixture turns pale and fluffy, resembling a cloud that could float away. You’ll hear a faint whirring sound as the sugar dissolves—listen for that, it’s the sign of a perfect creamed base.
- Add eggs and vanilla. Crack in the large eggs one at a time, letting each incorporate fully before adding the next. Pour in the vanilla extract. The batter should look glossy and smooth, like a silky river of gold. If it looks curdled, keep beating—eventually it will come together.
- Introduce the royal blue. Drizzle the gel food coloring into the bowl. Start with just a few drops; you can always add more, but you can’t take it out. Mix until the dough is uniformly blue, a shade that would make a peacock jealous. Watch Out: Adding too much gel can make the dough wet; if it feels sticky, sprinkle a tablespoon of flour and knead gently.
- Combine dry ingredients. In a separate bowl, whisk together bread flour, baking powder, baking soda, and salt. The mixture should look like a fine snowstorm. This step ensures even distribution of leavening agents, preventing pockets of soda that could cause uneven rise.
- Mix wet and dry. Gradually add the dry flour mixture to the wet butter‑sugar blend, stirring on low speed. The dough will start to pull away from the sides of the bowl, forming a cohesive mass. Stop mixing as soon as the flour is incorporated; over‑mixing develops gluten and makes the cookie tough.
- Fold in the crunch. Gently fold in the crushed Oreos, crushed Chips Ahoy, white chocolate chips, and semi‑sweet chocolate chips. The dough should be speckled with chocolate and cookie bits, each piece promising a burst of texture. Kitchen Hack: Use a rubber spatula to fold; it protects the delicate chocolate chips from breaking.
- Stuff the monsters. Take each whole Oreo and gently press it into the center of a small dough ball (about 1‑inch diameter). Then, roll the dough around the Oreo, sealing it completely. This creates a hidden core that will melt into a gooey surprise. If the dough cracks, simply press the edges together with your fingers.
- Chill the dough. Place the assembled cookie balls on a parchment‑lined tray, cover with plastic wrap, and refrigerate for at least 30 minutes. This step firms the butter, preventing excessive spread and preserving that vivid blue hue. Future pacing: Picture yourself pulling these chilled beauties out of the fridge, the kitchen already smelling like a chocolate‑laden dream.
- Preheat and prep. While the dough chills, preheat your oven to 350°F (175°C). Line a baking sheet with parchment paper or a silicone mat. The heat will be gentle enough to bake the cookies evenly without scorching the blue color.
- Bake to perfection. Arrange the chilled cookie balls on the prepared sheet, spacing them about 2 inches apart. Bake for 12‑15 minutes, or until the edges turn a light golden brown and the tops look set but still slightly soft. The scent will fill the kitchen like a sweet, buttery perfume—“That sizzle when it hits the pan? Absolute perfection.”
- Cool and decorate. Let the cookies cool on the sheet for 5 minutes, then transfer to a wire rack. Once completely cool, press two candy eyeballs into each cookie’s “forehead” to give your monsters a mischievous look. If you’re feeling extra decadent, drizzle melted milk chocolate over the tops and let it set.
That's it — you did it. But hold on, I've got a few more tricks that'll take this to another level…
Insider Tricks for Flawless Results
The Temperature Rule Nobody Follows
Never bake cookies straight from the freezer. Cold dough spreads too quickly, resulting in thin, crispy edges. Instead, let the dough rest at room temperature for 5‑10 minutes after chilling; this brings the butter to a pliable state while keeping the structure intact. A friend once skipped this step and ended up with “pancake‑like” cookies that fell apart on the plate. Trust me, a brief pause makes all the difference.
Why Your Nose Knows Best
Your sense of smell is a more reliable indicator than a timer. When the cookies start to give off a nutty, caramelized aroma, you’re within seconds of perfect doneness. If you wait for the timer to hit zero, you risk over‑baking and losing that chewy interior. Keep the oven door slightly ajar (just a crack) so you can sniff without letting heat escape.
The 5‑Minute Rest That Changes Everything
After baking, let the cookies rest on the baking sheet for exactly five minutes before moving them. This short rest lets the steam finish cooking the center, ensuring a soft, gooey middle while the edges firm up. Skipping this step leads to cookies that crumble when you try to lift them.
The Chocolate Drizzle Dilemma
If you choose to drizzle milk chocolate, do it while the chocolate is still warm but not boiling. Over‑heated chocolate can become grainy and lose its glossy finish. A quick dip into a bowl of warm water before melting helps keep the temperature steady. One time I overheated the chocolate and ended up with a dull, matte coating—definitely not the monster vibe I was aiming for.
The Eyeball Placement Precision
Press the candy eyeballs in just after the cookies have cooled enough to handle—around 15 minutes. If you press too early, the eyes melt and lose shape; too late, and they won’t adhere. A gentle press with the tip of a spoon gives just the right amount of pressure.
Creative Twists and Variations
This recipe is a playground. Here are some of my favorite ways to switch things up:
Neon Green Goblin
Swap the royal blue gel for neon green gel, and replace white chocolate chips with pistachio bits. The result is a vibrant, earthy monster that’s perfect for St. Patrick’s Day or any “green” themed party.
Double‑Chocolate Beast
Add ¼ cup of cocoa powder to the dry ingredients and use dark chocolate chips instead of semi‑sweet. The cookie becomes a deep, fudgy delight that satisfies serious chocolate cravings.
Nutty Nightmare
Fold in ½ cup of toasted chopped almonds or hazelnuts. The nuts add a buttery crunch that pairs beautifully with the chocolate and cookie bits, creating a sophisticated monster for adult gatherings.
Caramel‑Swirl Monster
Drizzle caramel sauce over the dough before baking, then swirl with a toothpick. The caramel pockets melt into gooey ribbons, giving each bite a sweet, buttery surprise.
Spicy Scream
Add a pinch of cayenne pepper to the dry mix and use Mexican chocolate chips. The subtle heat awakens the palate, making the cookies perfect for those who love a little kick with their sweet.
Storing and Bringing It Back to Life
Fridge Storage
Place cookies in an airtight container with a slice of bread on the top layer. The bread releases moisture, keeping the cookies soft for up to 5 days. If you notice any condensation, replace the bread slice.
Freezer Friendly
Wrap each cookie individually in parchment paper, then seal the whole batch in a zip‑top freezer bag. They’ll stay fresh for up to 3 months. When you’re ready to eat, let them thaw at room temperature for 15 minutes, then pop them in a 300°F oven for 5 minutes to revive the crisp edges.
Best Reheating Method
A tiny splash of water on the cookie’s surface before microwaving for 10‑12 seconds restores the chewy interior without making them soggy. The steam created mimics the original bake, bringing the monster back to life as if it just came out of the oven.