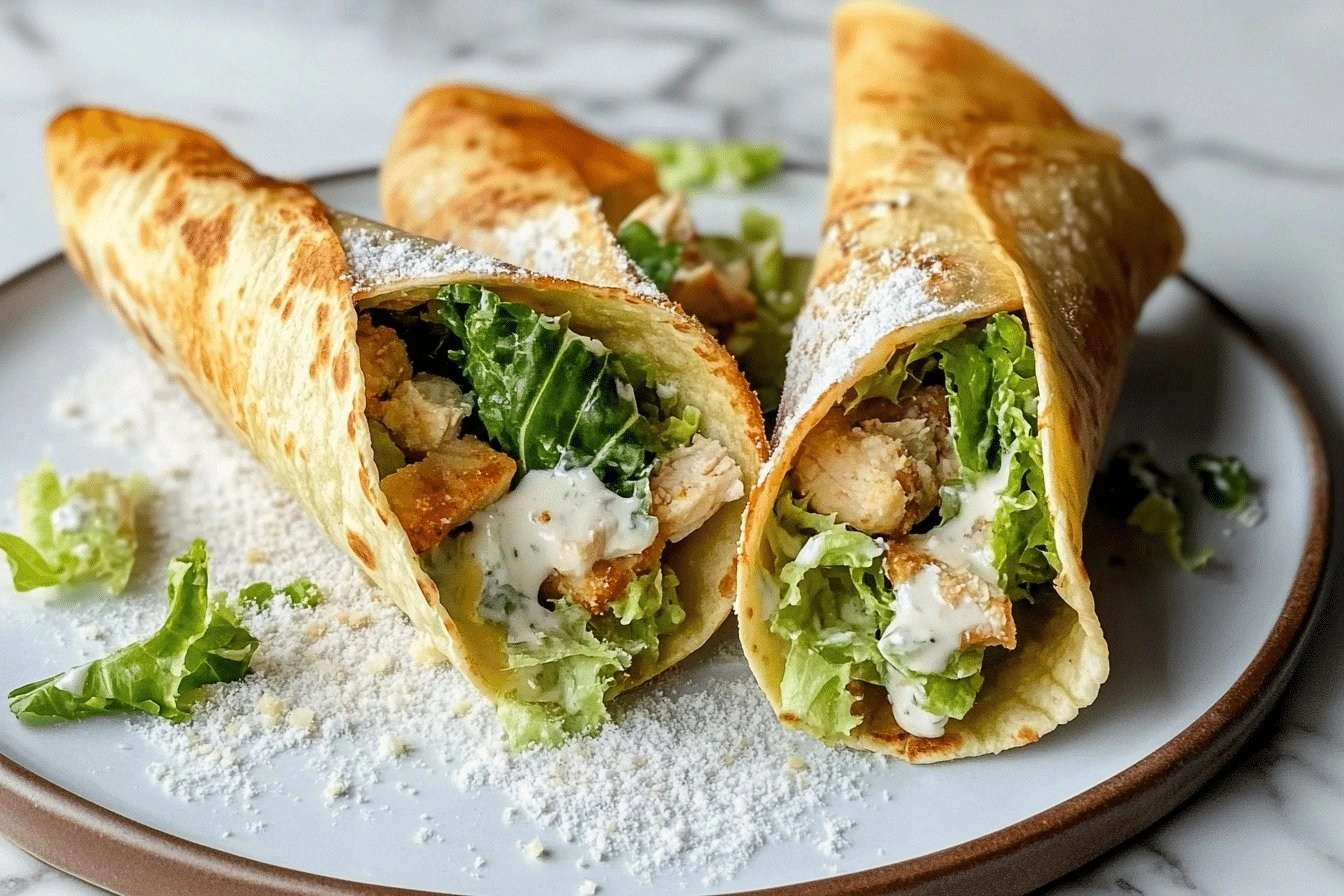
Picture this: I’m in the middle of a frantic Friday night, my kitchen smells like a burnt pizza, and my friends are demanding a quick, crowd‑pleasing appetizer. I stare at the fridge, eyes darting from a half‑eaten bag of chips to a lonely bag of tortillas that have been gathering dust for weeks. Suddenly, inspiration strikes—what if I could combine the crunchy, savory heart of a Caesar salad with the handheld fun of a tortilla cone? I grabbed a tortilla, folded it into a cone, and stuffed it with shredded chicken, crisp romaine, creamy dressing, and a generous sprinkle of Parmesan. The first bite was a revelation: the creamy dressing coated the lettuce like velvet, the croutons added a satisfying crunch, and the tortilla held everything together like a perfectly seasoned glove.
I dare you to taste this and not go back for seconds. The moment you bite into the first cone, you’ll feel the crisp tortilla give way to a burst of fresh, salty, and tangy flavors that dance across your palate. The texture is a symphony of crunch from the croutons, the smoothness of the dressing, and the tender bite of the chicken. The aroma alone—herbed chicken, fresh lettuce, and a hint of lemon—will have you swooning before you even taste it. Trust me, this is hands down the best version you’ll ever make at home.
Most recipes get this completely wrong, either by over‑dressing the salad or by using flimsy tortillas that tear. I’ve tried everything from paper‑thin tortillas to thick corn, and the difference is night and day. The secret is a medium‑sized tortilla that’s sturdy yet pliable, a key factor that makes the cone hold its shape without cracking. If you’ve ever struggled with a tortilla that falls apart, you’re not alone—and I’ve got the fix. Picture yourself pulling this out of the oven, the whole kitchen smelling incredible, and a crowd of friends lining up for the first bite.
And now the fun part: the twist that sets this apart is the “Caesar‑in‑a‑cone” presentation. Instead of a traditional bowl, the salad is encased in a tortilla, making it a handheld, mess‑free treat that’s perfect for parties, potlucks, or a quick weekday lunch. The combination of textures—crispy tortilla, crunchy croutons, and tender lettuce—creates a bite that’s both satisfying and refreshing. Stay with me here—this is worth it. By the end, you’ll wonder how you ever made it any other way.
What Makes This Version Stand Out
- Flavor: The creamy Caesar dressing melds with the savory chicken, creating a rich yet balanced profile that’s both indulgent and refreshing.
- Texture: The tortilla’s crisp edges contrast perfectly with the crunchy croutons, while the tender lettuce adds a fresh bite that keeps every mouthful interesting.
- Simplicity: No elaborate sauces or complex steps—just assemble, fold, and serve.
- Uniqueness: Turning a salad into a tortilla cone is a playful twist that elevates a classic dish into a conversation starter.
- Crowd Reaction: Guests rave about the novelty and the bite‑size convenience; it’s the perfect “wow” factor for any gathering.
- Ingredient Quality: Using fresh romaine, high‑grade Parmesan, and real chicken breast ensures a premium taste that’s hard to beat.
- Cooking Method: A quick grill or roast for the chicken and a gentle toasting of the tortilla means you’re ready in under 45 minutes.
- Make‑Ahead Potential: The cones can be assembled ahead of time and stored in the fridge, making last‑minute prep a breeze.
Inside the Ingredient List
The Flavor Base
The Caesar dressing is the heart of this dish, binding all elements together. It’s the creamy, garlicky, anchovy‑laden sauce that coats the lettuce like velvet. If you skip the dressing, you lose that signature umami punch that makes Caesar salads unforgettable. For a lighter version, try a yogurt‑based dressing; the tang will still shine through.
The Texture Crew
Croutons bring that classic crunch, but they also act as a textural bridge between the tender lettuce and the soft tortilla. Freshly grated Parmesan adds a nutty depth that rounds out the flavor profile. If you’re short on croutons, a handful of toasted breadcrumbs can do the trick. The tortilla itself must be sturdy—medium‑sized corn or flour tortillas work best, as they’re thick enough to hold the filling without tearing.
The Unexpected Star
Lemon wedges are optional but highly recommended for that bright, zesty finish. A squeeze of lemon brightens the dish, cutting through the richness of the dressing. If you prefer a sweeter twist, a drizzle of honey can replace the lemon, creating a sweet‑savory contrast.
The Final Flourish
Cooked chicken breast—grilled or roasted, then shredded—provides the protein punch that turns this into a satisfying meal. The chicken’s smoky flavor pairs beautifully with the Caesar’s tang. If you’re vegetarian, roasted chickpeas or grilled tofu can be a great substitute, though the texture will differ slightly.
Everything’s prepped? Good. Let’s get into the real action.
The Method — Step by Step
- Start by preheating your oven to 375°F (190°C). Lay out the tortillas on a baking sheet and bake for 5–7 minutes until they’re pliable but not browned. This step ensures the cones will hold their shape once folded.
- While the tortillas warm, grill or roast the chicken breasts until they reach an internal temperature of 165°F (74°C). Let them rest for 5 minutes before shredding; this keeps the meat juicy and flavorful.
- In a large bowl, combine the shredded chicken, chopped romaine, and broken croutons. Toss lightly to distribute the ingredients evenly.
- Add the Caesar dressing to the mixture and fold it in gently until everything is coated. The dressing should coat the lettuce like velvet, creating a cohesive flavor.
- Sprinkle grated Parmesan over the mixture, then fold the mixture into the center of each tortilla. Press the edges together to seal, forming a tight cone. If you’re using lemon wedges, place one on top of each cone before sealing.
- Place the assembled cones back on the baking sheet and bake for an additional 5–7 minutes. The cones should be golden and slightly crispy.
- Once baked, let the cones cool for a few minutes. Serve immediately with optional lemon wedges on the side for that bright, zesty finish. Enjoy the crunch, the creaminess, and the satisfying bite.
That’s it— you did it. But hold on, I’ve got a few more tricks that’ll take this to another level.
Insider Tricks for Flawless Results
The Temperature Rule Nobody Follows
Many people bake the tortillas at a high heat, which can cause them to burn before the filling sets. I always bake at a moderate 375°F (190°C) to ensure even cooking. This keeps the tortilla tender inside while achieving a crisp exterior. If you’re using a convection oven, reduce the temperature by 25°F (14°C) to avoid over‑browning.
Why Your Nose Knows Best
Before you seal the cones, give them a quick sniff. The aroma should be fresh, garlicky, and slightly tangy. If it smells too bland, add a splash of extra dressing or a pinch of garlic powder. The scent is a reliable indicator of flavor balance.
The 5‑Minute Rest That Changes Everything
After shredding the chicken, let it rest for 5 minutes. This allows the juices to redistribute, keeping the meat moist and flavorful. A quick rest also makes shredding easier and prevents the meat from sticking to the cutting board.
The Secret of a Perfect Seal
When folding the tortillas, press the edges gently but firmly. A well‑sealed cone won’t leak dressing or crumble. If you’re nervous, use a small amount of water on your finger to moisten the edges before sealing.
The Cheese Trick
Grate the Parmesan just before assembling the cones. Freshly grated cheese melts better and provides a richer flavor. If you’re in a hurry, pre‑grated cheese works, but it may not melt as smoothly.
The Final Touch
Just before serving, drizzle a thin line of olive oil over the tops of the cones. This adds shine and a subtle nutty flavor that complements the Caesar dressing.
Creative Twists and Variations
Spicy Chipotle Caesar Cone
Add a tablespoon of chipotle‑in‑adobo sauce to the dressing for a smoky heat that pairs well with the chicken. The chipotle also gives a subtle orange hue to the filling, making the cones visually striking. Guests who love a kick will rave about this twist.
Mediterranean Mushroom Twist
Sauté sliced mushrooms with garlic and thyme, then fold them into the salad. The earthy flavor complements the Parmesan and gives the dish a more robust, umami profile. This variation works beautifully for a brunch crowd.
BBQ Bacon Crunch Cone
Crisp bacon bits and a drizzle of barbecue sauce replace the croutons and dressing, respectively. The sweet‑smoky flavor balances the salty bacon and adds a new dimension to the classic Caesar. Perfect for a summer cookout.
Pesto‑Infused Green Cone
Swap the Caesar dressing for a basil pesto and add chopped sun‑dried tomatoes. The pesto’s bright green color and herbal notes make for a visually appealing and tasty alternative. This version is ideal for a light, vegetarian meal.
Thai‑Inspired Peanut Cone
Use a peanut‑based sauce instead of Caesar, add shredded carrots and sliced cucumbers for crunch. The creamy peanut sauce provides a sweet‑savory taste, while the veggies add freshness. Guests will love the unexpected fusion.
Sweet Apple & Cheddar Cone
Replace the romaine with thinly sliced apples and add shredded cheddar cheese. The sweetness of the apple balances the sharp cheddar, creating a unique sweet‑savory experience. This twist is great for a fall gathering.
Storing and Bringing It Back to Life
Fridge Storage
Store the assembled cones in an airtight container at room temperature for up to 2 hours. If you need to keep them longer, refrigerate them in a sealed bag for up to 24 hours. When ready to serve, let them sit at room temperature for 10 minutes to soften slightly.
Freezer Friendly
Wrap each cone individually in parchment paper and place them in a freezer bag. Freeze for up to 3 days. When you’re ready, thaw at room temperature for 20 minutes before reheating.
Best Reheating Method
Reheat in a preheated oven at 350°F (175°C) for 5 minutes. Add a splash of water to the bottom of the pan to create steam, which helps the tortilla stay soft and prevents it from drying out. Serve immediately with a fresh squeeze of lemon.