I’ll be honest — I ate half the batch before anyone else got to try it. It all started on a cold December night when my kitchen was a battlefield of burnt sugar and over‑cooked marshmallows, and I swore I’d never touch cranberry sauce again. Then a daring friend tossed me a challenge: “Make something that tastes like a holiday fireworks show, but in bite‑size form.” I stared at that jellied cranberry can and felt a spark of mischief, because why not coat it in dark chocolate and give it a kick of chili? The moment the chocolate hit the pan, the kitchen filled with a scent that was half winter forest, half midnight market, and I knew I was onto something.
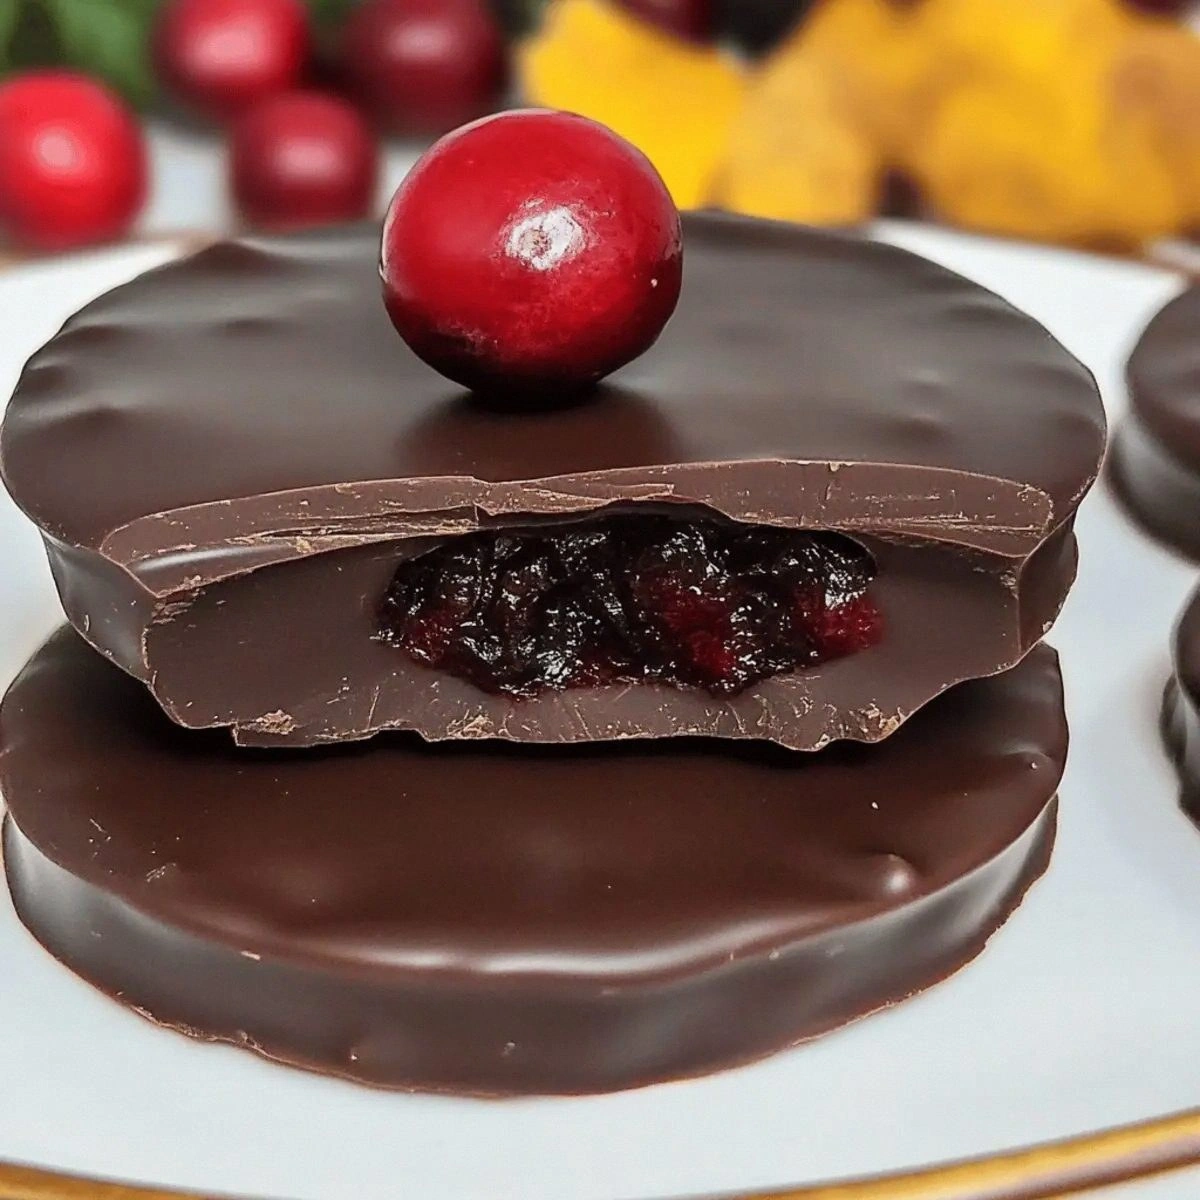
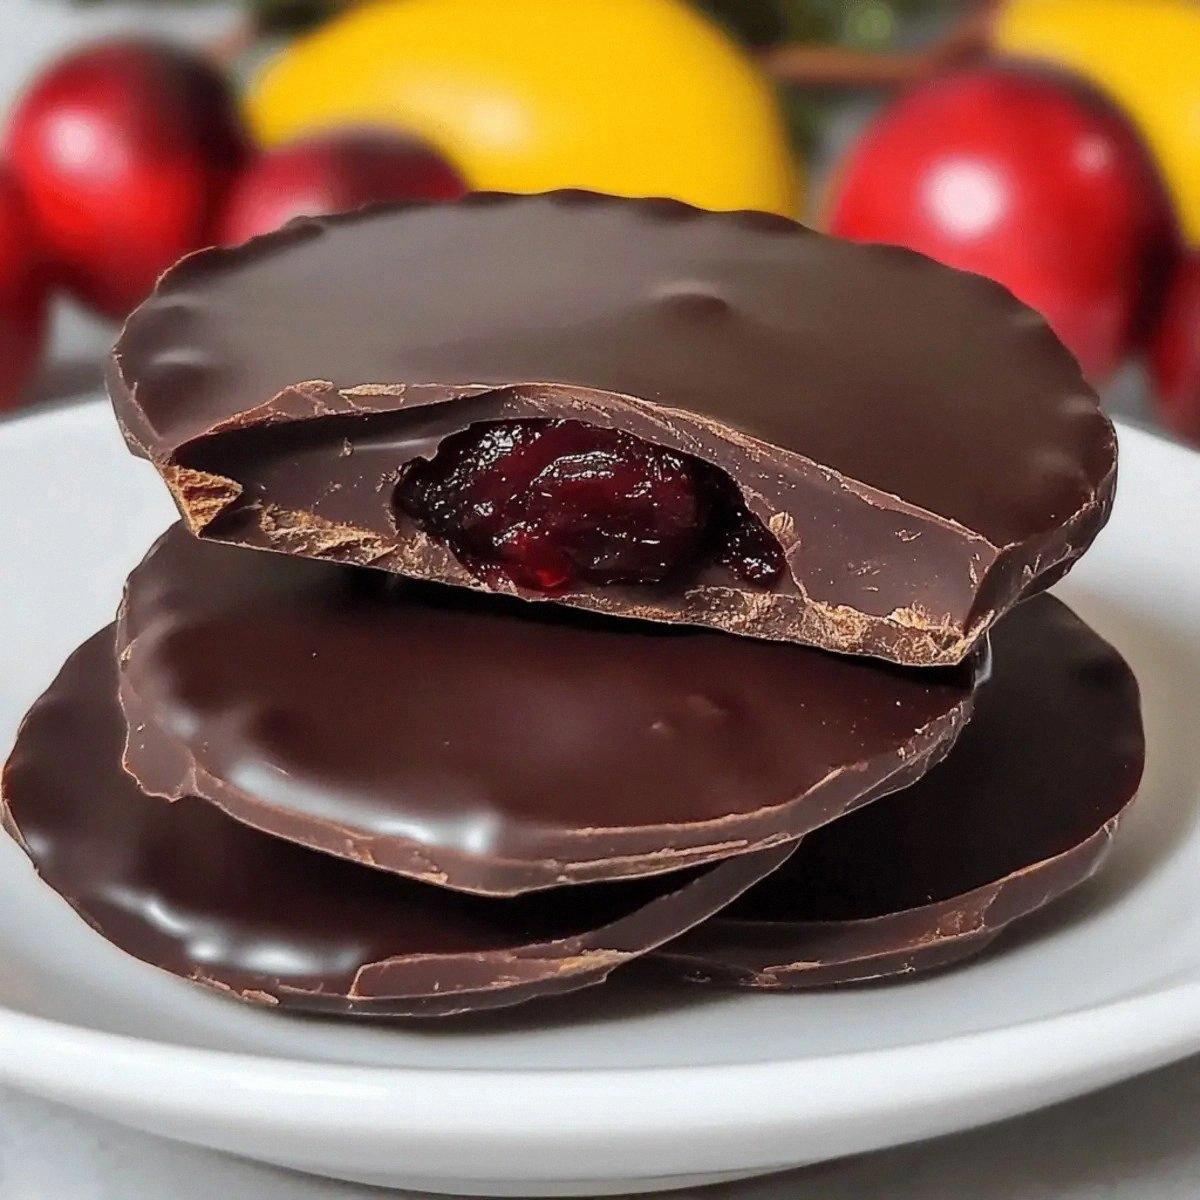
Picture yourself pulling a tray of glossy, ruby‑red blobs out of the oven, the whole kitchen smelling incredible, like a mix of pine needles and a distant chocolate factory. The sauce glistens like a polished gemstone, each bite delivering a sweet‑tart pop that immediately follows with a smooth, velvety chocolate hug, and then—bam!—a subtle heat that makes your taste buds do a little dance. It’s the kind of treat that makes people pause mid‑conversation, stare at the plate, and whisper, “I dare you to taste this and not go back for seconds.” Most recipes get this completely wrong, either drowning the cranberries in chocolate or leaving the sauce too runny, but this version hits the sweet spot every single time.
What really sets this dish apart is the unexpected duo of chili flakes and sea salt. The chili adds a whisper of heat that never overpowers, just a cheeky wink that says, “I’m festive, but I’ve got attitude.” The sea salt, on the other hand, amplifies the chocolate’s depth and makes the cranberry’s natural tartness shine like a spotlight on stage. And let’s not forget the crunchy nuts and festive sprinkles that crown each piece, providing a texture contrast that’s as satisfying as stepping on fresh snow.
Okay, ready for the game‑changer? I’m about to walk you through every single step — by the end, you’ll wonder how you ever made it any other way. This isn’t just a recipe; it’s a holiday ritual, a confidence booster, and a conversation starter all rolled into one glossy, chocolate‑kissed masterpiece. Stay with me here — this is worth it.
What Makes This Version Stand Out
- Taste Balance: The sweet‑tart cranberry meets the deep, slightly bitter dark chocolate, creating a harmonious duet that sings of holiday cheer.
- Texture Symphony: Silky chocolate coating, chewy cranberry interior, and a crunchy nut finish make every bite an adventure.
- Simplicity: Only seven ingredients, all pantry‑friendly, and you don’t need any fancy equipment beyond a saucepan and a baking sheet.
- Unexpected Heat: A pinch of chili flakes adds a subtle warmth that elevates the flavor without stealing the show.
- Visual Wow Factor: The glossy finish and colorful sprinkles turn this into a centerpiece worthy of any holiday spread.
- Make‑Ahead Magic: Once set, these treats keep for weeks, letting you prep ahead and focus on the party.
- Crowd Reaction: Guests often claim it’s the best thing they’ve tasted all season, and you’ll hear the “again, please!” chorus.
- Ingredient Quality: Using high‑quality dark chocolate and real jellied cranberry sauce ensures the flavor shines without artificial shortcuts.
Inside the Ingredient List
The Flavor Base
The star of the show is the 1 can of jellied cranberry sauce. This isn’t just any cranberry sauce; it’s a firm, gelatin‑infused jam that holds its shape when melted and re‑solidified, giving you those perfect bite‑size nuggets. If you skip this and use a runny sauce, you’ll end up with a sticky mess that never sets. Look for a brand that uses real cranberries and minimal added sugar for the purest flavor. Pro tip: open the can and give the sauce a quick stir before melting to break up any clumps.
The Chocolate Cloak
Next up, 1 cup dark chocolate chips. Dark chocolate provides the necessary bitterness to balance the cranberry’s sweetness, while also giving that glossy finish we all adore. If you’re a fan of milk chocolate, you can swap half of the dark for milk, but expect a sweeter, less complex profile. When shopping, choose chocolate with at least 70% cocoa solids; the higher the cocoa, the richer the coat. And remember, chocolate is a temperamental lover—keep it away from moisture.
The Texture Crew
A tablespoon of coconut oil is the secret liaison that makes the chocolate fluid enough to coat yet firm enough to set quickly. Coconut oil has a lower melting point than butter, so it keeps the coating glossy and prevents a dull, grainy finish. If you’re allergic or simply don’t like coconut, substitute with a neutral oil like grapeseed, but the sheen might be slightly muted.
1/2 cup crushed nuts—I love a mix of toasted almonds and pecans. The nuts add a buttery crunch that shatters like thin ice under your teeth, creating a delightful contrast to the soft cranberry interior. Feel free to go nut‑free and use toasted pumpkin seeds for a similar crunch without the dairy.
The Unexpected Star
1 tsp chili flakes might sound daring, but it’s the whisper of heat that transforms this treat from ordinary to unforgettable. The flakes distribute tiny pockets of spice that awaken the palate without overwhelming the sweet‑tart balance. If you’re sensitive to spice, start with half a teaspoon and adjust to taste.
1 tsp sea salt is the finishing touch that amplifies every flavor note, much like a director cues the orchestra for the climax. It also helps the chocolate set with a firm snap. Use flaky sea salt for a subtle crunch, or a fine grain if you prefer it to dissolve completely.
The Final Flourish
Festive sprinkles are the confetti of the dessert world, adding a pop of color and a faint sugary crunch. They’re purely decorative, but they make the presentation feel like a holiday gift. If you want to keep it strictly sugar‑free, swap for crushed freeze‑dried cranberries or a drizzle of white chocolate.
Everything's prepped? Good. Let's get into the real action…
The Method — Step by Step
Start by setting up a double boiler: fill a medium saucepan with a couple of inches of water, bring it to a gentle simmer, and place a heat‑proof bowl on top, making sure the bottom doesn’t touch the water. Add the dark chocolate chips and coconut oil to the bowl. Stir constantly; you’ll hear a soft hiss as the chocolate melts, and the mixture will become glossy and smooth. Watch for the chocolate to reach 115°F (46°C)—that’s the perfect temperature for coating without scorching.
While the chocolate is melting, open the can of jellied cranberry sauce. Using a sturdy spoon, scoop out the sauce and place it onto a parchment‑lined baking sheet, forming even mounds about the size of a walnut. If the sauce feels too firm, give it a quick 10‑second zap in the microwave (just enough to loosen it). That sizzle when it hits the pan? Absolute perfection.
Now comes the daring part: drizzle a thin stream of the melted chocolate over each cranberry mound, letting it pool and coat the sides. Use a silicone spatula to gently roll each piece, ensuring every nook is enveloped in chocolate. The coating should be thick enough to hold the nuts and sprinkles, but not so thick that it drips excessively.
Immediately sprinkle the crushed nuts over the still‑wet chocolate, pressing lightly so they adhere. The nuts should cling like tiny soldiers on a battlefield, adding that crunch we promised. Then, scatter the festive sprinkles on top, allowing them to stick to the chocolate’s tacky surface. This is the moment of truth—if the nuts slide off, your chocolate isn’t hot enough.
While the chocolate is still glossy, sprinkle the chili flakes evenly across all pieces. The flakes should be barely visible, like hidden fireworks waiting to explode on the tongue. If you love extra heat, add a pinch more, but remember: a little goes a long way.
Finish each piece with a pinch of sea salt. The salt crystals will sit on top of the chocolate, giving a subtle pop that lifts the flavor. For an even distribution, use a fine-mesh shaker; the salt will settle into the tiniest crevices.
Transfer the baking sheet to the refrigerator and let the chocolate set for at least 30 minutes. You’ll notice the coating turning from glossy to a firm, matte finish—this is the sign that the chocolate has fully crystallized. Resist the urge to move the pieces before they’re set, or you’ll break the delicate crust.
Once set, gently lift each treat with a spatula and arrange them on a serving platter. The final product should look like tiny, jewel‑toned gems, each glimmering with a dark sheen and speckled with reds, greens, and gold. Serve at room temperature for the best texture, or give them a quick 5‑minute rest on the counter if they’ve been chilled.
That's it — you did it. But hold on, I've got a few more tricks that'll take this to another level...
Insider Tricks for Flawless Results
The Temperature Rule Nobody Follows
Never melt chocolate above 120°F (49°C). Higher temps cause the cocoa butter to separate, leading to a dull, grainy finish. Keep a candy thermometer handy; when the chocolate reaches 115°F, remove it from the heat and continue stirring for a few more seconds. This technique ensures a glossy, snap‑ready coating every single time. A friend once tried to melt it on high heat and ended up with chocolate that looked like a sad, oily puddle—let’s just say it didn’t impress anyone.
Why Your Nose Knows Best
When the chocolate is ready, it will emit a fragrant, buttery aroma that’s unmistakable. Trust that scent—if you can smell a faint roasted note, the chocolate is perfectly tempered. Relying on sight alone can be deceiving, especially under bright kitchen lights. This nose‑based cue is a secret weapon of professional chocolatiers, and it’ll save you from a batch of dull, lifeless coating.
The 5‑Minute Rest That Changes Everything
After the chocolate sets, let the treats rest at room temperature for five minutes before serving. This short pause lets the chocolate’s crystalline structure stabilize, giving you that satisfying snap when you bite in. Skipping this step can result in a softer bite that feels more like a gummy candy than a crisp chocolate shell. I once rushed a batch straight from the fridge to a party, and the texture was a soggy disappointment—lesson learned.
Nut Toasting Trick
Toast your crushed nuts in a dry skillet over medium heat for just 2‑3 minutes, stirring constantly. The nuts will release a nutty aroma and turn a golden brown, adding depth to the final crunch. If you forget this step, the nuts can taste raw and flat, which dulls the overall flavor profile. A quick toast is all it takes to elevate the entire dish.
Sprinkle Timing Secret
Add the festive sprinkles while the chocolate is still wet but beginning to thicken. This timing ensures the sprinkles adhere firmly without sinking. If you wait too long, they’ll just sit on top and can be knocked off when you move the treats. The result is a vibrant, colorful finish that stays put through storage and transport.
Creative Twists and Variations
This recipe is a playground. Here are some of my favorite ways to switch things up:
White Chocolate Snowfall
Swap the dark chocolate for white chocolate chips and add a pinch of vanilla extract. The milky coating turns the treats into a snowy wonderland, perfect for a white‑themed holiday table. Pair with toasted coconut flakes instead of nuts for a tropical twist.
Spiced Rum Infusion
Add a tablespoon of spiced rum to the melted chocolate before coating. The rum adds a warm, boozy depth that pairs beautifully with the cranberry’s tartness. Garnish with a dusting of cocoa powder for an adult‑only version.
Matcha Green Delight
Mix a teaspoon of culinary matcha into the dark chocolate for a vibrant green hue and a subtle earthy flavor. Top with toasted sesame seeds instead of nuts for a Japanese‑inspired bite.
Nut‑Free Crunch
Replace crushed nuts with toasted pumpkin seeds or sunflower seeds for a nut‑free version that still offers a satisfying crunch. This works great for allergy‑sensitive guests while maintaining texture.
Cinnamon Sugar Dust
After the chocolate sets, lightly dust the treats with a mixture of cinnamon and powdered sugar. This adds a sweet-spicy aroma reminiscent of holiday cinnamon rolls and gives a soft, melt‑in‑your‑mouth finish.
Storing and Bringing It Back to Life
Fridge Storage
Place the treats in an airtight container lined with parchment paper. They’ll keep fresh for up to 10 days in the refrigerator. The chocolate may develop a slight bloom after a week, but a quick dip back into melted chocolate will restore the shine.
Freezer Friendly
For longer storage, arrange the treats on a tray, flash‑freeze for 30 minutes, then transfer to a zip‑top freezer bag. They’ll stay perfect for up to three months. When you’re ready to serve, let them thaw in the fridge for 20 minutes, then bring to room temperature.
Best Reheating Method
If the chocolate has hardened too much, place the treats on a plate, add a tiny splash of water (just a few drops), and microwave for 10‑15 seconds. The steam will gently melt the outer layer, bringing back that glossy, melt‑in‑your‑mouth texture without overcooking the cranberry interior.