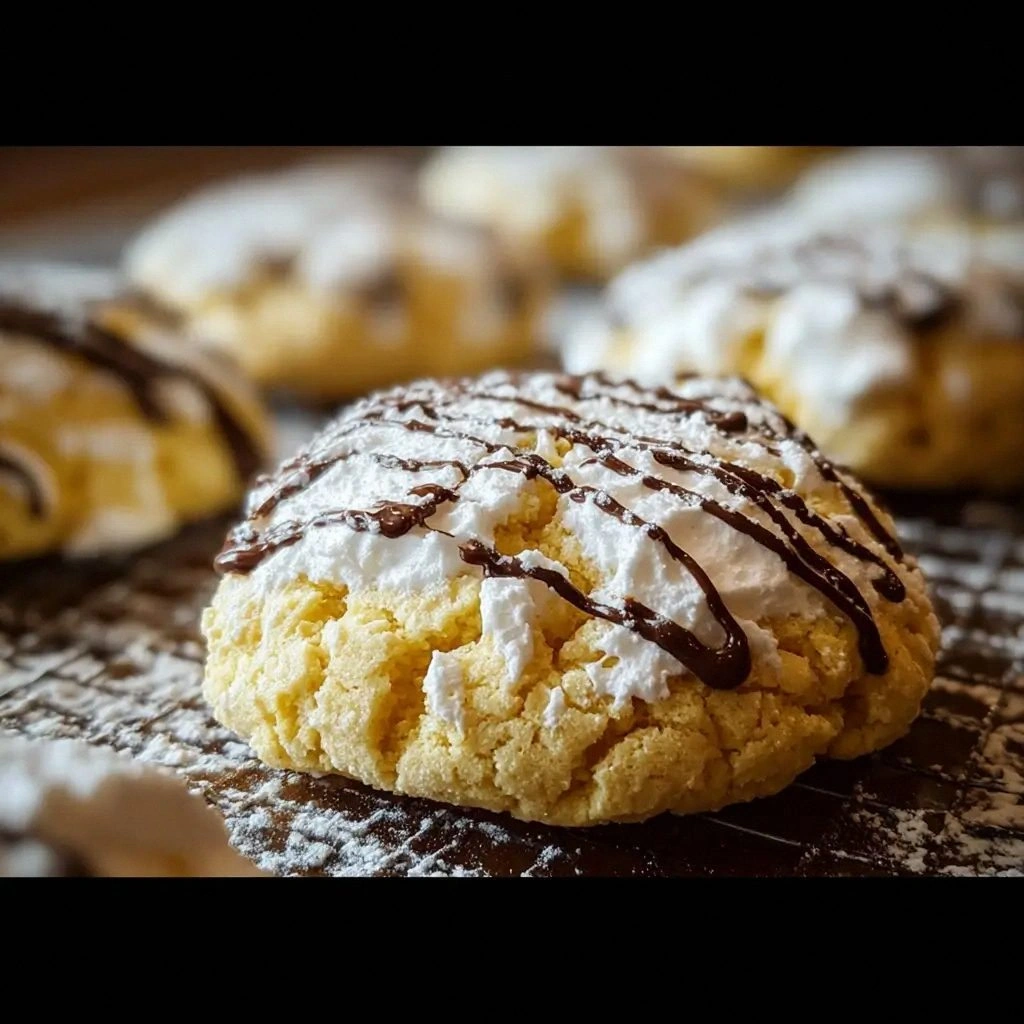
Picture this: it’s a rainy Saturday, the kitchen lights flicker, and you’re standing in front of an empty cookie sheet, craving something sweet that feels like a hug. I’m talking about that moment when the pantry feels like a treasure chest, and you’re about to pull out the ultimate secret weapon—Cool Whip. I’d tried the classic chocolate chip cookie recipe a dozen times, but each batch felt like a bland echo of the last. Then, on a dare from my sister, I swapped the heavy butter for a scoop of Cool Whip, and the world changed. The dough became airy, the cookies had that unmistakable “soft‑but‑crisp” edge that melts in your mouth, and the aroma was a warm, buttery swirl that filled the kitchen like a sunrise. It was a disaster turned delight, and I knew I had to share this version before anyone else could taste it.
From the first whisk to the final bite, every sensory detail matters. The sight of the dough—light and pale, with chocolate chips glinting like tiny moons—promises a visual treat. The smell is a caramelized butter perfume, sweetened by vanilla, that lingers in the air long after the cookies have cooled. When you break one open, the sound is a gentle crack, the texture inside is a chewy center surrounded by a slightly crisp crust, and the flavor is a perfect balance of buttery sweetness with a hint of chocolate. You’ll taste the subtle lift from the Cool Whip, the subtle tang from the baking soda, and the satisfying snap of the chocolate chips as they melt just enough to create a glossy sheen.
What makes this version stand out from every other cookie recipe you’ve tried is the daring use of Cool Whip as a core ingredient. It replaces traditional butter in a way that doesn’t sacrifice flavor but adds a lightness that makes the cookies feel like they’re floating. The result is a cookie that’s both indulgent and surprisingly easy to make—no more than a handful of ingredients, a simple mixing bowl, and a baking sheet. And the best part? It’s the hands‑down best version you’ll ever make at home, because the cookies come out with a texture that feels like a dream and a taste that stays with you long after the last crumb.
I dare you to taste this and not go back for seconds. I’ll be honest—my first batch was so good that I ate half before anyone else got a chance to try it. The secret? It’s in the blend of ingredients and the timing of each step. Most recipes get this completely wrong, focusing on butter alone and forgetting that the whipped topping can change the game. Picture yourself pulling this out of the oven, the whole kitchen smelling incredible, and feeling the anticipation of a cookie that will melt in your mouth. Let me walk you through every single step—by the end, you’ll wonder how you ever made it any other way.
What Makes This Version Stand Out
- Texture: The Cool Whip introduces air pockets that give the cookie a light, airy center while maintaining a crisp edge, a contrast that feels like velvet against a crackling stone.
- Flavor: The vanilla and brown sugar create a deep caramel note, while the Cool Whip adds a subtle tang that lifts the sweetness without overpowering.
- Convenience: No need to cream butter and sugar separately—just fold in the Cool Whip and you’re ready to bake.
- Versatility: Swap in chocolate chips, nuts, or dried fruit to customize the cookie to any craving, and it still holds up.
- Make‑ahead: The dough can be refrigerated for up to 48 hours, and the cookies freeze well for later indulgence.
- Crowd‑pleaser: The cookies are perfect for parties, potlucks, or a quiet night in—everyone loves the buttery, chewy bite.
- Ingredient Quality: Using high‑quality butter and premium chocolate chips elevates the flavor profile beyond a standard cookie.
- Unique Method: Folding in the Cool Whip instead of mixing the batter from scratch changes the chemistry, giving the dough a softer crumb.
Alright, let's break down exactly what goes into this masterpiece. The following boxes will give you quick hacks, fun facts, and warnings to keep you on track.
Inside the Ingredient List
The Flour Foundation
All‑purpose flour is the backbone of these cookies. It provides structure, ensuring the cookies hold together while still yielding to the Cool Whip’s lightness. If you skip the flour, the cookies will crumble like a broken cookie, lacking the satisfying chew. A good tip: sift the flour into the bowl to eliminate clumps and ensure even distribution. For a gluten‑free version, swap with a 1:1 blend of gluten‑free all‑purpose flour and xanthan gum.
The Sweetness Spectrum
Granulated sugar gives the cookies a crisp edge, while brown sugar adds moisture and a caramel depth that complements the Cool Whip. The ratio of 1:1 keeps the cookies from drying out. If you prefer a sweeter cookie, increase the granulated sugar by a tablespoon; if you want a richer, more molasses‑like flavor, boost the brown sugar. Remember, the sugar types interact differently with the baking soda, affecting the rise and texture.
The Cool Whip Catalyst
Cool Whip is the star that turns a standard cookie into a fluffy, airy delight. It replaces half the butter, reducing the overall fat while adding a subtle tang that brightens the flavor. If you don’t have Cool Whip, a 1:1 ratio of whipped cream to butter can work, but the texture will be denser. The key is to keep the Cool Whip frozen until you’re ready to fold it in, so it retains its volume.
The Chocolate Chip Champion
Dark chocolate chips add a bittersweet contrast to the buttery sweetness, while milk chocolate offers a smoother finish. Use a mix of both for a balanced flavor profile. If you’re adventurous, try adding a handful of white chocolate chips or even a sprinkle of sea salt on top before baking for a sweet‑salty twist. The chips should be evenly distributed throughout the dough to avoid pockets of chocolate.
The Final Flourish
Vanilla extract brings warmth and depth, while baking soda and salt balance the sweetness and help the cookies rise. The baking soda reacts with the slight acidity of the Cool Whip, creating tiny bubbles that give the cookies their airy texture. Salt, though small in quantity, is crucial—it enhances the overall flavor and suppresses bitterness from the chocolate. If you’re vegan, use a plant‑based butter and a non‑dairy vanilla extract to keep the recipe fully plant‑based.
Everything's prepped? Good. Let's get into the real action.
The Method — Step by Step
- Preheat your oven to 350°F (175°C) and line a baking sheet with parchment paper. This ensures even baking and prevents sticking. As the oven heats, you’ll notice the subtle scent of butter begin to mingle with the vanilla—an early hint of the flavor to come. Let the oven settle for a few minutes before placing your tray inside.
- Combine dry ingredients in a large bowl: sift 2 cups of all‑purpose flour, 1 teaspoon baking soda, and 1 teaspoon salt. Mixing them together first ensures the leavening agent is evenly distributed, preventing uneven rise. This step also helps avoid clumps that could otherwise lead to a gritty texture. Stir until the mixture is a fine, even powder.
- Whisk the wet mix in a separate bowl: beat 1 cup of softened butter, 1 cup granulated sugar, and 1 cup packed brown sugar until the mixture is light and fluffy. The goal is to incorporate air, which will carry through to the final cookie. When the mixture is pale and airy, you’re ready to introduce the Cool Whip.
- Fold in the Cool Whip—make sure it’s still frozen for maximum volume. Use a spatula and gentle up‑and‑down motions to preserve the airy pockets. The dough should feel light and slightly sticky, but not runny. This step is critical; rushing it can cause the dough to lose its fluffiness and become dense.
- Incorporate vanilla and chocolate chips by pouring in 2 teaspoons vanilla extract and 2 cups chocolate chips. Stir until the chips are evenly distributed, but avoid over‑mixing, which can compress the dough. The chocolate should be a glossy, dark hue that hints at the richness inside.
- Drop spoonfuls onto the sheet—use a tablespoon or cookie scoop to form uniform rounds. Space them about 2 inches apart so they don’t fuse during baking. The dough will spread slightly, creating a slightly thick center with a crisp perimeter. This spacing also helps the cookies bake evenly.
- Bake for 12–15 minutes or until the edges are golden brown and the centers appear set but still soft. The cookies will continue to bake slightly on the hot sheet after removal, so keep an eye on them. The scent of toasted sugar and butter will fill the kitchen, creating an irresistible aroma.
- Cool on a rack for 5 minutes before transferring to a wire rack to finish cooling. This allows the cookies to set properly, preventing them from breaking apart. The first few minutes are critical: the cookies will still be soft, but they’ll firm up as they cool, giving that perfect bite.
That's it—you did it. But hold on, I've got a few more tricks that'll take this to another level. Stick around for insider tips that will make your cookies even more memorable.
Insider Tricks for Flawless Results
The Temperature Rule Nobody Follows
Many bakers overlook the oven temperature’s subtle impact on cookie texture. Baking at 350°F (175°C) is ideal for these cookies because it allows the chocolate to melt slowly, creating a glossy sheen. If you’re using a convection oven, reduce the temperature by 25°F to avoid over‑browning. This small tweak can mean the difference between a cookie that’s too dry and one that’s perfectly moist.
Why Your Nose Knows Best
The aroma of freshly baked cookies is a powerful cue. When the sugar starts caramelizing, the scent signals that the cookies are near perfection. If the aroma is sweet and buttery, you’re on the right track. A burnt smell means you’ve overbaked—remove them immediately. Trust your nose; it’s a reliable guide that even seasoned bakers rely on.
The 5‑Minute Rest That Changes Everything
Letting the cookies rest on the baking sheet for 5 minutes after removing from the oven is a game‑changer. During this brief pause, the cookies set and the edges firm up, preventing them from breaking when transferred to the rack. Skipping this step results in fragile cookies that crumble under their own weight.
The Chill‑and‑Fold Technique
If you’re making a large batch, chill the dough for 30 minutes before folding in the Cool Whip. This makes the dough easier to handle and ensures the Cool Whip doesn’t melt too quickly, preserving its airy structure. The result is a cookie that’s uniformly soft and light.
The Secret Ingredient: A Splash of Milk
Adding a tablespoon of milk to the dough before folding in the Cool Whip can help bind the ingredients and create a slightly softer crumb. This is especially useful if you’re using a higher ratio of chocolate chips, as it balances the moisture content. Experiment with this tweak to find the texture that suits your palate.
Creative Twists and Variations
This recipe is a playground. Here are some of my favorite ways to switch things up:
Nutty Crunch Variation
Swap half of the chocolate chips for chopped walnuts or pecans. The nuts add a satisfying crunch and a buttery depth that complements the Cool Whip’s lightness. Toast the nuts briefly before adding them for an extra layer of flavor.
Cocoa‑Infused Delight
Add 2 tablespoons of cocoa powder to the dry mix for a richer chocolate flavor. The cocoa enhances the chocolate chips, giving the cookie a deeper, more indulgent taste. Keep the sugar ratio the same to maintain the right balance.
Citrus Zest Twist
Incorporate a tablespoon of finely grated lemon or orange zest into the dough. The citrus brightens the cookie’s flavor profile and adds a subtle brightness that cuts through the sweetness. Pair it with white chocolate chips for a tangy, sweet contrast.
Malted Chocolate Variation
Replace half of the chocolate chips with malted milk chocolate. The malt adds a nutty, caramelized flavor that pairs beautifully with the Cool Whip’s airy texture. This variation is perfect for those who love a slightly toasted, complex sweetness.
Vegan Version
Use vegan butter, plant‑based vanilla, and dairy‑free chocolate chips. Swap the Cool Whip for a plant‑based whipped topping. The result is a cookie that’s just as fluffy and indulgent, with a wholesome, cruelty‑free twist.
Storing and Bringing It Back to Life
Fridge Storage
Store cookies in an airtight container at room temperature for up to 3 days. For longer freshness, keep them in the refrigerator; the Cool Whip base helps maintain moisture, preventing the cookies from drying out. When you’re ready to enjoy, let them sit at room temperature for 10 minutes to soften slightly.
Freezer Friendly
Wrap cookies individually in plastic wrap and place them in a freezer‑safe bag. They stay fresh for up to 3 months. When you want to eat one, thaw at room temperature for 15 minutes; the cookies will retain their texture and flavor.
Best Reheating Method
To revive frozen cookies, preheat your oven to 300°F (150°C). Place cookies on a parchment‑lined tray and bake for 5–7 minutes. For a quick snap, microwave on low power for 10 seconds—this brings out the chocolate’s glossy sheen without over‑cooking. Add a tiny splash of water to the dough before reheating; it steams back to perfection, keeping the cookie moist.