I still remember the sticky-sweet carnivals of my childhood, where the air was thick with spun sugar and the promise of something magical. Fast-forward twenty-plus years, and I’m standing in my own kitchen at 9:17 p.m., hair in a messy bun, wearing the same hoodie I’ve owned since college, absolutely determined to cram that whimsical flavor into a cookie. The first attempt? A neon disaster that tasted like someone dissolved a bath bomb in sugar. The second? Better, but the color bled like a tie-dye experiment gone rogue. By batch four, I had it: a cookie that snaps at the edges, stays cloud-soft inside, and explodes with cotton-candy perfume the second it hits your tongue. I dare you to taste this and not go back for seconds—actually, I double-dog-dare you, because resistance is futile once that nostalgic aroma hijacks your brain.
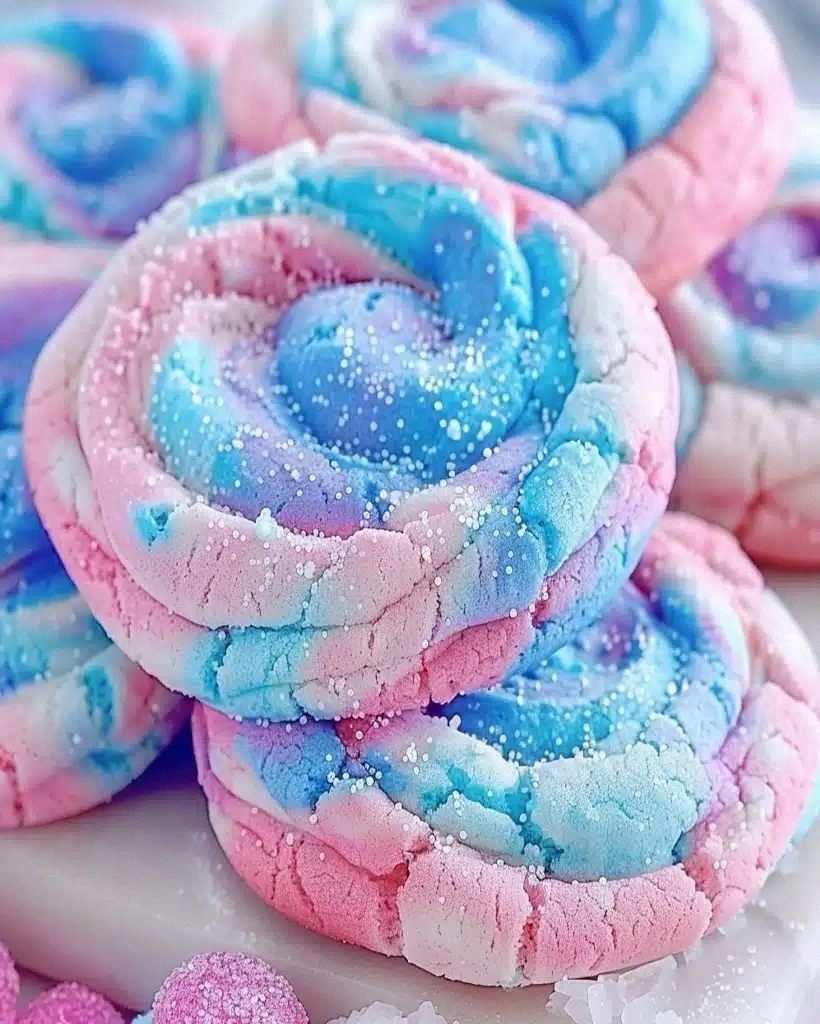
Picture yourself pulling this out of the oven, the whole kitchen smelling incredible, your neighbors’ dogs barking at the sugar mist wafting through the window. The dough itself is a pastel dream, swirling with ribbons of pink and baby-blue, like someone freeze-framed a sunrise in mid-fluff. When you bite down, the outer edge shatters like thin ice on a puddle, giving way to a tender, almost marshmallowy center. Most recipes get this completely wrong by dumping in bottled cotton-candy flavoring and calling it a day; we’re going straight to the source—powdered spun sugar, a whisper of strawberry milk powder, and a trick I learned from a retired carnival baker who swore by freeze-dried candy shards for that authentic mid-way magic.
I’ll be honest—I ate half the batch before anyone else got to try it. My excuse was “quality control,” but really I was chasing the ghost of summer nights spent clutching a paper cone of pink clouds while fireworks popped overhead. If you’ve ever struggled with cookies that spread into sad puddles or taste cloyingly artificial, you’re not alone—and I’ve got the fix. We’re talking precise creaming temperatures, a cornstarch insurance policy for pillowy centers, and a quick freeze that locks those swirls in place so they don’t morph into muddy tie-dye. Stay with me here—this is worth it.
Okay, ready for the game-changer? We’re browning just two tablespoons of the butter for a subtle nutty backbone that anchors all the sweetness, then chilling the dough with a sheet of parchment pressed on top so no condensation ruins our pastel swirls. Oh, and that secret ingredient you didn’t expect? A pinch of citric acid to mimic the faint tartness you taste when you’re nose-deep in real cotton candy. Let me walk you through every single step—by the end, you’ll wonder how you ever made it any other way.
What Makes This Version Stand Out
Pillow-Soft Centers: Thanks to cornstarch and freeze-dried candy melt right into the crumb, giving you that melt-on-your-tongue sensation you thought only existed at the fair.
Color That Behaves: We use gel colors suspended in powdered sugar so the hues stay vibrant and don’t bleed into each other like a toddler’s watercolor.
Flavor That Doesn’t Scream: Most recipes overdose on artificial extract and taste like cheap lip gloss. We layer powdered spun sugar, strawberry milk powder, and a whisper of vanilla for depth.
Make-Ahead Magic: The dough freezes like a dream; slice-and-bake from frozen for spontaneous carnival cravings or surprise play-date saves.
Texture Tug-of-War: Crispy sugar-shell edges meet fluffy, almost marshmallow middles—no cardboard sugar cookies here, promise.
Crowd Reaction Guarantee: I’ve watched grown engineers revert to six-year-olds after one bite, eyes wide, asking, “How did you bottle the fair?”
Alright, let’s break down exactly what goes into this masterpiece...
Inside the Ingredient List
The Flavor Base
Butter is the star quarterback here—use European-style with 82% fat for richer flavor and slower spread. Brown two tablespoons until the milk solids toast to hazelnut color, then pour it over the remaining cold butter; this gives you the best of both worlds: nutty aroma plus controlled temperature for creaming. Granulated sugar sweetens, but we swap a quarter cup for powdered sugar containing cornstarch, which tenderizes and keeps those centers plush. Vanilla extract is obvious, but we’re doubling down with vanilla bean paste for flecks that read “fancy carnival” even if you’re wearing pajama pants.
The Texture Crew
All-purpose flour builds structure, yet we siphon out two tablespoons and replace them with cornstarch—that little insurance policy I mentioned earlier. Baking powder lifts, baking soda accelerates browning, and a microscopic pinch of cream of tartar keeps the sugar from crystallizing into rock candy craters. The egg should be room temperature so it emulsifies smoothly; if you forgot to pull it ahead, submerge in warm tap water for five minutes while you measure everything else.
The Unexpected Star
Here’s where the carnival sneaks in: freeze-dried cotton candy, blitzed to dust in a spice grinder. It sounds like unicorn horns and dragon scales, but online retailers carry it year-round. That powder delivers concentrated flavor without extra liquid, plus tiny crunchy bits that dissolve on your tongue. If you can’t source it, strawberry yogurt melts work, but you’ll lose some authenticity. Corn syrup—just a teaspoon—hooks the spun-sugar flavor to the dough and prevents crystallization during baking.
The Final Flourish
Gel food coloring is non-negotiable; liquid versions activate gluten and turn your pastel swirls into sad Easter bruises. We’re using pink and sky-blue for classic cotton-candy vibes, but feel free to channel purple and green for a Mardi Gras mood. A squeeze of citric acid wakes up your salivary glands and balances sweetness so you can eat five cookies without palate fatigue. Sprinkle sanding sugar on top for crunch that catches the light like fresh snow under carnival lights.
Everything's prepped? Good. Let's get into the real action...
The Method — Step by Step
- Start by browning two tablespoons of butter in a stainless skillet over medium heat. Swirl constantly—this is the moment of truth—until the foam subsides and you see amber flecks; the smell should remind you of toasted hazelnuts and lazy Sunday mornings. Immediately scrape it over the remaining cold butter in your mixing bowl; the hot fat will melt just enough to create a creamy, cool base for aeration.
- Add both sugars and beat on medium for three full minutes. Set a timer—most people rush this part, but properly creamed butter traps air like microscopic balloons, giving lift later. The mixture should lighten to café-au-lait color and look like fluffy frosting. Don’t walk away from the mixer here; over-creaming at high speed generates heat and collapses that precious structure.
- Drop in the egg and vanilla, then beat just until the yolk disappears. Over-mixing at this stage tightens the dough and you’ll get cookies that dome like angry sourdough. Scrape the bowl’s bottom—dry butter streaks love to hide there like sneaky little landmines waiting to sabotage your swirls.
- In a separate bowl, whisk flour, cornstarch, baking powder, baking soda, cream of tartar, salt, and your powdered cotton-candy dust for 30 seconds. This pre-blending step is boring but crucial—nobody wants a salty baking-soda pocket ruining their sugar high.
- Add the dry mix all at once and pulse the mixer on low until only streaks of flour remain. Finish by hand with a flexible spatula; overworked dough develops gluten and you’ll lose that tender, carnival-cloud bite. The dough should feel like cool play-dough and smell like strawberry milk left in the sun—pure nostalgia.
- Divide the dough roughly in half. Tint one portion with the tiniest dip of pink gel; knead in a zip-top bag to keep your fingers Technicolor-free. Repeat with blue for the other half, adding a grain of citric acid to each portion so the tang disperses evenly. You want pastel, not fluorescent highlighter.
- Pinch marble-size nuggets from each color and stack them randomly on a long sheet of parchment. Roll into a 10-inch log, twisting slightly so the colors spiral like barbershop poles. Chill for 30 minutes to set the swirls; if you skip this, the colors merge into Pepto pink and you’ll cry carnival tears.
- Heat the oven to 350°F with a rack in the middle. Slice the log into half-inch coins using a sharp chef’s knife warmed under hot tap water; that quick heat prevents ragged edges and keeps your spirals crisp. Arrange on a parchment-lined sheet with two inches between cookies—they spread just enough to kiss each other, not become conjoined twins.
- Bake 9–11 minutes, rotating halfway. You’re watching for matte centers that look under-baked; carry-over heat finishes them on the pan. That sizzle when raw dough hits the hot sheet? Absolute perfection. Pull them when the edges turn pale gold—any darker and you lose the pastel illusion.
- Cool on the pan for five minutes, then transfer to a wire rack. While warm, dust with a 50/50 mix of powdered sugar and powdered cotton candy for that signature cloud-top finish. Store in an airtight tin, layers separated by wax paper, and try not to inhale them all before breakfast.
That's it—you did it. But hold on, I've got a few more tricks that'll take this to another level...
Insider Tricks for Flawless Results
The Temperature Rule Nobody Follows
Butter should feel cool to the touch yet dent when pressed—around 65°F. Too warm and the dough greases out, creating lacy edges that over-brown. Too cold and the sugar can’t punch air pockets, leaving you with dense pucks. I keep an instant-read thermometer in my drawer like a security blanket; if the dough warms during shaping, ten minutes in the freezer resurrects it faster than you can say “step right up.”
Why Your Nose Knows Best
When the browning butter smells like toasted nuts and the edge of the pan shows mahogany freckles, yank it off the heat immediately. The residual heat continues cooking, and those milk solids scorch fast—one Mississippi too long and you’ve got bitter burnt specks that even a mountain of sugar can’t hide. A friend tried skipping this step once; let’s just say it didn’t end well and her kitchen smelled like a campfire for days.
The 5-Minute Rest That Changes Everything
After slicing, pop the tray of raw coins into the freezer for five minutes while the oven finishes heating. This quick chill re-solidifies the butter so the cookies rise before they spread, giving you thick, bakery-style centers and Instagram-worthy ridges. It’s the culinary equivalent of stretching before a sprint—you’ll perform better and look good doing it.
Flavor Layering Secret
Add a whisper—just ⅛ teaspoon—of strawberry extract to the pink dough and blue raspberry to the blue. It’s subtle, but your brain registers layers of carnival fruitiness that make people say, “I can’t put my finger on it, but these taste like the real thing.” Power transitions like this separate good bakers from cookie whisperers.
Storage Salvation
Throw a slice of sandwich bread into the cookie tin; it acts as a humidity buffer so your cookies stay soft for days. Swap the bread every 24 hours if you’re rationing them longer than that—though in my house they rarely survive sunrise.
Creative Twists and Variations
This recipe is a playground. Here are some of my favorite ways to switch things up:
Carnival Confetti
Fold rainbow sprinkles into the final dough for a Funfetti vibe that looks like Mardi Gras exploded. Kids lose their minds, and adults secretly love the pop-culture nostalgia.
Ice-Cream Sandwich Extravaganza
Freeze the cookies, then sandwich with cotton-candy ice cream rolled in mini marshmallows. Slice through with a hot knife for photo-worthy layers that ooze pastel clouds.
Sugar-Free(ish) Dream
Swap half the sugar for allulose and use sugar-free vanilla whey in place of milk powder. The flavor stays surprisingly authentic, and your blood sugar thanks you between roller-coaster rides.
Mocha Midway Mash-Up
Add a teaspoon of espresso powder to the dry mix; the coffee bitterness plays off the candy sweetness like a dark roast paired with carnival donuts. Grown-up taste buds rejoice.
Gluten-Free Glam
Sub a 1:1 gluten-free baking blend and add an extra tablespoon of cornstarch for structure. Chill the log an extra 15 minutes so the alternative flour hydrates fully.
Firework Finale
Press Pop Rocks into the tops right after baking for crackling drama that mimics sparklers. The candy snaps in your mouth and adds textural fireworks without scorching.
Storing and Bringing It Back to Life
Fridge Storage
These cookies hate the fridge; cold air steals moisture and mutes flavor. Keep them in an airtight tin at room temp for up to five days. If your kitchen is sweltering, tuck the tin inside a zipper bag and park it in the coolest cupboard—never beside the oven where heat breeds staleness.
Freezer Friendly
Flash-freeze unbaked slices on a tray, then toss into a freezer bag for up to two months. Bake from frozen, adding an extra minute or two. Baked cookies freeze beautifully too—layer between parchment and vacuum-seal for long-term carnival cravings that strike without warning.
Best Reheating Method
Microwaves murder texture. Instead, pop cookies on a sheet in a 300°F oven for three minutes, then let them rest one minute. Add a tiny splash of water to the corner of the tray; the gentle steam revives centers without turning edges rubbery. Future pacing: imagine pulling warm, carnival-scented cookies from the oven at midnight—pure magic.