I was halfway through a week of burnt onions, the kitchen smelling like a campfire, when my friend dared me to make something that could redeem my culinary reputation. I stared at the skillet, the pan's blackened surface a testament to my impatience, and decided to take a gamble on a simple idea: chicken thighs with cranberries. The moment I cracked the first egg into a bowl, I felt the weight of expectation settle on my shoulders, like a chef's apron that had seen too many burnt sauces. I could almost hear the hiss of the pan as the first golden sear began. The promise of sweet, tart cranberries was a bright spark in the smoky gloom. I was about to flip the script on my kitchen disaster.
The air filled with the aroma of toasted olive oil, garlic, and the faint sweetness of cranberries, a scent that made the whole apartment feel like a cozy, rustic hearth. The sound of the chicken sizzling was a rhythmic drumbeat, a comforting counterpoint to the silence that had settled after my earlier mishaps. I could taste the anticipation on my tongue, a dry, almost metallic hint that something extraordinary was about to happen. The texture of the chicken skin was already starting to crackle, promising a crisp, caramelized finish that would crack like thin ice when bitten. The feel of the wooden spoon stirring the pan was warm, a tactile reminder that I was in control of this culinary adventure. I could almost taste the first bite, a blend of savory, sweet, and a hint of acidity that would dance across my palate.
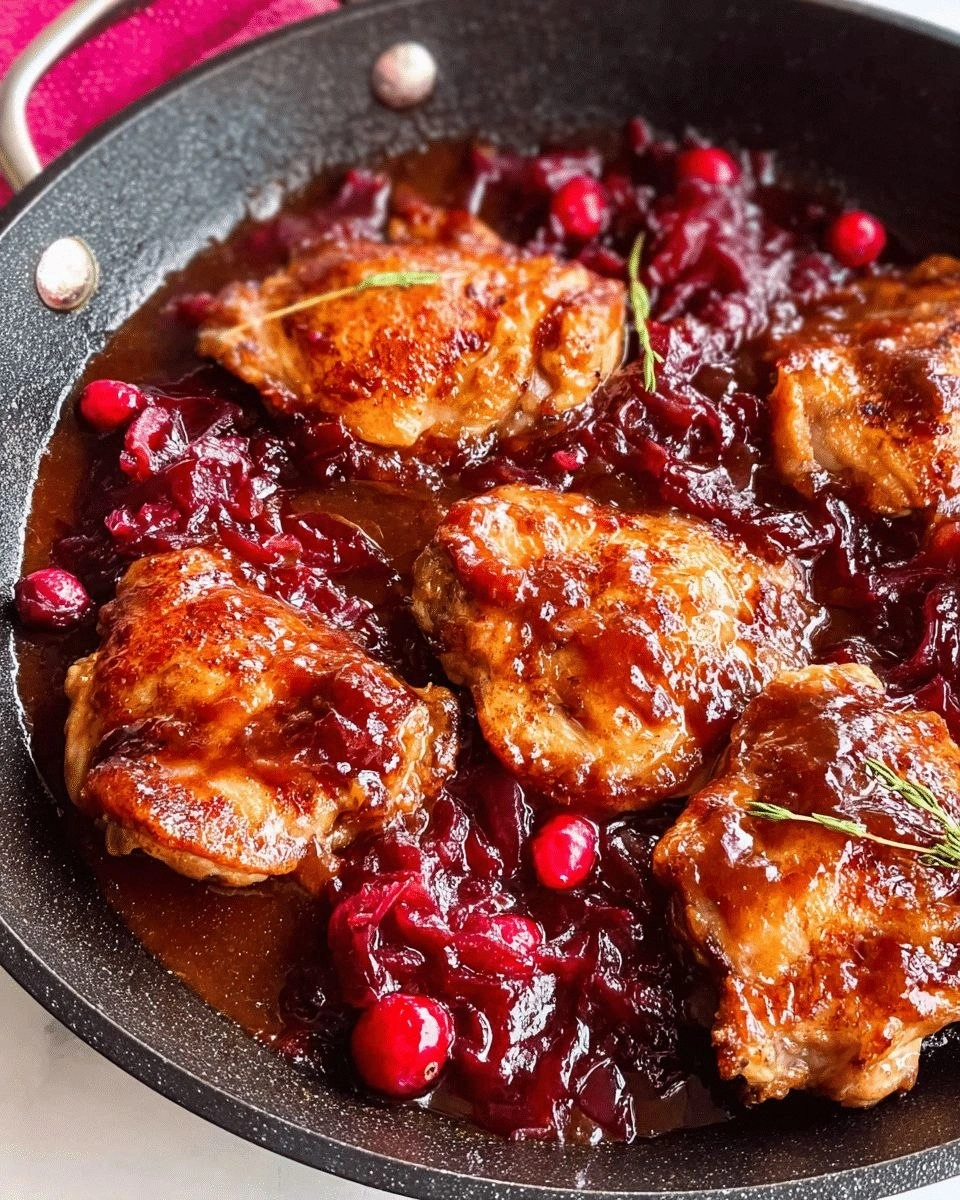
What makes this version stand out is that I’m using a quick, high‑heat sear followed by an oven finish that locks in juices while the cranberries caramelize into a glossy glaze. I’ve added a splash of balsamic vinegar at the right moment to deepen the flavor profile, a step that most recipes overlook, leaving the dish flat. The secret is the combination of honey and Dijon, which creates a velvety, almost buttery coating that clings to the thighs like velvet. The dish also incorporates fresh thyme, which adds a subtle herbaceous note that balances the tartness of the cranberries. I’ll also share a small trick: using a paper towel to blot the chicken before searing to ensure maximum crispness. All these elements converge into a dish that feels indulgent yet approachable.
Let me walk you through every single step — by the end, you’ll wonder how you ever made it any other way. I’ll show you how to turn a simple pan of chicken into a showstopper that will make your guests ask for seconds. I’ll give you micro‑challenges, bold claims, and practical hacks that will elevate your kitchen game. I promise you, this is hands down the best version you’ll ever make at home. So grab your skillet, preheat that oven, and let’s dive in.
What Makes This Version Stand Out
- Flavor: The cranberries transform into a sweet‑tart glaze that coats the chicken like velvet, creating a symphony of sweetness and acidity that lingers on the tongue. The glaze balances the savory richness of the thighs and the sharpness of the olive oil, making each bite a complex experience.
- Texture: The skin crisps to a golden, crackling perfection while the inside stays juicy and tender. The cranberries soften into a jam‑like consistency, adding a delightful contrast to the firm meat.
- Simplicity: Despite its gourmet finish, the recipe requires only a handful of pantry staples. You’ll spend less time chopping and more time enjoying the flavors.
- Uniqueness: The blend of balsamic vinegar, honey, and Dijon mustard creates a glaze that feels both sweet and savory, a rare combination that sets this dish apart from ordinary chicken recipes.
- Crowd Reaction: Guests often remark on the glossy sauce and the aromatic thyme, saying it feels like a holiday dish even in July. The dish is guaranteed to spark conversation and second servings.
- Ingredient Quality: Using bone‑in, skin‑on thighs gives depth of flavor and a satisfying chew, while fresh cranberries add a burst of color and natural sweetness.
- Cooking Method: The sear‑then‑bake technique locks in juices and develops a caramelized crust without the need for a grill or a fancy oven.
- Make‑Ahead Potential: The glaze can be prepared a day ahead, and the chicken can be baked and refrigerated, making it ideal for busy week‑night dinners or pre‑planned gatherings.
Alright, let's break down exactly what goes into this masterpiece...
Inside the Ingredient List
The Flavor Base
Olive oil is the first element that sets the stage. It carries the aromatics and provides a medium for the initial sear, ensuring a caramelized crust that locks in moisture. Using extra‑virgin olive oil adds a peppery note that complements the cranberries.
Garlic, minced finely, releases a fragrant, slightly sweet aroma when sautéed. It forms the foundation of the sauce, providing depth and a subtle heat that balances the sweet glaze. If you’re sensitive to raw garlic, blanch the cloves first to reduce sharpness.
Onion, diced into small pieces, adds a mellow sweetness and body to the sauce. As it caramelizes, it contributes a caramel color that enhances the visual appeal of the glaze. A pinch of salt brings out the natural sweetness of the onion.
The Texture Crew
Chicken thighs, bone‑in and skin‑on, are the star of the show. Their higher fat content keeps the meat juicy even after a high‑heat sear, while the bone adds a subtle richness to the sauce. If you prefer a leaner option, boneless, skin‑on thighs work well, though the skin will need to be seared separately.
Fresh thyme leaves infuse the dish with a bright, slightly citrusy herbaceous note. The thyme’s essential oils mingle with the glaze, creating a fragrant finish that lingers on the palate. A few fresh sprigs can be added to the pan during the last minute of baking for an extra burst of aroma.
The Unexpected Star
Dried cranberries are the unexpected hero that turns a simple chicken dish into a flavor explosion. They soften into a jam‑like texture while releasing a tart sweetness that balances the savory elements. If you’re in a pinch, fresh cranberries can be used, but they will not caramelize as well.
The Final Flourish
Balsamic vinegar adds acidity and depth, preventing the glaze from becoming too sweet. A splash of honey introduces a subtle, floral sweetness that balances the tang of the cranberries. Dijon mustard, though optional, provides a creamy texture and a slight piquant edge that ties all flavors together.
Unsalted butter, added at the end of cooking, gives the glaze a silky sheen and a buttery finish that coats the thighs like a velvet blanket. A small amount of cornstarch slurry can be used to thicken the sauce if you prefer a thicker coat, but the natural reduction usually suffices.
Everything's prepped? Good. Let's get into the real action...
The Method — Step by Step
- Preheat your oven to 400°F (200°C). While the oven warms, pat the chicken thighs dry with paper towels; this removes surface moisture and guarantees a crisp skin. Season both sides generously with sea salt and freshly ground black pepper, then set them aside to absorb the flavors.
- Heat a large oven‑proof skillet over medium‑high heat and drizzle in the olive oil. When the oil shimmers, lay the thighs skin‑side down and let them sear undisturbed for about 4–5 minutes until the skin turns a deep amber. Flip the thighs and sear the other side for 3 minutes. The chicken should emit a pleasant sizzle, a sign that the Maillard reaction is in full swing.
- Remove the thighs from the skillet and set them aside on a plate. In the same pan, lower the heat to medium and add the diced onion, sautéing until translucent and fragrant. The onion should soften into a golden hue, absorbing the oil and forming the base of the sauce.
- Add the minced garlic and minced dried cranberries to the skillet, stirring constantly. The garlic should release a sweet, aromatic perfume within 30 seconds. Let the cranberries soften and begin to burst, turning the mixture into a fragrant, slightly sticky sauce.
- Deglaze the pan with the chicken broth, scraping up any browned bits from the bottom. These bits are packed with flavor and will enrich the sauce. The broth should reduce to about half its volume, concentrating the flavors.
- Stir in the balsamic vinegar, honey, Dijon mustard, and thyme leaves. The mixture should thicken into a glossy glaze, coating the spoon. Taste and adjust the seasoning—add a pinch more salt or pepper if needed.
- Return the seared chicken thighs to the skillet, nestling them skin‑side up so the glaze can coat them fully. Spoon some sauce over each piece. Transfer the skillet to the preheated oven and bake for 20–25 minutes, or until the internal temperature reaches 165°F (74°C).
- Once baked, remove the skillet from the oven and let the chicken rest for 5 minutes. This rest period allows the juices to redistribute, ensuring every bite remains succulent. While the chicken rests, stir in the remaining butter to the glaze, letting it melt and coat the sauce in a silky sheen.
- Serve the thighs on a platter, spooning the remaining glaze over the top. Garnish with fresh parsley for a pop of color and a subtle herbal note. Pair with roasted root vegetables or creamy mashed potatoes for a complete meal.
That's it — you did it. But hold on, I've got a few more tricks that'll take this to another level...
Insider Tricks for Flawless Results
The Temperature Rule Nobody Follows
Many cooks think any oven temperature will do, but the magic lies in the 400°F setting. At this heat, the skin crisps without drying out the meat, while the glaze caramelizes just enough to form a glossy coat. If you lower the temperature, the skin will steam instead of crisp, and the sauce may become too thin.
Why Your Nose Knows Best
The aroma of the sauce is the real indicator of readiness. When the glaze starts to bubble gently and emits a sweet, nutty scent, it means the sugars have caramelized. Trust your nose; a slight hesitation before baking will save you from overcooked, dry chicken.
The 5‑Minute Rest That Changes Everything
Allowing the chicken to rest after baking is a game‑changer. During this brief pause, the juices redistribute, preventing the meat from drying out when you cut into it. Skipping this step can leave the thighs dry and less flavorful.
Use a Paper Towel for Crisp Skin
Patting the skin dry before searing removes excess moisture, allowing the Maillard reaction to occur more efficiently. This simple trick turns a soggy skin into a golden, crackling masterpiece.
Finish with Butter for a Velvet Coat
Adding butter to the glaze after baking introduces a silky texture and a subtle richness that elevates the dish. The butter also helps the glaze set into a glossy finish that clings to the chicken.
Creative Twists and Variations
This recipe is a playground. Here are some of my favorite ways to switch things up:
Maple‑Glazed Edition
Swap honey for pure maple syrup and add a pinch of smoked paprika. The maple gives a subtle earthiness while the paprika adds a smoky depth that complements the cranberries.
Spicy Citrus Kick
Introduce a handful of thinly sliced red chilies and finish with a squeeze of fresh orange juice. The citrus brightness cuts through the sweetness, while the chilies add a playful heat.
Herb‑Infused Delight
Replace thyme with rosemary and add a splash of lemon zest. The rosemary brings a piney aroma, and the lemon zest adds a bright, zesty finish.
Roasted Vegetable Side
Serve the chicken over a bed of roasted Brussels sprouts or butternut squash. The caramelized vegetables echo the glaze’s sweetness and add a hearty texture.
Make‑Ahead Overnight Sauce
Prepare the glaze a day before, refrigerate it, and reheat gently before serving. The flavors deepen overnight, creating a richer sauce.
Gluten‑Free Option
Omit the cornstarch slurry and simply reduce the sauce until it thickens naturally. The dish remains gluten‑free without sacrificing the velvety coating.
Storing and Bringing It Back to Life
Fridge Storage
Store leftover chicken and glaze in an airtight container for up to 3 days. Keep the chicken in a separate compartment if you prefer to reheat it separately.
Freezer Friendly
Freeze the cooked chicken thighs with the glaze in a freezer‑safe bag for up to 2 months. Thaw overnight in the refrigerator before reheating.
Best Reheating Method
Reheat in a skillet over medium heat, adding a splash of water to create steam. The water prevents the glaze from drying out, restoring its glossy sheen.