I was in the middle of a snowstorm, the kind that makes the world outside look like a giant cotton‑candy blanket, when my roommate dared me to make a hot chocolate that could actually melt the ice on the windows. I laughed, grabbed the pantry staples, and set to work, only to discover that most white hot chocolate recipes out there taste like watered‑down frosting. After a few disastrous attempts—one that turned into a clumpy mess that could have doubled as a paint thinner—I finally cracked the code. The secret? A perfect marriage of whole milk and premium white chocolate, plus a cloud of whipped cream that sits on top like a soft, sugary snowdrift.
Picture this: the kettle whistles, the kitchen fills with a buttery aroma that makes you want to hug the stove, and the first sip hits your tongue with the silkiness of a cashmere sweater on a chilly morning. You can hear the faint pop of the chocolate melting, see the glossy river of white gold swirling in the pot, feel the warmth radiating from the mug, and taste the delicate balance of sweet and buttery notes that linger just long enough to make you sigh. It’s not just a drink; it’s a full‑on sensory experience that turns a simple winter night into a celebration of comfort.
Why does this version stand out? Most recipes either drown the chocolate in milk or over‑sweeten it until it feels like syrup. I took a different route: I use a modest amount of whole milk, let the white chocolate melt slowly over low heat, and finish with a pinch of salt that cuts through the sweetness like a well‑placed plot twist in a thriller. The result is a drink that’s rich without being cloying, and the whipped cream topping adds a light, airy contrast that feels like a cloud you can actually eat. I dare you to taste this and not go back for seconds.
Okay, ready for the game‑changer? I’m about to reveal a tiny technique that most home cooks overlook: tempering the white chocolate just enough to keep its glossy sheen while preventing it from seizing. Trust me, this little trick turns a good hot chocolate into the best version you’ll ever make at home. Let me walk you through every single step — by the end, you’ll wonder how you ever made it any other way.
What Makes This Version Stand Out
- Taste: The pinch of salt amplifies the buttery notes of the white chocolate, creating a flavor depth that feels almost savory.
- Texture: Whole milk provides a creamy body while the whipped cream adds a feather‑light foam that melts into the drink like sunrise.
- Simplicity: Only seven core ingredients, all pantry‑friendly, mean you can whip this up in under 45 minutes.
- Uniqueness: The optional sprinkle of cinnamon or nutmeg adds a warm spice note that most white chocolate drinks completely ignore.
- Crowd Reaction: Guests often ask for the recipe after the first sip, and I’ve seen this drink turn casual gatherings into full‑blown “hot chocolate parties.”
- Ingredient Quality: Using premium Ghirardelli white chocolate chips ensures a smooth melt and balanced sweetness that cheap chips can’t match.
- Cooking Method: Low‑and‑slow melting prevents scorching, preserving the chocolate’s natural gloss and flavor.
- Make‑Ahead Potential: The base can be prepared in advance and reheated, while the whipped cream stays fresh for up to 24 hours.
Inside the Ingredient List
The Flavor Base
Whole milk is the unsung hero of this recipe. At 2 cups (480 ml), it provides the perfect amount of dairy fat to carry the chocolate’s sweetness without turning the drink watery. If you’re dairy‑free, almond or oat milk works, but expect a slightly thinner mouthfeel. The milk should be heated just below boiling; any higher and you risk a scorched taste that will ruin the delicate balance.
The Texture Crew
White chocolate chips (or chopped white chocolate) are the star. Four ounces (115 g) is enough to create a luxuriously thick sip that coats the palate like velvet. I prefer Ghirardelli because its cocoa butter content is higher, giving that melt‑in‑your‑mouth sensation. If you skip this and use a generic brand, you’ll likely end up with a gritty texture that feels more like a dessert topping than a drink.
The Unexpected Star
A pinch of salt might seem trivial, but it’s a flavor enhancer that cuts through the sugary notes, making the chocolate taste richer. Think of it as the “secret sauce” in a burger; you barely notice it, but the overall experience is elevated. If you’re watching sodium, you can omit it, but be prepared for a slightly one‑dimensional sweetness.
The Final Flourish
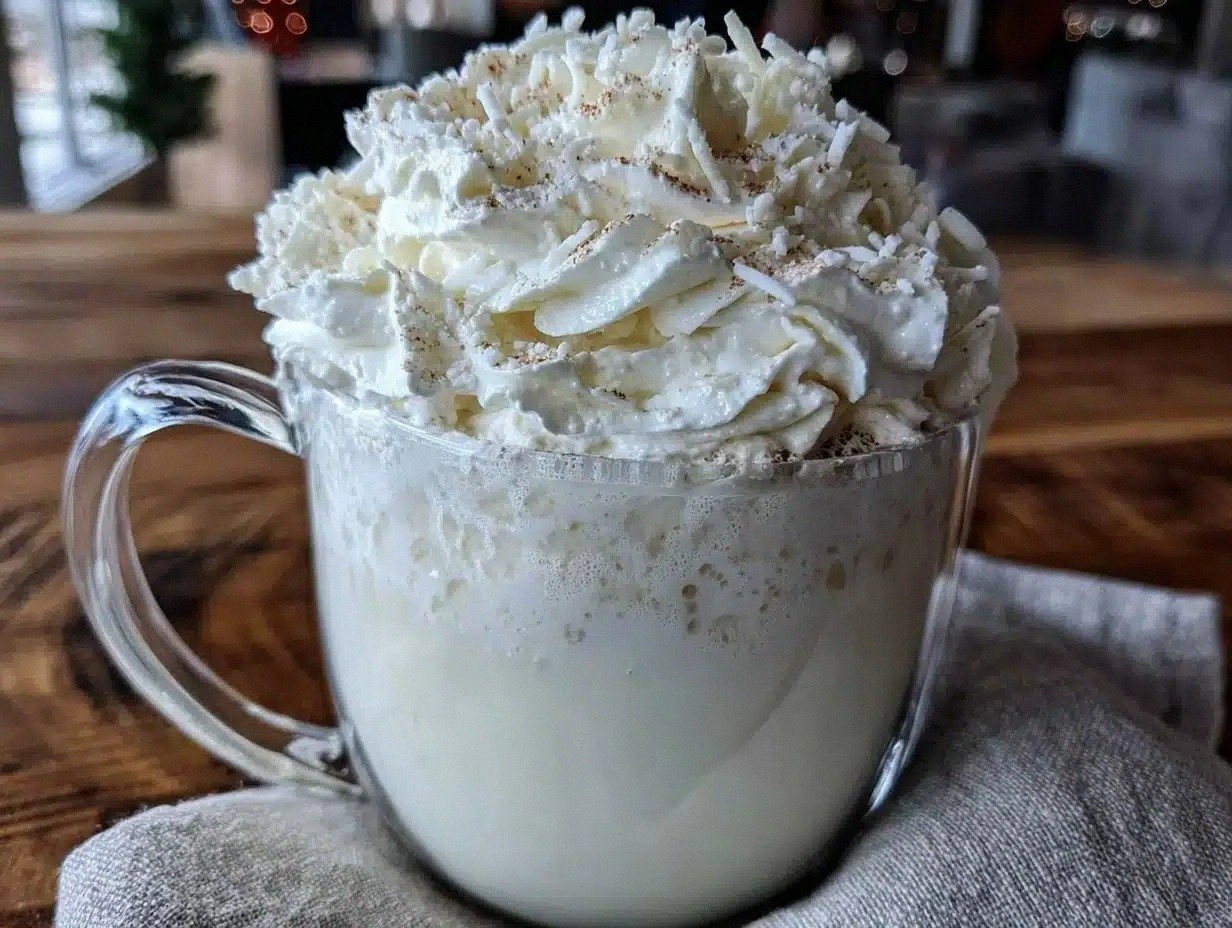
Heavy cream, when whipped, becomes the crown jewel of this drink. One cup (240 ml) of chilled cream, whisked with a tablespoon of sugar and a teaspoon of vanilla, transforms into a cloud that sits atop the hot chocolate, slowly melting and infusing the drink with buttery richness. The vanilla extract adds a warm, aromatic depth that pairs perfectly with the optional cinnamon or nutmeg sprinkle.
Everything's prepped? Good. Let’s get into the real action…
The Method — Step by Step
First, gather all your ingredients and set a medium‑sized saucepan on the stove. Pour the whole milk into the pan and begin heating over medium‑low heat. You’ll hear a gentle sigh as the milk warms—listen for that subtle bubbling at the edges; that’s your cue that it’s hot enough but not boiling. This stage is crucial because overheating the milk will scorch the cocoa butter later on, and nobody wants a burnt chocolate flavor.
While the milk warms, break the white chocolate into uniform pieces if you’re using a block, or simply measure out the chips. Add the chocolate to the pan once the milk reaches about 180°F (82°C). Stir constantly with a silicone spatula; the chocolate will begin to melt, turning the liquid a glossy ivory. This is the moment of truth—if the mixture looks grainy, that’s a sign you’ve introduced too much heat too quickly.
Kitchen Hack: If the chocolate starts to seize, whisk in a tablespoon of hot milk; the extra liquid re‑emulsifies the cocoa butter and brings back that silky texture.When the chocolate is fully incorporated, add the pinch of salt and the vanilla extract. The salt will immediately brighten the flavor, while the vanilla adds a fragrant undertone that feels like a cozy blanket. Give the mixture a good stir and let it simmer gently for another 2‑3 minutes. You’ll notice the surface forming tiny bubbles—this is the perfect point to move on.
While the hot chocolate simmers, prepare the whipped cream. Chill a mixing bowl and whisk attachments in the freezer for at least 10 minutes; this cold environment is the secret to achieving stiff peaks faster. Pour the heavy cream into the chilled bowl, add the tablespoon of granulated sugar (if you like it sweeter) and the vanilla extract, then whisk on medium‑high speed.
Watch Out: Over‑whipping turns cream into butter; stop as soon as soft peaks form, then finish to stiff peaks for the best dollop.Once the whipped cream reaches glossy, firm peaks, set it aside in a warm spot (but not too warm) while you finish the chocolate. If you’re feeling adventurous, fold a pinch of cinnamon or nutmeg into the whipped cream for an extra aromatic layer that will surprise your taste buds.
Now return to the saucepan. Give the hot chocolate a final stir, then remove it from heat. Pour the liquid into pre‑warmed mugs—this helps maintain the temperature and prevents the chocolate from cooling too quickly. I like to use a small ladle to control the flow and avoid splashes that could ruin the foam later.
Top each mug with a generous swirl of the whipped cream. The cream should sit like a fluffy cloud, slowly melting into the hot chocolate and creating ribbons of vanilla‑infused silk. If you’ve added cinnamon or nutmeg to the cream, sprinkle a light dusting on top for that final visual pop.
Serve immediately, but not before you give the drink a quick sniff. That aromatic cue—sweet vanilla mingling with a hint of spice—sets the stage for the first sip. Take a moment to appreciate the steam rising from the mug; it’s like watching a tiny snowstorm inside your cup.
Enjoy! And remember, if you have leftovers, the base can be reheated gently on the stove, while the whipped cream can be re‑whipped with a splash of fresh cream to bring back its airy texture.
Kitchen Hack: Store the hot chocolate base in a glass jar; when reheating, add a splash of milk to revive its silkiness.
That's it — you did it. But hold on, I've got a few more tricks that'll take this to another level…
Insider Tricks for Flawless Results
The Temperature Rule Nobody Follows
Never let the milk boil. A rolling boil will scorch the milk proteins, creating a burnt flavor that masks the delicate chocolate. Keep the heat low and watch for tiny steam bubbles along the edge of the pan—that's the sweet spot. I once let it boil and ended up with a caramelized aftertaste that ruined the whole batch. Trust the thermometer, and your drink will stay silky.
Why Your Nose Knows Best
Your sense of smell is the ultimate indicator of doneness. When the chocolate fully integrates, you’ll catch a buttery, slightly caramel aroma that signals the mixture is ready. If you smell any raw milk scent, keep simmering for another minute. This sensory checkpoint saves you from under‑cooking, which can leave a chalky mouthfeel.
The 5‑Minute Rest That Changes Everything
After whisking the whipped cream, let it sit for five minutes before dolloping. This short rest lets the air bubbles stabilize, giving you a firmer, more stable peak that won’t melt too quickly into the hot chocolate. I’ve seen friends rush this step and end up with a runny topping that disappears before the first sip.
Spice It Right
If you love a hint of spice, add the cinnamon or nutmeg to the whipped cream, not the hot chocolate. Heat can mute the spice’s brightness, whereas folding it into the cold cream preserves its punch. A pinch is enough; too much will dominate the subtle sweetness.
Double‑Whip for Extra Fluff
For an ultra‑light topping, whip the cream to soft peaks, add a splash of milk, then whip again to stiff peaks. This “double‑whip” technique incorporates extra air, making the cream feel like a cloud that melts slowly. I tried it once for a holiday party and the guests were amazed at the airy texture.
Creative Twists and Variations
This recipe is a playground. Here are some of my favorite ways to switch things up:
Matcha White Fusion
Swap half of the whole milk for matcha‑infused milk (steep green tea powder in warm milk). The earthy green tones contrast beautifully with the sweet white chocolate, creating a sophisticated latte‑like experience. Perfect for brunches where you want a caffeine boost without the bitterness of coffee.
Peppermint Dream
Add a drop of peppermint extract to the hot chocolate base and garnish with crushed candy canes on the whipped cream. The cool mint rush pairs like a winter wonderland, making it ideal for holiday gatherings.
Salted Caramel Swirl
Drizzle a spoonful of homemade salted caramel sauce into the mug before adding the whipped cream. The caramel’s buttery depth amplifies the white chocolate, while the salt ties the flavors together in a luxurious loop.
Spiked Adult Version
Stir in a shot of bourbon or Irish cream after removing the pan from heat. The alcohol adds warmth and complexity, turning this cozy drink into a cocktail worthy of after‑dinner relaxation.
Vegan Velvet
Replace whole milk with oat milk and heavy cream with coconut cream (chilled and whipped). Use a dairy‑free white chocolate that contains cocoa butter and soy lecithin. The result is a dairy‑free indulgence that still feels decadently creamy.
Storing and Bringing It Back to Life
Fridge Storage
Transfer any leftover hot chocolate base to an airtight glass jar and refrigerate for up to 3 days. When you’re ready to serve, gently reheat on the stove over low heat, whisking constantly. Adding a splash of milk (about 2 Tbsp per cup) during reheating restores that original silkiness.
Freezer Friendly
For longer storage, pour the cooled base into freezer‑safe containers, leaving a little headspace for expansion. Freeze for up to 2 months. To thaw, move the container to the fridge overnight, then reheat gently as described above.
Best Reheating Method
The secret to reheating without losing texture is a double‑boiler setup. Place the frozen or chilled base in a heat‑proof bowl over simmering water, stirring until smooth. This indirect heat prevents scorching and keeps the cocoa butter emulsified. Finish with a fresh dollop of whipped cream for that “just made” feel.