I swear, the moment I first tried to fry chicken that tasted like a dill pickle I was convinced the universe was playing a prank on me. The kitchen was a battlefield: a pan full of oil that sputtered like a nervous crowd, a stack of pickles that stared back with their glossy green skins, and a chicken breast that seemed to sigh in defeat. I was desperate, hungry, and a little bit reckless, so I tossed the chicken into a batter that was practically screaming “cheese!” and let the magic happen. The first bite was a revelation – a crunchy, salty, tangy explosion that made my taste buds do a happy dance and my mind shout, “This is hands down the best version you'll ever make at home.”
Picture this: the kitchen fills with a buttery, nutty aroma that hints at Parmesan, while a faint vinegary tang wafts from the pickle juice soaking the coating. The sizzle when the chicken hits the pan is like a tiny fireworks show, each pop promising a crunch that shatters like thin ice. You can hear the crust forming, feel the heat radiating from the stove, and already see the golden‑brown edges that will soon be the centerpiece of any plate. It’s the kind of dish that makes you want to call everyone you know, because honestly, I dare you to taste this and not go back for seconds.
Most recipes get this completely wrong. They either drown the chicken in a soggy pickle slurry or they forget the Parmesan, leaving you with a bland, greasy mess. I’ve tried the “quick fix” versions that promise “5‑minute pickles” and ended up with a soggy disappointment that tasted more like a pickle‑infused pancake than a chicken dinner. The secret? A three‑step coating system that locks in moisture, adds a tangy bite, and finishes with a cheesy crunch that sticks to the ribs. I’m going to be honest — I ate half the batch before anyone else got to try it, and that’s because the flavor is that addictive.
Now, let’s talk about the game‑changing technique that most home cooks overlook: the pickle‑infused brine. By soaking the chicken in a mixture of dill pickle juice and a splash of buttermilk, you’re not just adding flavor, you’re tenderizing the meat from the inside out. This little trick is the difference between a chicken that’s juicy on the inside and one that’s dry as a desert. Okay, ready for the game‑changer? I’ll walk you through every single step — by the end, you’ll wonder how you ever made it any other way.
What Makes This Version Stand Out
- Flavor Fusion: The dill pickle juice adds a tangy bite that cuts through the richness of the Parmesan, creating a perfect balance of salty, sour, and savory.
- Crunch Factor: A triple‑layer coating – flour, egg‑buttermilk, and panko‑Parmesan – gives you a crust that shatters like glass but melts in your mouth.
- Simplicity: Only a handful of pantry staples are needed, and the steps are straightforward enough for a weekday dinner.
- Uniqueness: Most chicken recipes never think to incorporate pickle juice; this one does, and it changes the game entirely.
- Crowd Reaction: Serve it at a gathering and watch the “What is that?!” faces turn into “Give me more!” smiles.
- Ingredient Quality: Fresh dill pickles and real Parmesan cheese elevate the dish from ordinary to unforgettable.
- Cooking Method: Pan‑frying gives you that restaurant‑style crust without the need for a deep fryer.
- Make‑Ahead Potential: You can prep the coating and brine a day ahead, making the actual cooking a quick 30‑minute sprint.
Alright, let's break down exactly what goes into this masterpiece...
Inside the Ingredient List
The Flavor Base
Dill Pickle Juice: This is the secret sauce of the recipe. The acidity breaks down muscle fibers, ensuring the chicken stays juicy, while the dill and garlic notes infuse every bite. If you skip it, you’ll lose that signature tang that makes the dish sing. You can substitute with a mixture of white vinegar and a pinch of dried dill, but the authentic pickle brine is unbeatable.
The Texture Crew
Panko Breadcrumbs: Their airy, flaky structure creates that light, crispy exterior. Avoid regular breadcrumbs—they’ll weigh the coating down and make it soggy. For a gluten‑free version, swap with crushed rice crackers. A pro tip: toast the panko lightly in a dry skillet for an extra golden hue before mixing with Parmesan.
Parmesan Cheese: Freshly grated Parmesan adds a nutty, umami depth that plain breadcrumbs lack. The cheese also helps the crust brown evenly, giving you that beautiful caramelized finish. If you’re low on Parmesan, Pecorino Romano works in a pinch, though it’s a bit sharper.
The Unexpected Star
Buttermilk: This tangy dairy product works hand‑in‑hand with the pickle juice, creating a briny‑cream bath for the chicken. It also adds a subtle richness that balances the acidity. If you don’t have buttermilk, mix 1 cup milk with 1 tablespoon lemon juice and let it sit for 5 minutes.
The Final Flourish
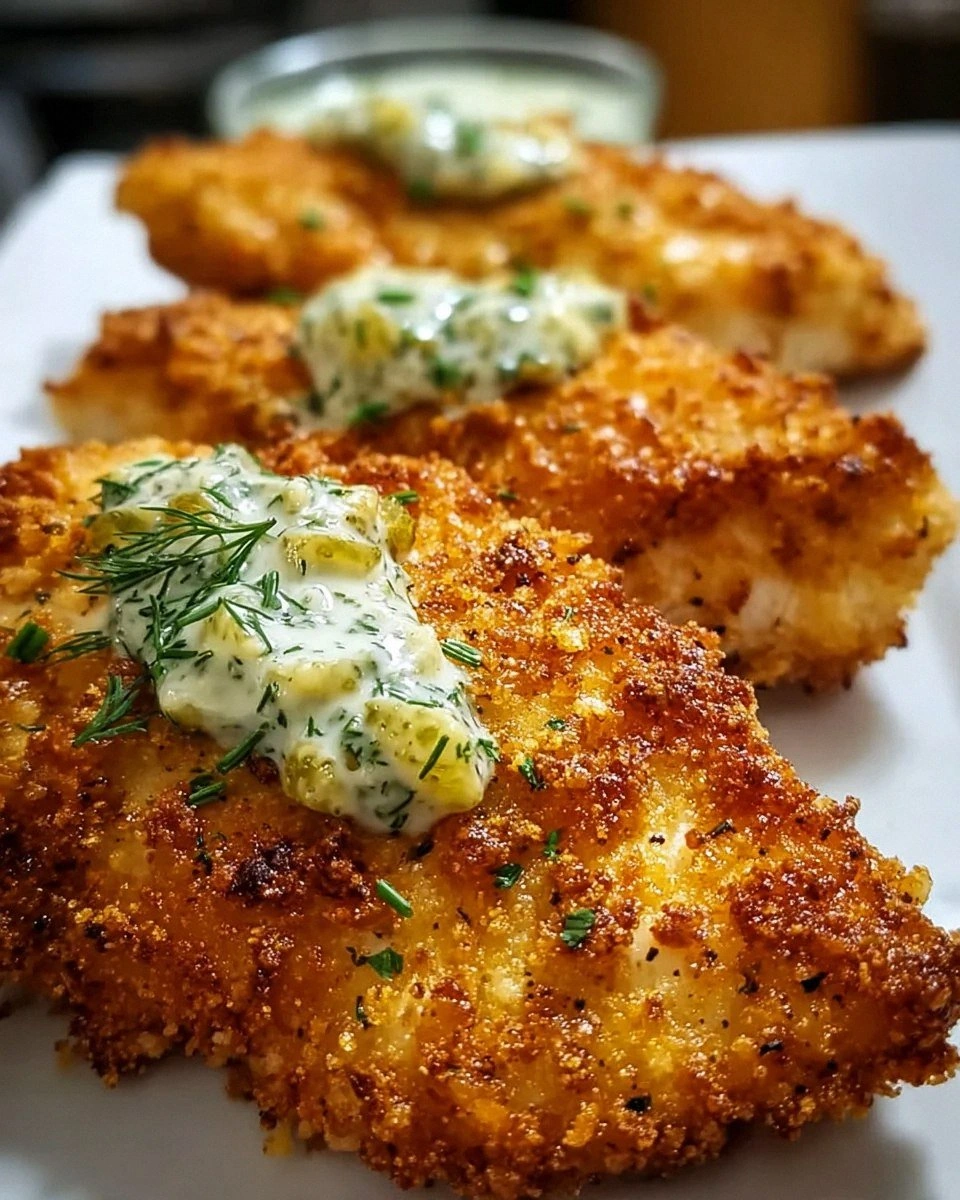
Fresh Dill (optional garnish): A sprinkle of chopped dill right before serving adds a burst of herbaceous freshness that lifts the entire dish. It’s not required, but it makes the plate look restaurant‑ready and adds an extra layer of aroma.
Everything's prepped? Good. Let's get into the real action...
The Method — Step by Step
-
Step 1 – Brine the Chicken: Place the chicken breasts in a shallow dish and pour over the dill pickle juice until they’re just covered. Let them soak for at least 30 minutes, or up to 2 hours if you have the patience. This is the moment of truth: the meat will start to look a little pinkish from the brine, and you’ll smell that faint vinegar‑dill perfume. Pro tip: If you’re short on time, a quick 10‑minute dip still imparts a noticeable tang.
Kitchen Hack: After brining, pat the chicken dry with paper towels; excess moisture will prevent the coating from sticking properly. -
Step 2 – Prepare the Coating Stations: Set out three shallow bowls. In the first, combine the flour, salt, pepper, garlic powder, onion powder, and smoked paprika. In the second, whisk together the eggs and buttermilk. In the third, mix the panko breadcrumbs with the grated Parmesan and a pinch of extra salt. This three‑step system ensures each layer adheres perfectly.
Watch Out: Don’t skip the flour dusting; it creates a dry surface that helps the egg wash cling, preventing a soggy crust. -
Step 3 – Dredge the Chicken: Take each brined chicken breast, coat it lightly in the seasoned flour, shaking off any excess. Then dip it into the egg‑buttermilk mixture, letting any surplus drip back into the bowl. Finally, press it into the panko‑Parmesan blend, ensuring an even, thick crust on all sides. You should feel the coating cling like a second skin; if it falls off, give it another quick dip in the egg wash.
-
Step 4 – Preheat the Pan: Heat a large skillet over medium‑high heat and add the olive oil. Once the oil shimmers and you can see a faint ripple when you flick a drop of water in, it’s ready. The temperature should be around 350°F (175°C). If the oil is too hot, the coating will burn before the chicken cooks through; too cool and you’ll get greasy, limp crust.
Kitchen Hack: Add a tiny knob of butter to the oil right before the first piece hits the pan; it adds a buttery aroma without smoking. -
Step 5 – Fry the Chicken: Gently lay the coated breasts into the hot oil, giving them enough space to breathe. Cook for 4‑5 minutes per side, or until the crust turns a deep golden‑brown and the interior reaches 165°F (74°C). You’ll hear a steady sizzle, and the edges will start pulling away from the pan – that’s your cue that the crust is forming correctly.
Resist the urge to move the chicken around too much; let it sit undisturbed so the crust can set. When you flip, use tongs and a gentle hand – the coating is sturdy but can crumble if you’re too aggressive.
-
Step 6 – Finish with Butter and Herbs: Once the chicken is cooked, add a tablespoon of butter to the pan and let it melt, spooning the melted butter over the breasts for an extra glossy finish. Toss in a handful of fresh dill, allowing it to wilt just enough to release its fragrance. This final flourish adds a bright, herbaceous note that balances the richness.
-
Step 7 – Rest the Chicken: Transfer the chicken to a wire rack set over a baking sheet and let it rest for 5 minutes. This rest period lets the juices redistribute and the crust firm up, preventing the coating from sliding off when you slice.
While it rests, the kitchen will be filled with that intoxicating aroma of toasted Parmesan and dill – a scent that practically guarantees a second helping.
-
Step 8 – Slice and Serve: Cut the chicken across the grain into thick strips or bite‑size pieces. Serve immediately with a side of creamy coleslaw, a crisp green salad, or even a simple lemon wedge. The contrast between the tangy pickle‑infused crust and the juicy interior is what makes this dish unforgettable.
And now the fun part: watch your guests’ faces light up as they bite into that perfect crunch. That’s the payoff for all the meticulous steps you just followed.
That's it — you did it. But hold on, I've got a few more tricks that'll take this to another level...
Insider Tricks for Flawless Results
The Temperature Rule Nobody Follows
Most home cooks set the stove to “medium” and hope for the best. In reality, the oil temperature is the linchpin of a perfect crust. Use an instant‑read thermometer to keep the oil between 340‑360°F (170‑180°C). If the temperature dips, the coating will soak up oil and become soggy; if it spikes, the crust will burn before the chicken cooks through. I once tried to “wing it” and ended up with a greasy disaster – lesson learned.
Why Your Nose Knows Best
Your sense of smell is a more reliable indicator than a timer when it comes to judging doneness. When the crust reaches that nutty, toasty aroma, you’re almost guaranteed that the interior is nearing the perfect 165°F. Trust that scent; it’s like a culinary GPS guiding you to crispy perfection.
The 5‑Minute Rest That Changes Everything
Skipping the rest period is a common rookie mistake. Letting the chicken sit for five minutes on a wire rack allows the juices to settle and the coating to crisp up further. A friend once sliced his chicken immediately and the crust fell apart – a tragic reminder that patience truly is a virtue in the kitchen.
Double‑Dip for Extra Crunch
If you crave an even thicker crust, give each piece a quick second dip in the egg wash and a final roll in the panko‑Parmesan mixture. This double‑dip method creates a “crust‑on‑crust” effect that’s unbelievably crunchy, almost like a chicken‑based version of a fried cheese stick.
Seasoning the Frying Oil
Add a pinch of smoked paprika or a few crushed garlic cloves to the oil while it heats. The oil will absorb these flavors, subtly enhancing the crust without overwhelming the pickle tang. Just remember to remove any solid bits before the chicken goes in, or they’ll burn and turn bitter.
Creative Twists and Variations
This recipe is a playground. Here are some of my favorite ways to switch things up:
Spicy Pickle Kick
Add a teaspoon of crushed red pepper flakes to the panko‑Parmesan mix. The heat pairs beautifully with the dill pickle’s acidity, creating a tongue‑tingling experience that’s perfect for spice lovers.
Herb‑Infused Crust
Swap half of the Parmesan for finely chopped fresh thyme and rosemary. The herbaceous notes add a woodland vibe that works especially well with roasted vegetables on the side.
Cheese Lover’s Dream
Mix in shredded mozzarella or provolone with the Parmesan for a gooey, melty interior that stretches with each bite. This variation turns the dish into a cheesy indulgence that’s perfect for comfort food cravings.
Gluten‑Free Gladiator
Replace the all‑purpose flour with a 1:1 gluten‑free flour blend and use crushed cornflakes instead of panko. The texture remains satisfyingly crunchy while accommodating dietary restrictions.
Pickle‑Infused Sauce
Whisk together equal parts mayo, dill pickle juice, and a dash of hot sauce for a drizzle that mirrors the flavor profile of the chicken. It’s a quick finishing touch that adds creaminess without drowning the crunch.
Storing and Bringing It Back to Life
Fridge Storage
Place the cooked chicken in an airtight container, separating pieces with parchment paper to keep the crust from getting soggy. It will stay fresh for up to 3 days. When reheating, use a preheated oven at 350°F (175°C) for 10‑12 minutes to revive the crunch.
Freezer Friendly
Cool the chicken completely, then wrap each piece individually in foil and place them in a zip‑top freezer bag. They’ll keep for up to 2 months. To reheat, bake directly from frozen at 375°F (190°C) for 20‑25 minutes, adding a splash of water to the pan to create steam that prevents the crust from drying out.
Best Reheating Method
For ultimate crispness, reheat in a hot cast‑iron skillet with a thin drizzle of oil over medium‑high heat. Add a teaspoon of water and cover for the first minute to generate steam, then uncover to let the crust re‑crisp. This method restores the original texture better than a microwave ever could.