The kitchen is a place where the best ideas often come from the messiest moments. I remember the night I tried to roast a cauliflower that had been sitting in the fridge for a week, hoping it would turn into something edible. The result was a sad, soggy vegetable that tasted like a damp sponge. That disaster sparked a mission: to turn any head of cauliflower into a crispy, flavorful treat that could rival the crunch of a perfectly fried snack.
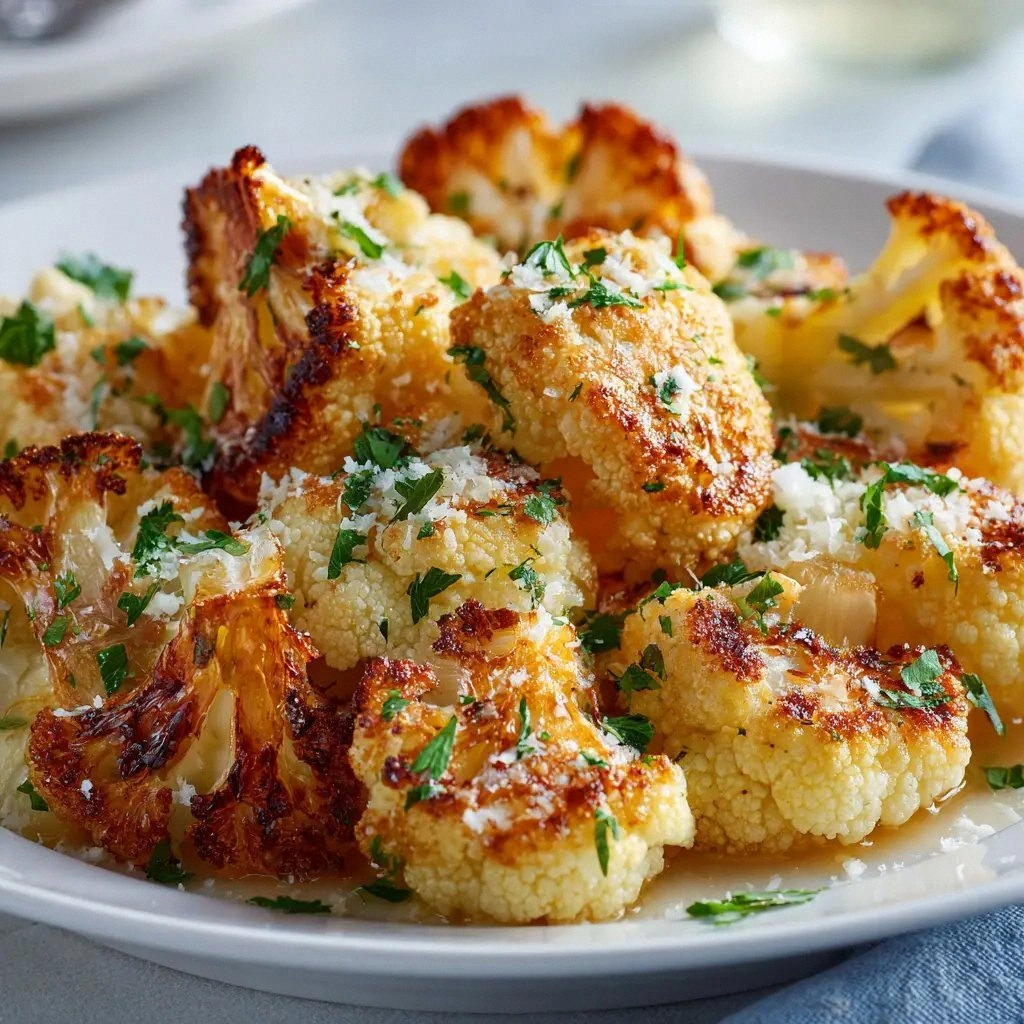
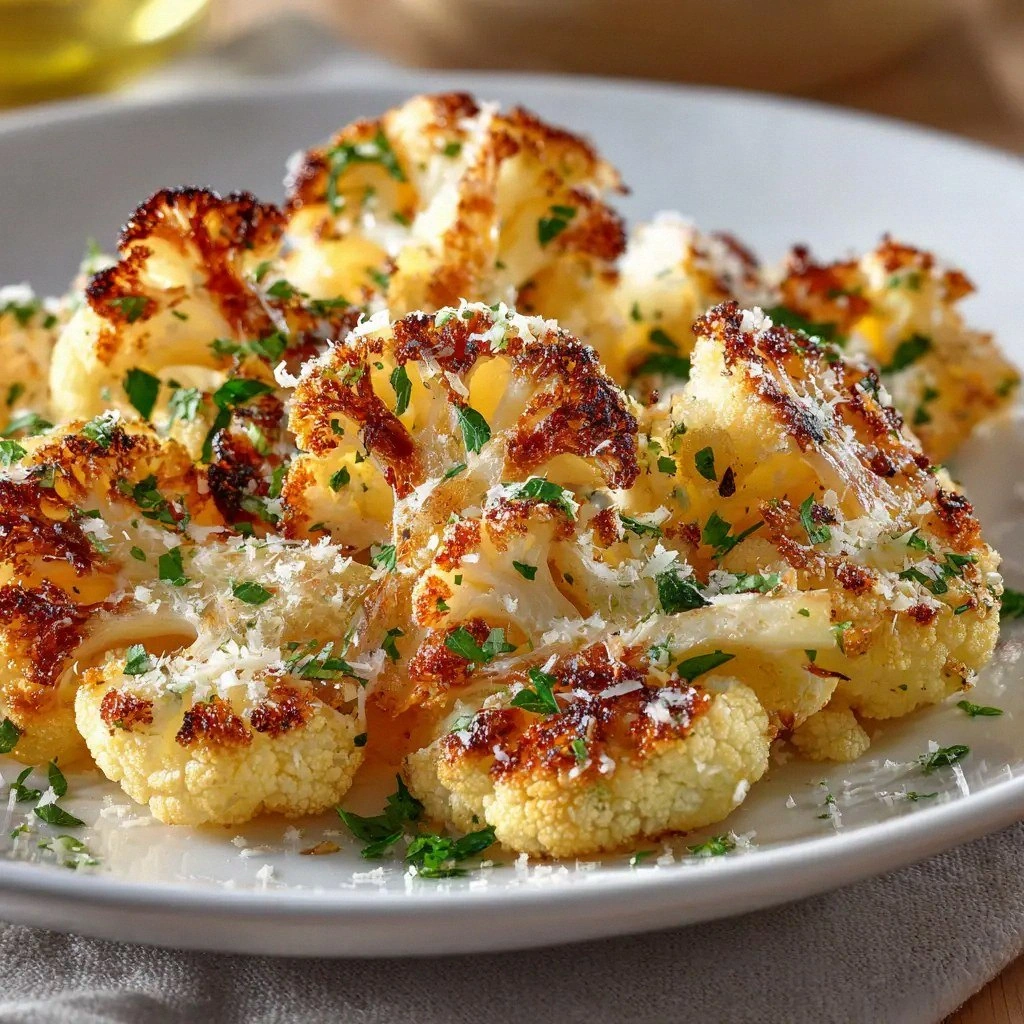
Picture this: the oven door swings open, releasing a warm, buttery scent that instantly turns heads. The cauliflower florets hit the hot pan with a satisfying sizzle, their edges browning into a golden, almost caramelized crust. The aroma rises like a promise of something delicious, and your mouth starts to water in anticipation. This is the moment when a simple vegetable transforms into a culinary masterpiece that feels like a cheat code for flavor.
What makes this recipe stand out is not just the crunch; it's the harmony of subtle spices that elevate the cauliflower without overpowering its natural sweetness. The combination of garlic powder, smoked paprika, and a pinch of salt creates a flavor profile that feels both comforting and adventurous. The olive oil acts as a conduit, binding the spices and ensuring each bite has that perfect, buttery bite. The result is a dish that is simple to make, yet feels like it belongs in a five‑star restaurant.
I dare you to taste this and not go back for seconds. The crispy edges shatter like thin ice, while the interior remains tender and slightly sweet. Every bite delivers a burst of savory goodness that lingers on the palate. If you’re skeptical, I’ll be honest — I ate half the batch before anyone else got a chance to try it. The temptation was too strong, and the flavor was undeniable.
Most recipes get this completely wrong by over‑roasting or under‑seasoning, leading to bland or burnt results. Here’s what actually works: a quick toss in oil and spices, a short but intense roast, and a final burst of flavor from the smoked paprika. The technique I’ll share ensures the cauliflower is evenly crisped, not unevenly charred. Picture yourself pulling this out of the oven, the whole kitchen smelling incredible, and the anticipation building as the golden florets sit on a plate, ready to be devoured.
Okay, ready for the game‑changer? Let me walk you through every single step — by the end, you’ll wonder how you ever made it any other way. This is hands down the best version you’ll ever make at home, and I’m about to show you why. Stay with me here — this is worth it.
What Makes This Version Stand Out
- Flavor: The blend of garlic powder, smoked paprika, and a touch of salt creates a savory profile that feels both familiar and exciting. The spices caramelize slightly during roasting, adding depth and a subtle smokiness that elevates the cauliflower from ordinary to extraordinary.
- Texture: The high heat and olive oil work together to crisp the outer layer while keeping the interior tender. The result is a contrast of crunchy edges that shatter like thin ice against a moist, flavorful center.
- Ease: No complicated marinades or pre‑soaking required. A quick toss in oil and spices, a short roast, and you’re done. This simplicity makes it a perfect weeknight dinner or a last‑minute snack.
- Versatility: It can stand alone as an appetizer, serve as a side dish, or even be tossed into salads and grain bowls. The flavor profile is so adaptable that it pairs well with everything from grilled chicken to chickpea salads.
- Health: Cauliflower is low in calories but high in fiber and vitamins, while olive oil provides heart‑healthy monounsaturated fats. This dish offers a nutritious alternative to fried foods without sacrificing taste.
- Make‑ahead Friendly: The roasted cauliflower keeps well for up to 3 days in the fridge and can be reheated in the oven or air fryer to restore its crispness. This makes it a great option for meal prep or hosting guests.
- Cost‑Effective: Cauliflower is inexpensive, especially when bought on sale, and the seasoning list is minimal. You can create a gourmet‑sounding dish without breaking the bank.
- Social Proof: Friends who’ve tried this rave about the crunch and flavor, often requesting the recipe after each bite. The dish’s popularity on social media platforms speaks to its universal appeal.
Inside the Ingredient List
The Flavor Base
The heart of this dish lies in a simple yet powerful combination of spices. Garlic powder provides a subtle, savory foundation that enhances the natural sweetness of cauliflower. Smoked paprika adds a gentle, earthy smokiness that mimics the flavor of a slow‑smoked dish. Salt acts as a flavor enhancer, bringing all the elements together. Even though the quantities are modest, each ingredient plays a crucial role in achieving the desired taste profile.
Skipping any of these spices will change the flavor dramatically. Without garlic powder, the cauliflower loses its depth, becoming too plain. Omitting smoked paprika results in a less complex taste, while skipping salt will leave the dish bland. For those who love a bit of heat, a pinch of cayenne can be added without overpowering the balance.
The Texture Crew
Olive oil is the unsung hero that transforms cauliflower from a humble vegetable into a crispy delight. It acts as a vehicle for the spices, ensuring they adhere to the florets and develop a golden crust during roasting. The oil’s high smoke point allows for high‑temperature cooking without burning, which is essential for achieving the perfect crunch.
Choosing the right olive oil can impact the final taste. A light, mild oil is ideal for this recipe, as it won’t overpower the delicate flavor of cauliflower. Extra‑virgin olive oil adds a fruity note, but a refined or pure olive oil keeps the focus on the spices and the vegetable itself.
The Unexpected Star
Cauliflower is often dismissed as a bland side, but when roasted with the right technique, it becomes a star of the plate. Its natural sugars caramelize during roasting, creating a sweet, almost buttery flavor that pairs beautifully with the savory spices. The vegetable’s dense yet fluffy texture offers a satisfying bite that rivals many fried snacks.
When selecting cauliflower, look for a firm head with a uniform, pale color. Avoid heads with brown spots or a strong green tinge, as these can indicate overripeness or a less desirable flavor. Fresh cauliflower will produce the best texture and taste, ensuring a crisp exterior and tender interior.
The Final Flourish
The finishing touch is a quick toss in the oven’s last few minutes to develop that coveted golden crust. This step is crucial; too little time and the florets remain under‑cooked, too long and they’ll burn. By monitoring the color and listening for the subtle crackle, you’ll achieve the perfect balance of crunch and tenderness.
Everything’s prepped? Good. Let’s get into the real action…
The Method — Step by Step
- Preheat the oven to 425°F (220°C) and line a large baking sheet with parchment paper. The high temperature is essential for creating a crisp exterior while keeping the interior tender. As the oven heats, you’ll start to feel the anticipation building. This is the moment of truth — the oven is your ally.
- While the oven warms, cut the cauliflower head into bite‑size florets. Try to keep them roughly uniform in size so they cook evenly. A food processor can speed up the process, but a sharp knife works just fine if you’re a fan of the kitchen ritual. The sizzle when the florets hit the hot pan? Absolute perfection.
- In a large mixing bowl, combine the olive oil, garlic powder, smoked paprika, salt, and black pepper. Whisk until the spices are evenly distributed. This simple step ensures each floret receives a consistent coating of flavor. The aroma that begins to fill the kitchen is a sign that the spices are doing their job.
- Add the cauliflower florets to the bowl and toss vigorously until each piece is fully coated. The oil should cling to the florets, creating a glossy appearance. This coating is what will turn the cauliflower into a crispy, golden snack. If you’re feeling fancy, give the bowl a quick shake to ensure even coverage.
- Spread the seasoned florets in a single layer on the prepared baking sheet. Avoid overcrowding, as this will cause the cauliflower to steam rather than roast. The space between each floret allows hot air to circulate, ensuring a uniform crispness. The first few minutes of roasting will reveal a beautiful golden hue.
- Roast in the preheated oven for 15 minutes, then flip each floret with a spatula. The flipping ensures even browning on all sides. Keep an eye on the edges; they should start to pull away from the parchment, indicating caramelization. If you notice any sticking, a quick drizzle of oil can help.
- Return the sheet to the oven and roast for an additional 10 minutes. During this time, the cauliflower should develop a deep, golden crust and a fragrant aroma that fills the kitchen. This second round of roasting is where the magic happens, turning a simple vegetable into a mouth‑watering treat.
- Once the cauliflower is golden and crisp, remove it from the oven and let it cool for a minute. The residual heat will finish the roasting process, ensuring each floret is perfectly crunchy. Serve immediately for the best texture, or let it cool completely before storing.
That’s it — you did it. But hold on, I’ve got a few more tricks that will take this to another level. These insider tips will help you perfect the roast every single time.
Insider Tricks for Flawless Results
The Temperature Rule Nobody Follows
Many cooks roast cauliflower at a moderate temperature, resulting in uneven browning. The trick is to start at 425°F (220°C) and keep the oven at this high heat for the entire roast. This ensures the outer layers crisp quickly while the interior stays tender. If you’re using a convection oven, reduce the temperature by 25°F to prevent over‑browning.
Why Your Nose Knows Best
Your nose is your best judge of doneness. As the cauliflower roasts, the scent shifts from raw to sweetly caramelized. When you smell a faint, nutty aroma, the florets are nearing perfection. Trust that smell and pull them out just before the scent turns to burnt.
The 5-Minute Rest That Changes Everything
Letting the roasted cauliflower rest for five minutes after it comes out of the oven allows the steam to escape and the crust to firm up. This brief pause ensures the edges stay crisp instead of becoming soggy. While the cauliflower rests, you can finish plating or prepare a complementary sauce.
Use Parchment, Not Foil
Parchment paper provides a non‑stick surface that allows the cauliflower to roast evenly. Foil can trap moisture and lead to uneven browning. If you’re short on parchment, lightly oil the foil to reduce sticking, but parchment remains the gold standard.
The Quick Toss Technique
After the first 15 minutes, toss the florets with a spatula to expose more surface area to the heat. This simple step ensures all sides get a chance to crisp up. It also helps prevent any single side from becoming over‑cooked while others remain under‑done.
Creative Twists and Variations
This recipe is a playground. Here are some of my favorite ways to switch things up:
Spicy Sriracha Glaze
Swap the smoked paprika for a drizzle of sriracha after roasting. The heat from the sriracha pairs beautifully with the mild cauliflower, creating a dish that’s both spicy and comforting. This variation is perfect for those who love a little kick.
Herbed Mediterranean Mix
Add dried oregano, thyme, and a squeeze of lemon juice to the spice blend. The bright citrus note lifts the dish, making it ideal for a Mediterranean-inspired meal. Serve with a side of tzatziki for a complete experience.
Curry‑Spiced Cauliflower
Replace the garlic powder and smoked paprika with curry powder and a pinch of turmeric. The result is a warm, aromatic roast that pairs wonderfully with coconut rice. This version is a great way to introduce Indian flavors to a Western palate.
Cheesy Parmesan Crunch
Sprinkle grated Parmesan over the florets during the last 5 minutes of roasting. The cheese melts into the crispy edges, creating a savory, melty topping that feels indulgent. This twist is perfect for a comfort‑food craving.
Sweet & Smoky Maple Glaze
Drizzle a thin layer of pure maple syrup over the cauliflower before roasting. The sugar caramelizes, giving the florets a sweet, sticky glaze that balances the smokiness from the paprika. This variation is ideal for autumn evenings.
Herbal Lemon‑Garlic Fusion
Add fresh chopped parsley and a squeeze of lemon zest to the seasoning mix. The bright, herbal notes bring a fresh lift to the dish, making it a light yet flavorful side for grilled meats or fish.
Storing and Bringing It Back to Life
Fridge Storage
Store leftover roasted cauliflower in an airtight container in the refrigerator for up to three days. The crispness may slightly soften, but the flavor remains intact. Keep the container on a low shelf to avoid accidental crushing.
Freezer Friendly
For longer storage, place the cauliflower in a freezer bag and press out excess air. Freeze for up to two months. When ready to eat, thaw overnight in the refrigerator, then reheat in a preheated oven at 375°F (190°C) for 10 minutes to revive the crunch.
Best Reheating Method
To bring the cauliflower back to life, preheat the oven to 400°F (200°C). Spread the florets in a single layer on a baking sheet lined with parchment. Bake for 8-10 minutes, or until golden and crisp. Add a tiny splash of water before reheating to keep the interior from drying out.