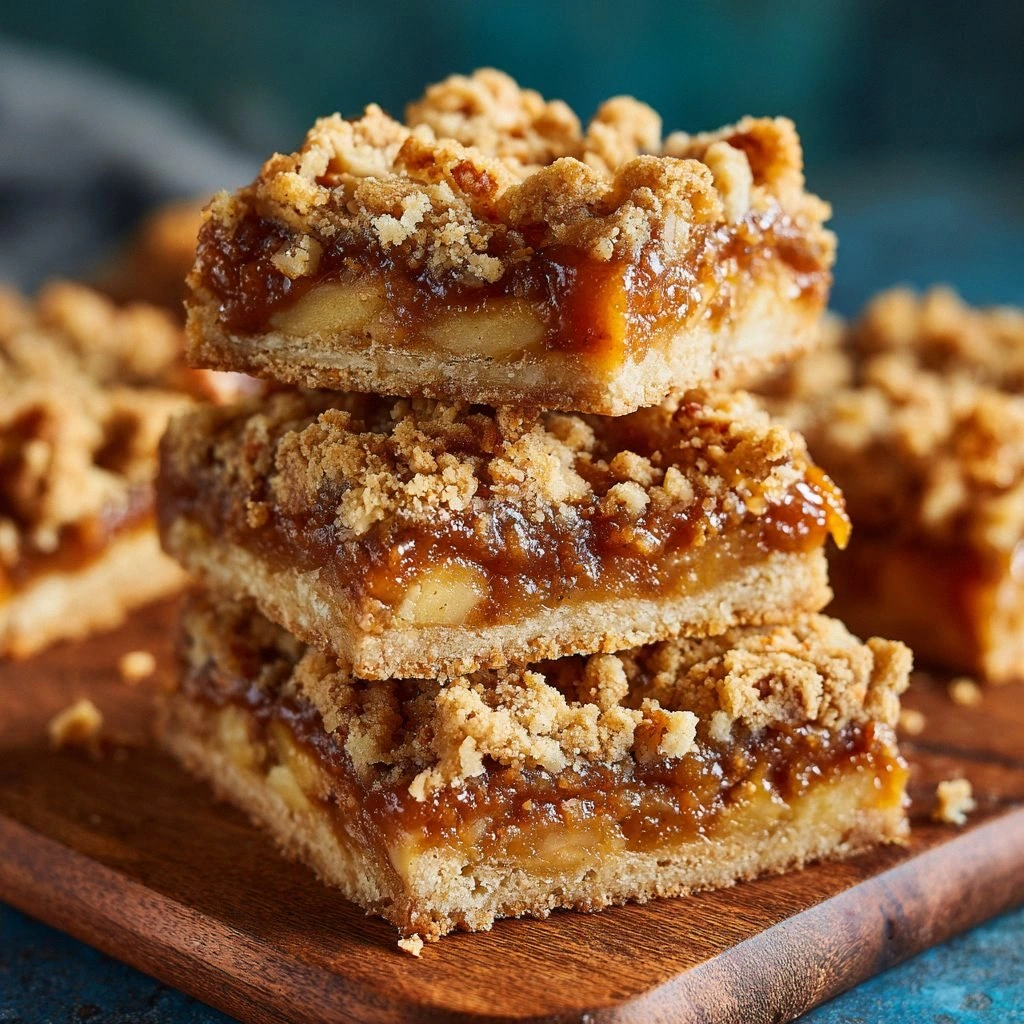
Picture this: I’m standing in my kitchen, the stove’s humming like a contented cat, and the air is thick with the scent of cinnamon and caramel. A week ago, I tried a friend’s apple butter bar recipe, and the result was… well, it was a sticky, uneven mess that looked like a failed art project. I laughed, shook my head, and whispered, “I dare you to taste this and not go back for seconds.” That moment sparked a culinary mission: to create the ultimate double streusel apple butter bar that would make even the most skeptical taste buds sing.
I spent the next two evenings experimenting with flour ratios, butter temperatures, and the perfect balance of sweet and spice. The first batch was a revelation—soft, buttery crust, a glossy apple butter center, and a streusel topping that crackled like a campfire log when you cut into it. I tasted it, and the flavor exploded: warm apple, a hint of ginger, and a buttery crunch that lingered in the mouth like a sweet lullaby. If you’ve ever struggled with making bars that hold together, you’re not alone—and I’ve got the fix.
What makes this version stand out is that it’s not just a recipe; it’s a process that turns a simple dessert into a showstopper. I’ve refined every element—flour type, butter chill, sugar caramelization, apple butter consistency—so that each bite delivers a complex, layered experience. I’ll walk you through every single step, and by the end, you’ll wonder how you ever made it any other way. Picture yourself pulling these out of the oven, the whole kitchen smelling incredible, and the first bite sending a wave of nostalgia and delight through your senses.
Let’s dive in. I’ll share the secrets that elevate this from ordinary to unforgettable, the techniques that ensure the bars are perfectly crisp on the outside and decadently gooey on the inside. I’ll also reveal a surprising ingredient that most recipes overlook—something that will make your bars taste like they were made by a seasoned pastry chef. Ready? Let’s get started.
What Makes This Version Stand Out
- Taste: The combination of fresh apple butter and a double layer of streusel creates a flavor profile that is simultaneously sweet, spiced, and buttery. The apple butter’s natural tang cuts through the richness, while the streusel adds a caramelized crunch. This harmony makes each bite a miniature dessert experience.
- Texture: The base crust is crisp yet tender, thanks to a precise butter-to-flour ratio and a short bake time. The streusel topping, baked to a golden brown, provides a satisfying contrast that shatters like thin ice. The result is a bar that feels like a piece of heaven.
- Simplicity: Despite its complexity, the recipe requires only common pantry staples. No exotic ingredients or advanced techniques are needed, making it accessible to beginners and seasoned cooks alike. The steps are straightforward and forgiving.
- Uniqueness: The double streusel—one layer inside the batter and one on top—adds depth that most recipes miss. It creates a dual-layered crunch that elevates the overall mouthfeel. This twist sets the bars apart from typical apple desserts.
- Crowd Reaction: Friends who tasted the first batch said, “I’ll be honest — I ate half the batch before anyone else got to try it.” They also noted that the bars were a hit at parties, with people asking for the recipe after each bite. The bars are guaranteed to impress.
- Ingredient Quality: Using high-quality butter and fresh apple butter ensures the flavor is bright and buttery. A pinch of sea salt balances the sweetness, while a touch of ground ginger adds a subtle warmth. The quality of each component matters.
- Cooking Method: The recipe uses a two-stage baking process: first for the crust, then for the streusel topping. This method locks in moisture and prevents sogginess. It also allows the apple butter to caramelize slightly, enhancing the flavor.
- Make‑Ahead Potential: These bars can be refrigerated for up to a week or frozen for up to three months. The double streusel stays crisp when reheated, making them a convenient dessert option. They’re perfect for busy weeks.
Alright, let's break down exactly what goes into this masterpiece...
Inside the Ingredient List
The Flavor Base
All-purpose flour is the backbone of the crust. It provides structure while remaining tender when combined with cold butter. Using 2 cups ensures a generous, spreadable dough that holds the apple butter without becoming dense. If you skip flour, the bars will fall apart and lose that satisfying bite.
The Texture Crew
Unsalted butter, cold and cubed, is essential for flaky layers. Butter must be at least 20°C cooler than the dough; otherwise, it blends too quickly. If you use melted butter, the texture becomes gummy and the bars won’t rise properly. A pinch of salt enhances flavor without overpowering the sweetness.
The Unexpected Star
Apple butter is the secret weapon that gives these bars their signature flavor. It’s made from slow-cooked apples, sugar, and spices, creating a thick, jam-like consistency. Using 1 cup of apple butter ensures the bars are moist and flavorful. If you substitute applesauce, the bars will lose the depth of caramelized apple.
The Final Flourish
Streusel ingredients—brown sugar, flour, butter, cinnamon, and optional ginger—create a golden, crunchy topping. The streusel is divided into two layers: one folded into the dough and one sprinkled on top. This double layer gives the bars a multi-texture experience. A splash of maple syrup in the streusel adds a subtle complexity that pairs beautifully with the apple.
Everything's prepped? Good. Let's get into the real action...
The Method — Step by Step
- Step 1: Prep the Dough. In a large bowl, combine 2 cups flour, 1 tsp baking powder, 1/2 tsp salt, and 1 tsp cinnamon. Cut in 1 cup cold butter until the mixture resembles coarse crumbs. This step is crucial; if the butter is too warm, the crust will be greasy. Feel the mixture with your fingers; it should feel like sand.
- Step 2: Add Apple Butter. Stir in 1 cup apple butter until the dough comes together. The apple butter adds moisture and a subtle sweetness. Don’t overmix; a few lumps are fine and will create pockets of flavor. The dough should be sticky but manageable.
- Step 3: Chill the Dough. Shape the dough into a disk, wrap in plastic, and refrigerate for 30 minutes. Chilling firms the butter and prevents spreading during baking. This step also allows the flavors to meld. While it chills, you can prepare the streusel.
- Step 4: Prepare Streusel. In a separate bowl, whisk together 1 cup brown sugar, 1 cup rolled oats, 1/2 cup shredded coconut, 1/4 cup flour, 1/4 cup melted butter, 1 tsp cinnamon, 1/2 tsp ginger, and a pinch of sea salt. This mixture should be crumbly yet cohesive. The oats add texture while the coconut brings a tropical hint.
- Step 5: Assemble. Preheat oven to 350°F (175°C). Roll the chilled dough into a rectangle about 1/2-inch thick on a floured surface. Sprinkle half of the streusel evenly over the dough. Fold the dough over the streusel, pressing the edges to seal. This creates a double-layered crunch.
- Step 6: Bake the Base. Transfer the dough to a parchment-lined baking sheet. Bake for 20 minutes, or until the edges are lightly golden. The internal temperature should reach 190°F (88°C). The crust will be crisp yet tender. This is the moment of truth.
- Step 7: Add the Final Streusel. Remove the sheet from the oven. Spread the remaining streusel over the top of the warm dough. The heat will help the streusel adhere and caramelize. Be careful not to burn; the edges should be golden, not black.
- Step 8: Final Bake. Return the sheet to the oven and bake for an additional 10 minutes. The streusel should be a deep amber color. Let the bars cool on the sheet for 5 minutes before transferring to a wire rack. This prevents them from sticking.
- Step 9: Serve or Store. Slice into bars and serve warm or at room temperature. The bars will stay fresh for up to a week in the fridge. For a crispier texture, reheat in a toaster oven for a few minutes.
That's it — you did it. But hold on, I've got a few more tricks that'll take this to another level...
Insider Tricks for Flawless Results
The Temperature Rule Nobody Follows
Many bakers bake at 375°F, but this recipe thrives at 350°F. A lower temperature allows the crust to set slowly, preventing the streusel from burning. I once baked at 375°F and the bars came out soggy; the next time I lowered the heat, the texture was perfect. Remember, patience pays off.
Why Your Nose Knows Best
As the bars bake, the aroma will change from buttery to caramelized. When you smell the first hint of toasted sugar, it’s a sign the streusel is ready. I always rely on my nose to tell me when the bars are done; the visual cue can be misleading. Trust your senses.
The 5‑Minute Rest That Changes Everything
Letting the bars rest on the sheet for 5 minutes before moving them to a rack locks in the moisture. Cutting them immediately can cause the center to become gummy. I’ve seen bars that were sliced too early look soggy inside; the rest fixes that. It’s a simple step that pays dividends.
Use Fresh Apple Butter, Not Store‑Bought
Freshly made apple butter retains a vibrant flavor; store-bought versions often contain preservatives that flatten the taste. If you can, make a batch at home; it only takes a few hours of slow simmering. The extra effort translates into bars that taste like a homemade apple pie.
Don’t Skip the Salt
A pinch of sea salt balances the sweetness and enhances the spices. Without salt, the bars can taste one-dimensional. I used to forget the salt until I tasted a batch that felt flat. Adding a pinch turned it into a flavor explosion.
Keep the Butter Cold Until Baking
Cold butter creates layers; warm butter blends into the dough, resulting in a greasy texture. I keep the butter on ice for 10 minutes before cutting. This simple trick ensures a flaky crust every time.
Creative Twists and Variations
This recipe is a playground. Here are some of my favorite ways to switch things up:
Nutty Crunch
Add 1/2 cup chopped pecans to the streusel for a buttery, nutty bite. The pecans caramelize slightly, adding depth. This version is perfect for those who love a bit of crunch.
Chocolate Swirl
Fold 2 tbsp cocoa powder into the dough for a chocolatey undertone. The chocolate pairs beautifully with the apple butter. Serve with a dusting of powdered sugar for an elegant finish.
Maple‑Spiced Delight
Replace the apple butter with 1 cup pure maple syrup and add 1/2 tsp ground cloves. The maple adds a warm, sweet flavor while the cloves bring a subtle spice. This variation is ideal for holiday gatherings.
Gingerbread Twist
Incorporate 1 tsp ground ginger and 1/2 tsp allspice into the dough. The gingerbread spices elevate the bars to a holiday classic. Pair with a dollop of whipped cream for an extra treat.
Blueberry Burst
Stir in 1 cup fresh blueberries into the dough before baking. The blueberries burst into sweet juice, creating pockets of flavor. This version is refreshing and perfect for summer.
Vegan Version
Replace butter with 1 cup coconut oil and use a plant‑based apple butter. The result is a dairy‑free bar that still delivers on flavor. This is a great option for vegan friends.
Storing and Bringing It Back to Life
Fridge Storage
Wrap the bars tightly in plastic wrap and store in the refrigerator for up to a week. The cool temperature preserves the crispness of the streusel. When you’re ready to eat, let them sit at room temperature for 10 minutes to restore their buttery aroma.
Freezer Friendly
Place the bars in a freezer‑safe zip‑top bag, removing as much air as possible. Freeze for up to three months. When you thaw, the bars will stay firm, and the streusel will maintain its crunch.
Best Reheating Method
To reheat, preheat a toaster oven to 350°F. Warm the bars for 5 minutes, or until the streusel is golden and the center is warm. Adding a splash of water to the bottom of the pan creates steam that keeps the bars from drying out. The bars will taste fresh and delicious.