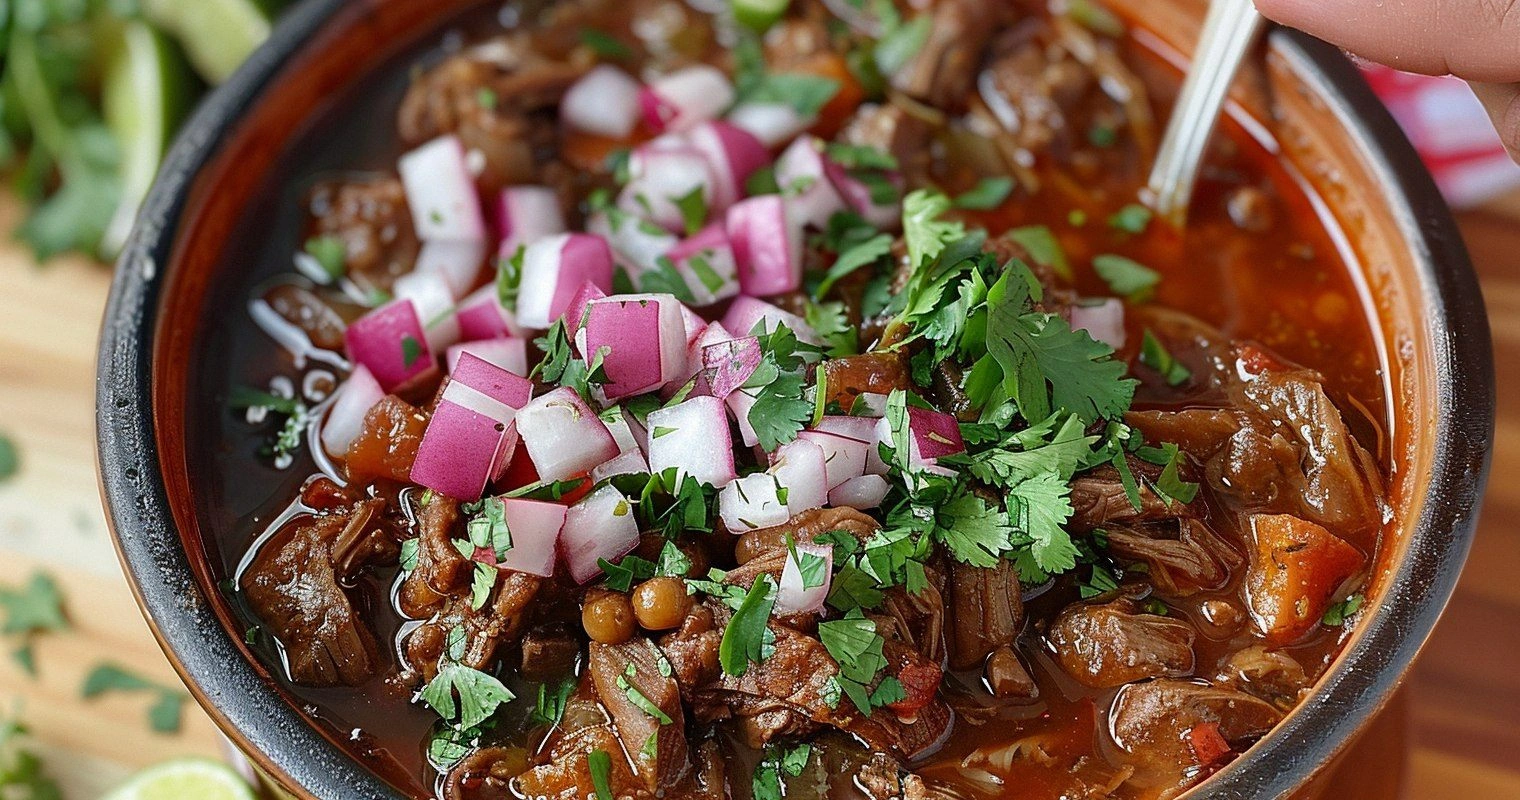
I still remember the day I accidentally created the best birria of my life. It was supposed to be a simple Sunday stew, but I got cocky and decided to wing it without a recipe. Three hours later, my kitchen looked like a crime scene — dried chile pods everywhere, my Dutch oven threatening to unionize, and me standing there with a wooden spoon like some sort of sauce-splattered warrior. But then I tasted it. Holy mother of all that is holy, I nearly dropped the spoon. The depth, the complexity, the way the meat fell apart like it had been waiting its whole life for this moment — it was everything I never knew I needed in a bowl.
Fast forward through six months of obsessive tweaking, fifteen pounds of dried chiles, and one very patient butcher who stopped asking questions after the fourth week, and here we are. This Dutch oven birria isn't just another recipe — it's a revelation wrapped in corn tortillas and dipped in consommé so good you'll want to bathe in it. The magic happens when you take the time to toast your chiles properly (most recipes rush this part and it shows), when you let the meat marinate overnight in a paste that looks like tar but tastes like heaven, and when you embrace the glorious mess that is authentic birria-making.
Picture this: It's Saturday morning, you're still in your pajamas, and your Dutch oven is quietly working its magic on the stove. The aroma drifting through your house is so intoxicating that your neighbors start showing up with Tupperware and hopeful expressions. That first bite — when the crispy edges of the meat meet the velvety sauce, when the corn tortilla has soaked up just enough consommé to become pliable but not soggy — that's the moment you'll understand why I spent half a year perfecting this. The layers of flavor unfold like a story: smoky, spicy, tangy, rich, with whispers of cinnamon and clove dancing around the edges.
I'll be honest with you — I ate half the batch during "quality control" testing and had to make a second round before I could photograph anything. My dog learned to recognize the sound of the blender when I'm making the chile paste and now sits by the kitchen door like some sort of furry food critic. But here's what makes this version different from every other birria recipe floating around the internet: we're not cutting corners, we're not using shortcuts that compromise flavor, and we're definitely not settling for "good enough." Let me walk you through every single step — by the end, you'll wonder how you ever made it any other way.
What Makes This Version Stand Out
Depth Charge: We're building flavors like a skyscraper — layer upon layer that creates a sauce so complex, food scientists would need a flowchart to map it. The secret lies in toasting each chile variety separately because they all have different burning points, then blending them with roasted tomatoes that have been kissed by fire until their skins blister and blacken.
Texture Triumph: Most birria ends up either stringy or mushy, but not here. We're using a combination of cuts — chuck roast for that gelatinous richness and short ribs for the meat that shreds into these gorgeous long strands that catch the sauce like edible spaghetti. The result? Meat that holds its shape but melts on your tongue.
Authenticity Without the Flight: You don't need to smuggle spices back from Jalisco (though I've done that too). Every ingredient is available at your local Latin market, and I'll teach you how to spot the good stuff. No "birria seasoning packets" or other culinary crimes against humanity.
Make-Ahead Magic: This is the dinner party hero you need — it actually gets BETTER after a day in the fridge. The flavors marry, the meat relaxes, and you can skim off the solidified fat for the most luxurious cooking oil you've ever tasted. I make double batches just to have leftovers for quesadillas.
Equipment Humblebrag: Your Dutch oven isn't just for sourdough, baby. The way it maintains heat creates this gentle simmer that transforms tough cuts into spoon-tender submission. Plus, it goes from stovetop to oven to table, which means fewer dishes and more time for important things like eating.
Consommé That'll Make You Cry: We're not just making meat in sauce — we're creating the liquid gold that makes the whole thing sing. Clear, rich, with just enough fat floating on top to create that perfect dipping experience for your tacos. The onions melt into sweetness, the chiles infuse their soul, and you end up with something that tastes like it took three days to make (it didn't, but let them think it did).
Leftover Legacy: This birria keeps revealing new tricks. Day one: traditional tacos. Day two: quesabirria with cheese that stretches for days. Day three: birria ramen that'll make you question everything you thought you knew about fusion food. I've even used it as pizza topping, and yes, I'm prepared for the hate mail from pizza purists.
Inside the Ingredient List
The Flavor Base
Dried chiles are the backbone of any respectable birria, and we're using a trio that creates a symphony of flavors. Guajillo brings the fruity brightness with notes of green tea and slight berry, while ancho adds that raisin-like sweetness and deep red color that makes your sauce look like liquid rubies. Pasilla rounds things out with its herbaceous complexity and mild heat — think of it as the bass line that holds everything together. When you're selecting these at the store, look for chiles that are still pliable, not brittle like autumn leaves. The good ones smell like dried fruit and tobacco, not dust and disappointment.
Tomatoes aren't just filler — they're the bridge between the earthiness of the chiles and the brightness that keeps the sauce from becoming a one-note wonder. I use Roma tomatoes because they have less water and more flesh, which means more concentrated flavor. Roast them until the skins are charred and blistered, almost black in spots. This isn't the time to be precious about burning — those dark bits add bittersweet complexity that makes the sauce taste like it has a secret.
The Texture Crew
Chuck roast is your workhorse here, marbled with just enough fat to keep things juicy without turning greasy. When you're picking it out, look for pieces with good marbling but not huge chunks of fat — you want it to melt into the sauce, not float on top like icebergs. Cut it into two-inch chunks; any smaller and they'll dry out, any larger and they won't get that beautiful shreddable texture we're after.
Short ribs are the luxury addition that takes this from good to legendary. The bones add gelatin that makes the sauce unctuous and lip-smacking, while the meat shreds into these long, luxurious strands that look like edible gold ribbons. Bone-in is non-negotiable here — the bones are flavor bombs that you can't replicate with any amount of store-bought stock.
The Unexpected Star
Cinnamon might seem out of place in a savory dish, but trust me on this one. We're not talking about the cinnamon that makes your oatmeal taste like Christmas — Mexican cinnamon (canela) has a more delicate, floral quality that adds warmth without screaming "dessert!" Just a whisper, a half-stick really, gives the sauce this mysterious background note that makes people ask "what is that?" in the best possible way.
Vinegar is the unsung hero that nobody talks about. It brightens all the other flavors, cuts through the richness of the meat, and helps tenderize everything it touches. I use apple cider vinegar because it's milder than white vinegar but has more personality than rice vinegar. The key is adding it at the right time — too early and it makes the meat tough, too late and it tastes harsh.
The Final Flourish
Mexican oregano is completely different from the Italian stuff gathering dust in your spice rack. It's more citrusy, less sweet, and has this incredible ability to make meat taste meatier. If you can't find it, skip the oregano altogether rather than substituting — regular oregano will make your birria taste like pizza, and nobody wants that. The leaves should be green, not brown, and they should crumble easily between your fingers, releasing a scent that's almost lime-like.
Bay leaves are the grandmother of the herb world — they don't seem like much, but take them away and everything falls apart. Two leaves, no more, no less. They add this subtle menthol note that makes the whole dish taste fresher, plus they have this magical ability to round out harsh edges and marry flavors together. Just remember to fish them out before serving — biting into a bay leaf is like getting a mouthful of eucalyptus.
The Method — Step by Step
-
Start by toasting your chiles, and please, for the love of all that is delicious, don't rush this part. Heat a dry comal or heavy skillet over medium heat, and working in batches, toast the guajillo, ancho, and pasilla chiles for about 30 seconds per side. You're looking for them to become fragrant and slightly darker, not black and bitter. The guajillos will puff up slightly and release a scent that's like dried cherries and tobacco. The anchos will blister and smell almost like raisins left in the sun. The pasillas will darken and release an herby aroma that'll make you want to bottle it as cologne. Set them aside to cool, then remove the stems and seeds, but don't throw away those seeds — they add heat if you want to kick things up later.
-
Now we're going to roast the aromatics, and this is where your kitchen starts smelling like a Mexican grandmother's house. In the same skillet, roast the unpeeled garlic cloves until they're blackened in spots and soft when squeezed — about 15 minutes, turning occasionally. The skins will blister and the cloves inside will turn into sweet, mellow garlic candy. While that's happening, quarter your onions (skin on — it adds color and flavor) and char them alongside the tomatoes. Everything should have char marks; we're building layers of smoky flavor here. Don't worry about burning the tomato skins — we want them almost black in places because those bitter edges will balance the sweetness of the meat later.
-
Time to rehydrate those chiles, and here's where most recipes go wrong. Don't just soak them in hot water — that leaches out flavor. Instead, bring 4 cups of water to a boil, then turn off the heat and add the toasted chiles. Let them soak for 20 minutes, pushing them down occasionally so they're fully submerged. They should become pliable and velvety, like expensive leather. Save this soaking liquid — it's liquid gold that we'll use later to adjust the consistency of our sauce. If you taste it, you'll notice it's slightly bitter but full of chile flavor, which is exactly what we want for building our base.
-
This is the moment of truth — blending your chile paste, and it's going to look like something you shouldn't eat. In your blender, combine the drained chiles, roasted tomatoes (skins and all), peeled garlic, charred onions, cinnamon stick, bay leaves, oregano, cumin, black pepper, and cloves. Add about a cup of the chile soaking liquid and blend until smooth. You're looking for the consistency of thick ketchup; it should coat the back of a spoon but still be pourable. If it's too thick, add more liquid a quarter cup at a time. Taste it now and you'll think you've made a mistake — it's bitter, spicy, and way too intense. That's perfect — it'll mellow beautifully during cooking.
-
Season your meat like you mean it. Pat the chuck roast and short ribs dry with paper towels — this helps them brown instead of steam. Season generously with salt and pepper, making sure to get into all the nooks and crannies. Heat 2 tablespoons of oil in your Dutch oven over medium-high heat until it shimmers like a mirage. Working in batches (don't crowd the pan or the meat will steam), sear the meat until it's deeply browned on all sides — about 4 minutes per side. Those brown bits stuck to the bottom? That's flavor concentrate, and we're going to use every last speck of it.
-
Here's where the magic happens — marrying the meat with the chile paste. Pour off any excess fat from the pot, leaving just enough to coat the bottom. Add your chile paste to the hot pot and let it cook for about 5 minutes, stirring constantly. It will darken, thicken, and the raw chile taste will transform into something deep and complex. The paste should sizzle gently and coat the bottom of the pot. Now nestle your seared meat back into this beautiful red bath, making sure each piece gets coated with the sauce. Add enough water or stock to come about three-quarters of the way up the meat — you want it mostly submerged but not swimming.
-
Bring everything to a gentle simmer, then cover and transfer to a 325°F oven for 3 to 4 hours. This is where you become a kitchen ninja — check it after 2 hours, but don't stir too much or you'll break up the meat. The sauce should be bubbling lazily, like a lazy river of red gold. If it looks dry, add a splash of water. If it's too thin, remove the lid for the last hour. The meat is done when it yields easily to a fork but hasn't completely fallen apart. You should be able to shred it with two forks, but it should still have some texture.
-
The final transformation happens when you add vinegar and adjust the seasoning. Pull out the meat and let it rest for 15 minutes — this lets the juices redistribute and makes it easier to shred. Skim off the fat from the surface of the sauce (save it for cooking beans or rice — it's liquid flavor). Add the vinegar, starting with 2 tablespoons and adding more to taste. The sauce should taste bright and complex, not vinegary. Season with salt — it will need more than you think. The sauce should make your tongue dance, not cry. If it's too spicy, a teaspoon of honey can round things out without making it sweet.
Insider Tricks for Flawless Results
The Temperature Rule Nobody Follows
Here's the thing about braising that cookbook authors never explain properly — the temperature of your liquid matters more than the oven temperature. When you add cold stock to a hot pot, you shock the meat and it seizes up like a frightened turtle. Instead, warm your liquid first, or better yet, use some of that chile soaking water you saved. The meat should be surrounded by liquid that's just below a simmer — around 180°F. Too hot and the meat tightens up and gets dry; too cool and it never breaks down properly. I learned this the hard way when my first batch tasted like beef-flavored rubber bands.
Why Your Nose Knows Best
Your nose is the most underutilized tool in cooking, especially when it comes to knowing when your birria is done. About 30 minutes before it's ready, your kitchen will start smelling different — deeper, more complex, like the sauce has figured out who it wants to be when it grows up. The individual aromas of chile, meat, and spices merge into one harmonious scent that makes your stomach growl like a distant thunder. If you're still smelling sharp, separate aromas, it needs more time. This is also when you should start checking for doneness — when the meat yields completely to a gentle press of a fork but hasn't disintegrated into mush.
The 5-Minute Rest That Changes Everything
After you shred the meat, let it rest in the warm consommé for exactly five minutes. Not ten, not two — five. This is the Goldilocks zone where the meat reabsorbs some of the sauce without becoming soggy. The fibers relax, the flavors meld, and you end up with meat that's impossibly juicy but still has texture. Skip this step and your meat will be dry no matter how good your sauce is. A friend tried rushing this part once and ended up with birria that tasted like beef jerky in tomato soup — not the vibe we're going for.
Creative Twists and Variations
This recipe is a playground. Here are some of my favorite ways to switch things up:
The Breakfast Birria Bomb
Take your leftover birria and mix it with scrambled eggs, cheese, and potatoes for breakfast tacos that'll make you reconsider your morning routine. The richness of the meat pairs perfectly with fluffy eggs, and a splash of the consommé in the scramble adds depth that'll have you wide-eyed and ready for anything. Top with fresh cilantro and a squeeze of lime for a breakfast that beats the pants off any drive-through.
The Vegan's Nemesis (Birria Ramen)
Ladle hot consommé over fresh ramen noodles and top with shredded birria, pickled onions, and a soft-boiled egg that you let poach right in the broth. The noodles soak up that chile-rich liquid while the meat adds smoky depth that makes traditional tonkotsu seem one-dimensional. It's fusion that actually works, not the kind that makes food bloggers weep.
The Quesabirria Queen
Spread cheese on a tortilla, add birria, fold and griddle until the cheese oozes out and crisps like frico. Dip the whole thing in consommé that's been reduced until it's almost syrupy. The cheese creates these lacy edges that shatter like thin ice, while the inside stays molten and stringy. It's messy, it's indulgent, and it's worth every single napkin you'll need.
The Birria Grilled Cheese
Use crusty sourdough, layer with birria and Oaxaca cheese, then griddle until golden. The bread soaks up some of the meat juices while staying crisp, and the cheese melts into every crevice. Serve with a little cup of consommé for dipping — it's like the world's most sophisticated dunking situation. My kids request this more than the original tacos.
The Birria Bloody Mary
Mix the consommé with tomato juice, vodka, and a splash of Worcestershire for a Bloody Mary that tastes like Mexico and Sunday brunch had a beautiful baby. Rim the glass with Tajín, add a birria-stuffed olive, and garnish with a mini quesabirria on a skewer. It's breakfast and hair of the dog in one magnificent package.
The Birria Shepherd's Pie
Layer birria in a baking dish, top with mashed potatoes mixed with a bit of the fat from the top of the consommé, and bake until the peaks of potato turn golden. The sauce bubbles up around the edges, creating these crispy, chile-infused bits of potato that'll have you fighting over the corners. It's comfort food that speaks two languages fluently.
Storing and Bringing It Back to Life
Fridge Storage
Store the meat and consommé separately in airtight containers — the meat will keep for up to 5 days, the consommé for a week. The fat that solidifies on top of the consommé is liquid flavor gold — save it for frying eggs or sautéing vegetables. When you're ready to reheat, warm the consommé first, then add the meat just until heated through. Overheating is the enemy of tender meat, so gentle is the name of the game.
Freezer Friendly
This birria freezes beautifully for up to 3 months. Freeze the meat and consommé together in portion-sized containers — about 2 cups per container is perfect for two people. Thaw overnight in the refrigerator, then reheat gently. The texture might be slightly different after freezing, but the flavor will still make you weak in the knees. Pro tip: freeze some in ice cube trays for instant flavor bombs in soups and stews.
Best Reheating Method
The stovetop is your friend here. Place the meat in a pan with a splash of consommé, cover, and warm over low heat. Add a tiny splash of water before reheating — it steams back to perfection without drying out. Avoid the microwave unless you enjoy meat with the texture of shoe leather. If you must use it, do it in 30-second bursts with lots of liquid. For tacos, reheat the meat in a dry skillet first to crisp it up, then add a splash of consommé to rehydrate.