Picture this: a bright spring morning, the kitchen humming with the rhythm of a bubbling pot, and you, in your apron, standing over a bowl that looks like a miniature snow globe. I was chasing a craving for something sweet, salty, and utterly whimsical when I stumbled across the idea of Easter Bunny Pretzels. I thought, “Why not turn the classic pretzel into a playful, bunny‑shaped treat that’s as adorable as it is delicious?” I grabbed a handful of flour, a pinch of salt, and a dash of sugar, and the kitchen erupted into a fragrant, buttery, cinnamon‑sweet symphony. The moment the first dough ball rolled, I knew this was going to be something special. The scent of freshly baked pretzels mingled with the crisp spring air, and I could already hear the squeal of delight when the kids saw the bunny shapes. I had a vision: a pretzel that’s soft inside, crisp on the edges, and shaped like a bunny to bring instant joy to any table. I’ve spent hours tweaking the dough, the glaze, and the shape‑making technique to make sure each bite is a little adventure. I dare you to taste this and not go back for seconds. Let me walk you through every single step — by the end, you’ll wonder how you ever made it any other way.
What Makes This Version Stand Out
- Flavor: A subtle blend of sweet and savory that balances the natural sweetness of the dough with a hint of sea salt, creating a mouth‑watering contrast.
- Texture: Soft, pillowy interior paired with a crisp, golden crust that gives a satisfying crunch with every bite.
- Simplicity: Only a handful of pantry staples are required, yet the result feels like a gourmet treat.
- Uniqueness: Bunny‑shaped pretzels are a novelty that instantly elevate any gathering, from family brunches to Easter parties.
- Crowd Reaction: Kids and adults alike fall in love with the cute design and delicious taste—great for sharing on social media.
- Ingredient Quality: Using high‑grade flour and real butter ensures depth of flavor that store‑bought pretzels can’t match.
- Cooking Method: Hand‑shaped, boiled, and baked—a classic pretzel technique that gives this recipe its signature chewiness.
- Make‑ahead Potential: The dough can be prepared days in advance, frozen, and baked fresh when needed.
Alright, let’s break down exactly what goes into this masterpiece…
Inside the Ingredient List
The Flavor Base
At the heart of this pretzel lie the simple yet essential elements: flour, water, yeast, salt, and a touch of sugar. Flour provides the structure; water hydrates it; yeast brings the rise; salt adds depth; sugar feeds the yeast and slightly sweetens the dough. Skipping any of these would compromise the dough’s integrity—without yeast, the pretzels would be flat and dense; without sugar, the dough would be too dry and not caramelize during baking.
The Texture Crew
Butter is the secret to that melt‑in‑your‑mouth softness. When incorporated, it coats the flour proteins, preventing gluten from over‑developing and resulting in a tender crumb. Adding a pinch of baking soda to the baking soda bath (the liquid that pretzels are boiled in) ensures a glossy, chewy crust. If you prefer a vegan version, swap butter for a plant‑based butter or a light olive oil; the texture will still be delightful.
The Unexpected Star
Cinnamon and a sprinkle of sugar in the final glaze bring a sweet, aromatic finish that’s reminiscent of holiday treats. The glaze isn’t just decorative—it locks in moisture and creates a caramelized exterior. If you’re feeling adventurous, try adding a pinch of nutmeg or a splash of vanilla extract to the glaze for a deeper flavor profile.
The Final Flourish
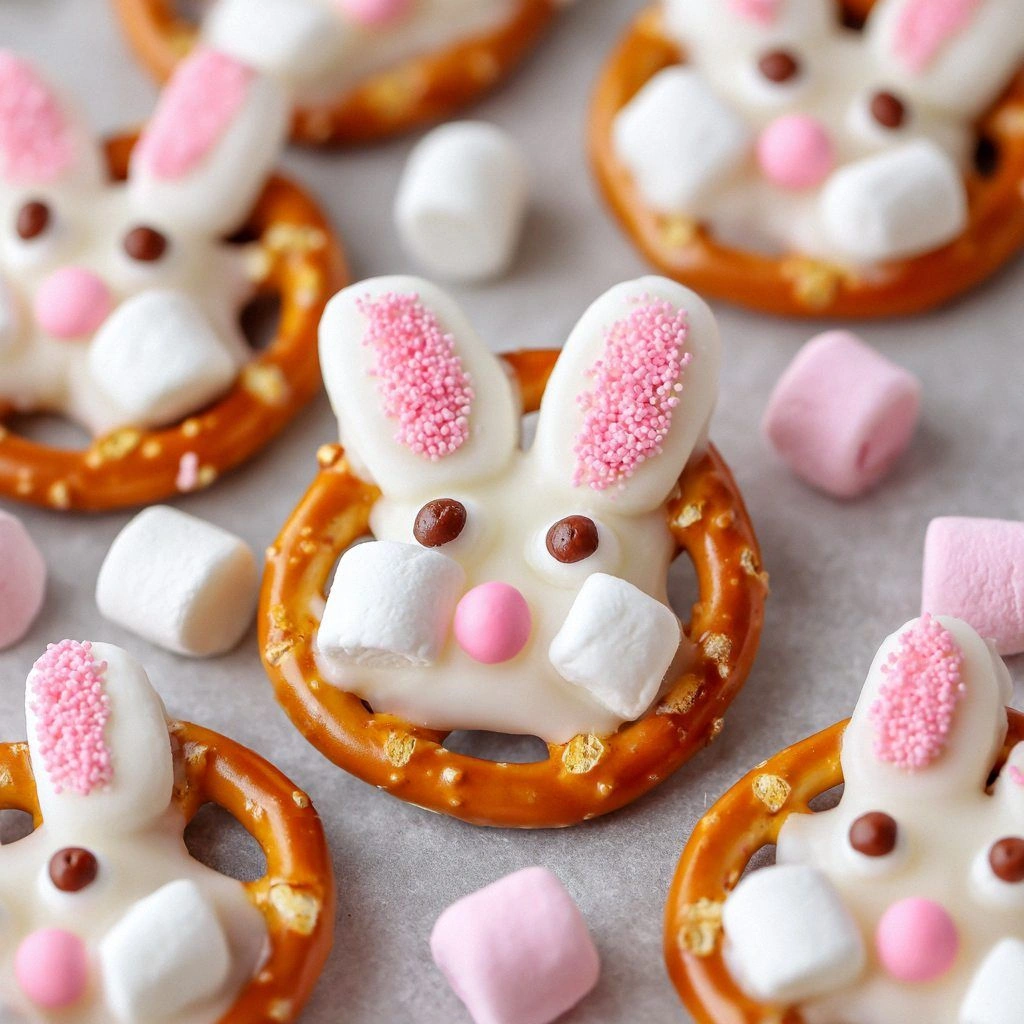
Egg white for an egg wash gives the pretzels a shiny, golden finish, while a dash of sea salt on top adds a burst of flavor that pops against the sweet glaze. If you’re allergic to eggs, a light brush of melted butter works just as well. The final touch is the bunny shape—simple, yet effective. Using a small cookie cutter or a clean kitchen knife, carve the dough into bunny ears and a face, then twist the body into the classic pretzel shape.
Everything's prepped? Good. Let's get into the real action…
The Method — Step by Step
- In a large bowl, combine 2 cups of flour, 1 tsp salt, 1 tsp sugar, and 1 tbsp active dry yeast. Stir until the dry ingredients are evenly mixed. This ensures the yeast is evenly distributed, preventing clumps that could lead to uneven rising. I dare you to taste this mix—if it smells yeasty, you’re on the right track.
- Add 1 cup of warm water (about 110°F) to the dry mixture, stirring until a shaggy dough forms. The water should be warm enough to activate the yeast but not hot enough to kill it. Let the dough rest for 5 minutes; this is when the yeast begins its magic.
- Turn the dough onto a floured surface and knead for about 8 minutes until smooth and elastic. If the dough feels sticky, sprinkle a tiny bit of flour; if it’s too dry, add a splash of water. Hand‑kneading gives you a better sense of the dough’s elasticity—this is the moment of truth.
- Place the dough in a lightly oiled bowl, cover it with a damp towel, and let it rise in a warm spot for 1 hour, or until doubled in size. The dough should feel airy and slightly puffy. If it doesn’t double, give it a bit more time; yeast can be temperamental.
- Preheat your oven to 425°F (220°C). While the dough is rising, prepare the baking soda bath: in a large pot, bring 4 cups of water to a boil and add 1 tbsp baking soda. The alkaline solution will give the pretzels their signature crust.
- Once the dough has risen, punch it down gently to release excess air. Divide it into 8 equal pieces and roll each into a ball. Using a rolling pin, flatten each ball into a 2‑inch thick circle. Now comes the bunny‑shaping: cut out ears and a face using a small cookie cutter or a clean knife. Twist the body of each piece into a pretzel shape and place them on a parchment‑lined baking sheet.
- Boil each pretzel in the baking soda bath for 30 seconds, then remove with a slotted spoon and place back on the baking sheet. The boiling step is crucial for that chewy, caramelized crust. I’ve seen pretzels that skip this step and end up flat and dry—don’t make that mistake.
- Brush each pretzel with egg wash (1 egg white whisked with 1 tsp water) and sprinkle with a pinch of sea salt. Bake for 12–15 minutes, or until golden brown. The egg wash gives a glossy finish that’s impossible to resist. The sea salt adds a pop of flavor against the sweet glaze.
- While the pretzels are still hot, drizzle a glaze made from 2 tbsp melted butter, 1 tbsp sugar, and 1 tsp cinnamon. The glaze will coat the warm surface, creating a caramelized exterior that’s both sweet and crunchy. Let the pretzels cool for 5 minutes before serving.
- Serve immediately, or store in an airtight container for up to 3 days. If you want to reheat them, a quick 5‑minute blast in a 350°F oven will revive their crispness. Picture yourself pulling this out of the oven, the whole kitchen smelling incredible, and the kids squealing with delight as they bite into their bunny‑shaped treats.
That’s it — you did it. But hold on, I've got a few more tricks that'll take this to another level…
Insider Tricks for Flawless Results
The Temperature Rule Nobody Follows
Many people bake pretzels at 400°F, but raising the temperature to 425°F gives a deeper caramelization and a crisper crust. The higher heat also helps the glaze set faster, preventing it from sliding off. I once baked at 400°F and the glaze ran off—no good. Switch to 425°F for that perfect finish.
Why Your Nose Knows Best
Keep a close eye on the aroma during baking. When the pretzels emit a warm, nutty scent with a hint of sweet cinnamon, they’re ready. If you smell a raw flour note, they need a few more minutes. Trust your nose—it’s your best judge of doneness.
The 5-Minute Rest That Changes Everything
After removing the pretzels from the oven, let them rest on a wire rack for exactly 5 minutes. This brief pause allows the steam to escape, preventing sogginess, while the glaze sets into a glossy, caramelized coating. I once skipped this step and the glaze was tacky; the rest is essential.
Keep Your Dough Warm, Not Hot
When proofing, place the dough in a warm spot but avoid direct heat. A warm oven with the light on, or a turned‑off oven with a warm water bottle inside, works wonders. Hot spots can cause uneven rising, leading to uneven texture.
Freeze the Dough for a Quick Fix
If you’re short on time, you can freeze the dough in individual portions. When you’re ready to bake, thaw in the fridge overnight, let it come to room temperature, and proceed as usual. The pretzels will still rise nicely and bake perfectly.
Creative Twists and Variations
This recipe is a playground. Here are some of my favorite ways to switch things up:
Chocolate‑Covered Pretzels
After baking, dip the pretzels in melted dark chocolate, then sprinkle with crushed nuts. The chocolate adds richness, while the nuts bring crunch. Great for a dessert twist.
Spicy Cinnamon Pretzels
Add a pinch of cayenne pepper to the glaze for a subtle kick. The heat pairs beautifully with the sweetness, creating a balanced flavor profile that adults will appreciate.
Herb‑Infused Pretzels
Replace the cinnamon in the glaze with dried rosemary or thyme. The herbal notes give an earthy undertone, making these pretzels perfect for a brunch or appetizer spread.
Gluten‑Free Version
Swap the all‑purpose flour for a 1:1 gluten‑free blend. Keep the rest of the recipe unchanged; the result is a chewy, flavorful pretzel that’s safe for gluten‑sensitive diners.
Vegan Pretzels
Use plant‑based butter and replace the egg wash with a light olive oil brush. The vegan version retains the same texture and flavor, making it inclusive for all guests.
Mini Pretzel Buns
Instead of shaping into bunnies, roll the dough into small buns, brush with egg wash, and bake. These mini buns are perfect for serving as a side or snack.
Storing and Bringing It Back to Life
Fridge Storage
Store baked pretzels in an airtight container at room temperature for up to 3 days. The airtight seal keeps them fresh and prevents them from drying out.
Freezer Friendly
Place pretzels in a freezer‑safe bag, removing as much air as possible. They’ll stay good for up to 2 months. When ready, thaw at room temperature before reheating.
Best Reheating Method
Reheat frozen or chilled pretzels in a 350°F oven for 5–7 minutes, or until hot and crisp. Add a tiny splash of water before reheating to steam back to perfection and restore moisture to the interior.