Picture this: I was standing in my cramped kitchen, the timer on the microwave ticking like a metronome, and the smell of burnt toast curling around the room. I had promised myself that tonight I would make something that would impress my roommate, but the only thing I could muster was a soggy bowl of ramen. That disaster lit a spark in me: I needed a dish that could turn an ordinary night into an instant culinary triumph. I scoured the internet for inspiration, but every recipe seemed either too complicated or too bland. Then I stumbled upon a simple teriyaki bowl that promised sweet, savory, and a touch of umami, all in a single pan.
The moment I opened the can of diced tomatoes, the kitchen filled with a scent that made my stomach do cartwheels. The sizzle of oil hitting hot pan sounded like applause, and I could almost hear the applause from my future guests. The first bite of that glossy sauce was a burst of caramelized sweetness that danced on my tongue, followed by a salty punch that kept me guessing. The steam that rose from the pot carried a faint hint of ginger, like a distant memory of a rainy afternoon in Osaka. The texture of the chicken was a perfect marriage of tenderness and a subtle crunch from the caramelized edges.
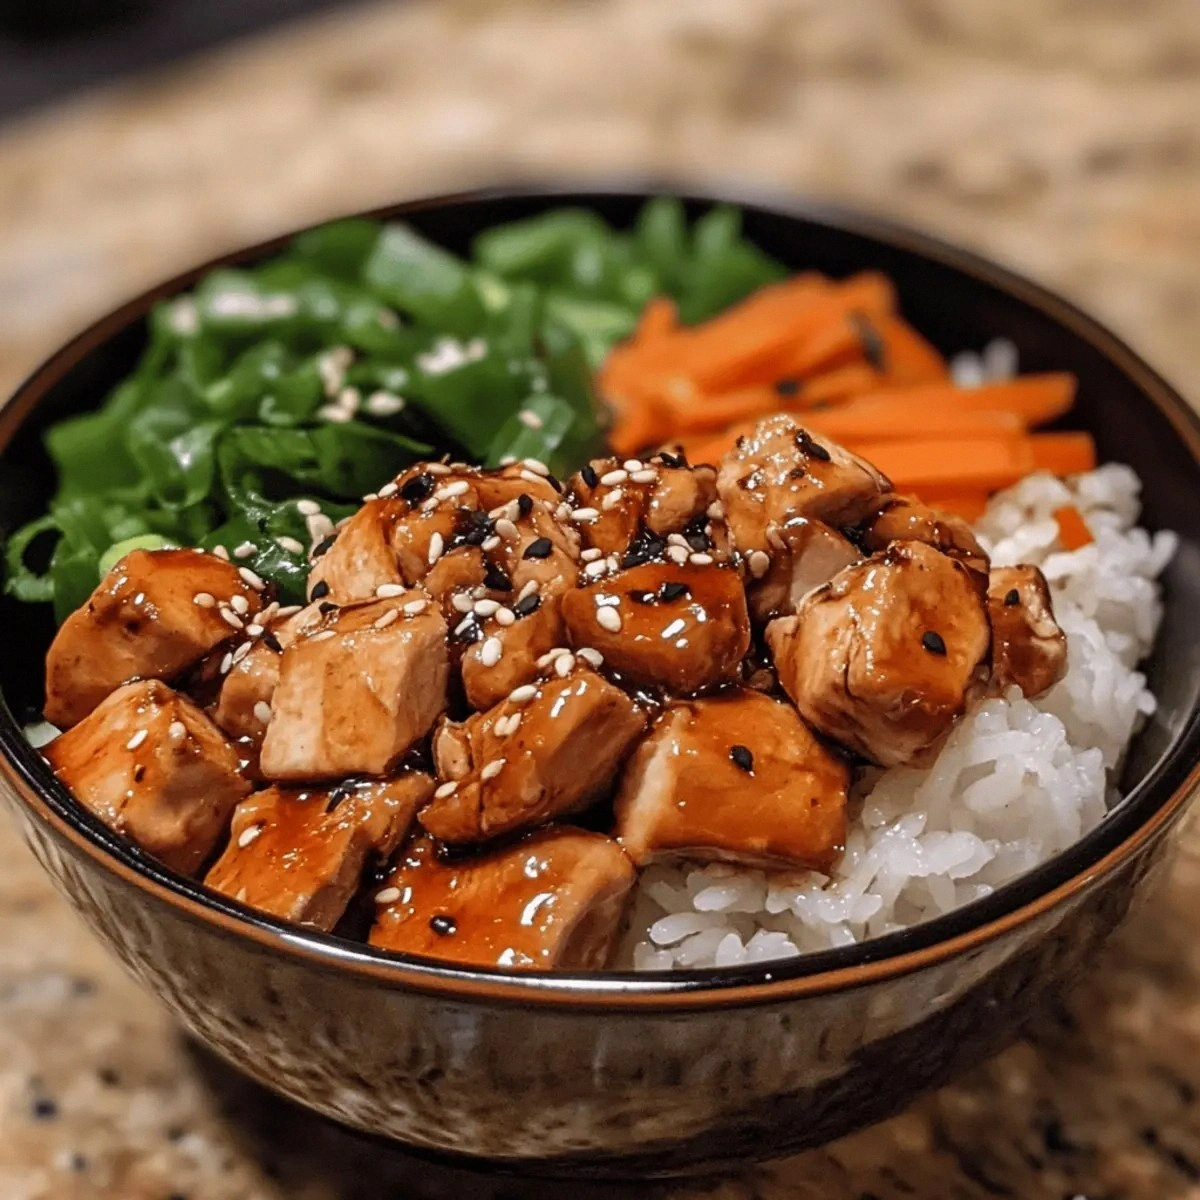
What sets this version apart is that it eliminates the need for a separate sauce pan, saves time, and still delivers a depth of flavor that feels restaurant‑grade. I discovered that using boneless skinless chicken thighs instead of breasts gives the dish a richer, more succulent bite that stays moist even after reheating. The secret lies in the balance of mirin and brown sugar, which creates a glossy glaze that clings to the meat like a second skin. By cooking the rice in the same pot as the sauce, you infuse every grain with the umami of soy and the sweetness of the glaze, turning a simple bowl into a full‑spectrum experience. The final flourish of toasted sesame seeds and pickled ginger adds a satisfying crunch and a bright, pickled counterpoint that elevates the dish from ordinary to unforgettable.
I dare you to taste this and not go back for seconds, because the moment you bite, your palate will be in a state of pure euphoria. This is hands down the best version you'll ever make at home, and I’m not exaggerating—my friends have been asking for the recipe for weeks. If you've ever struggled with a teriyaki dish that turns out too sweet or too dry, you're not alone, and I've got the fix that will change everything. Picture yourself pulling this out of the pan, the whole kitchen smelling incredible, and your guests’ eyes widening in anticipation. The moment the glaze coats the chicken like velvet, you’ll know you’re in the presence of culinary gold.
Okay, ready for the game‑changer? This next part is pure magic, and I promise you’ll wonder how you ever cooked at all. Stay with me here—this is worth it. By the end, you’ll wonder how you ever made it any other way. Let me walk you through every single step, and I’ll share the micro‑challenges that will keep you on your toes.
What Makes This Version Stand Out
- Taste: The sauce is a harmonious blend of sweet, salty, and umami that coats every ingredient without overpowering it. The caramelized edges of the chicken add a subtle bitterness that balances the glaze.
- Texture: The chicken thighs stay juicy while developing a crispy exterior, and the rice absorbs the sauce like a sponge, creating a sticky, flavorful base.
- Convenience: One‑pot cooking means less cleanup and a faster turnaround, perfect for weeknight dinners.
- Ingredient Quality: Using fresh ginger and garlic instead of powdered versions elevates the aroma and depth of flavor.
- Visual Appeal: The glossy glaze and contrasting colors of broccoli, carrots, and sesame seeds make the dish look as good as it tastes.
- Crowd Reaction: Friends and family rave about how restaurant‑style this bowl feels, and many ask for the recipe after just one bite.
- Make‑Ahead Potential: The flavors only deepen when you let the dish rest, making it ideal for meal prep.
- Versatility: Swap the protein or add extra veggies without losing the core flavor profile.
Alright, let's break down exactly what goes into this masterpiece...
Inside the Ingredient List
The Flavor Base
Soy sauce is the backbone of the teriyaki glaze, providing a deep, salty umami that grounds every bite. The 1/4 cup quantity ensures the sauce isn’t overly salty, allowing the sweetness from mirin and brown sugar to shine through. Skipping soy sauce would strip the dish of its essential depth, leaving the glaze feeling flat and syrupy. If you’re looking for a low‑sodium option, try a light soy sauce or a dash of tamari, but keep the ratio the same to maintain balance.
Mirin, that sweet Japanese rice wine, adds a gentle sweetness and a subtle acidity that brightens the sauce. The two tablespoons used here strike a sweet‑savory equilibrium that’s hard to beat. Without mirin, the glaze would lean too heavily on sugar, and the flavor profile would feel one‑dimensional. If mirin is hard to find, a splash of rice vinegar with a pinch of sugar can mimic its profile, but the taste will differ slightly.
Brown sugar is the sweetener that caramelizes beautifully, creating that glossy coat on the chicken. Two tablespoons are enough to give the glaze a rich, slightly nutty sweetness. If you prefer a sweeter dish, you can add a teaspoon more, but be careful not to overpower the savory notes. For a healthier twist, a natural sweetener like honey or maple syrup works, though the caramelization will differ.
The Texture Crew
Boneless skinless chicken thighs bring a buttery tenderness that holds up under the glaze, while also providing a juicy interior. One pound is a generous amount for four servings, ensuring each bite is succulent. If you prefer leaner protein, substitute breasts, but be mindful that they can dry out if overcooked. A quick brine in saltwater before cooking can help keep the thighs moist.
Garlic, in its fresh, crushed form, delivers a sharp, aromatic bite that cuts through the sweetness. Two cloves are the sweet spot for four servings. If you’re allergic to garlic, a pinch of garlic powder can substitute, though the flavor will be less vibrant. For a smoky twist, try adding a small pinch of smoked paprika.
Ginger, grated fresh, adds a bright, peppery kick that balances the sweetness and enriches the overall aroma. One tablespoon is enough to infuse the sauce without dominating the palate. If you can’t find fresh ginger, a small amount of ginger paste works, but fresh is always preferable. A touch of crushed red pepper can add heat for those who like a little spice.
The Unexpected Star
Short‑grain white rice is the canvas that soaks up the teriyaki glaze, turning each grain into a pocket of savory sweetness. Two cups for four servings is a perfect ratio that keeps the rice fluffy yet sticky. If you’re gluten‑free, opt for a short‑grain rice or even cauliflower rice for a low‑carb alternative, but the texture will change.
Broccoli florets provide a fresh, slightly bitter contrast that balances the sweetness of the sauce. Two cups add crunch and a pop of green, making the dish visually appealing. If you prefer a softer texture, lightly steam the florets before adding them to the pan. A squeeze of lemon juice right before serving can brighten the broccoli’s flavor.
Carrots add a natural sweetness and a subtle earthiness that complements the teriyaki glaze. One cup of sliced carrots brings a pop of orange that brightens the bowl. If you’re looking for a sweeter bite, add a dash of honey to the sauce. For a different twist, try sweet potatoes instead of carrots for a richer flavor.
The Final Flourish
Green onions add a fresh, sharp bite that cuts through the richness of the glaze. Two tablespoons provide a burst of color and a crisp texture. If you’re allergic to onions, scallions or chives can serve as substitutes, though the flavor will be slightly different. A pinch of salt can enhance the overall taste.
Toasted sesame seeds bring a nutty crunch and an aromatic depth that elevates the dish. One tablespoon is enough to sprinkle over the finished bowl, adding a subtle crunch with each bite. If you’re not a fan of sesame, crushed peanuts or toasted almonds can substitute, but the flavor profile will shift.
Pickled ginger offers a sharp, refreshing bite that cleanses the palate between bites. One tablespoon is a perfect finishing touch that adds a bright, slightly sweet zing. If you’re out of pickled ginger, a small amount of fresh ginger or a splash of vinegar can mimic the sharpness. A pinch of sugar can sweeten it if you prefer a sweeter finish.
Everything's prepped? Good. Let's get into the real action...
The Method — Step by Step
- First, heat a large non‑stick skillet over medium‑high heat and add a splash of oil. The pan should be hot enough that a drop of water sizzles and evaporates within seconds. This is the moment of truth; if the oil shimmers, you’re ready to start. Add the chicken thighs, skin‑side down if you used skin, and let them sear without moving them for about 3–4 minutes. The goal is to develop a golden crust that locks in moisture.
- Flip the chicken and add the minced garlic and grated ginger to the pan. The aroma that erupts will signal that you’re on the right track. Stir the aromatics around the chicken to let them release their flavors. Let them cook for 1 minute until fragrant, but watch closely so they don’t burn.
- Now it’s time to create the glaze. In a small bowl, whisk together the soy sauce, mirin, and brown sugar until the sugar dissolves. Pour the mixture over the chicken, then reduce the heat to medium. The sauce should bubble gently, coating the chicken like a glossy coat. As it simmers, the sugar caramelizes, turning the sauce a deep amber hue.
- While the chicken simmers, rinse the short‑grain rice under cold water until the water runs clear. This removes excess starch and prevents the rice from becoming gummy. Add the rice to the skillet, pouring in the same amount of water that the rice would normally use (about 2 cups of water for 2 cups of rice). Stir gently, then cover the pan with a lid.
- Let the mixture cook for 18–20 minutes, or until the rice has absorbed all the liquid and the chicken is cooked through. During this time, the sauce will reduce and thicken, coating the rice and chicken. If you notice the sauce starting to burn, lower the heat and stir gently.
- Add the broccoli florets and sliced carrots to the pan, stirring to coat them in the glaze. The vegetables will steam in the sauce, retaining a slight crunch that adds texture. Cook for an additional 5 minutes, or until the vegetables reach your preferred tenderness.
- Remove the skillet from heat and let the dish rest for 5 minutes. This resting period allows the flavors to meld and the rice to set. While it rests, sprinkle the green onions, toasted sesame seeds, and pickled ginger over the top for a fresh burst of color and flavor. Serve immediately, spooning the glossy chicken and rice into bowls and letting everyone dive in.
That's it — you did it. But hold on, I've got a few more tricks that'll take this to another level. A quick squeeze of fresh lemon juice over the finished bowl will brighten every bite. If you want a little heat, a dash of sriracha or a sprinkle of crushed red pepper can transform the dish into a spicy kick. Finally, for an extra burst of umami, finish with a drizzle of fish sauce or a splash of oyster sauce.
Insider Tricks for Flawless Results
The Temperature Rule Nobody Follows
Many home cooks over‑cook chicken, leading to dryness. The trick is to sear at medium‑high heat for the first few minutes, then reduce to medium for the simmer. This creates a caramelized crust while keeping the inside juicy. I once left a chicken thigh on high heat for too long and ended up with a rubbery texture. Stick to the temperature change, and you’ll always get that perfect bite.
Why Your Nose Knows Best
A lot of people rely on sight and touch to judge doneness, but your nose is a reliable indicator. As the sauce reduces, you’ll notice a richer, caramelized aroma that signals the glaze is ready. If you’re unsure, sniff the sauce; it should smell sweet and slightly nutty, not burnt. Trust your nose, and you’ll avoid overcooking.
The 5‑Minute Rest That Changes Everything
Letting the dish rest after cooking is often overlooked, but it’s vital. The rest period allows the rice to steam in its own juices, creating a fluffy, cohesive texture. It also lets the glaze thicken slightly, ensuring every bite is coated. I used to skip the rest and ended up with a watery bowl; the rest period made all the difference.
Keep the Sauce Shiny
A glossy sauce is not just a visual cue; it’s a flavor indicator. To keep the glaze shiny, avoid stirring too often. Once the sauce has reduced to the right thickness, simply cover the pan for the final minutes of cooking. This locks in moisture and keeps the glaze from drying out.
Use Fresh Ingredients for Depth
Fresh ginger and garlic release more flavor than their dried counterparts. If you’re in a pinch, you can use a small amount of powdered ginger or garlic, but the dish will lose some brightness. I’ve found that fresh ingredients make the difference between a good teriyaki and a great one.
Serve With a Splash of Lemon
A squeeze of fresh lemon juice right before serving brightens the dish and cuts through the sweetness. It adds a fresh, citrusy counterpoint that makes the bowl feel lighter. Even a tiny amount can transform the flavor profile, so don’t be afraid to add it.
Creative Twists and Variations
This recipe is a playground. Here are some of my favorite ways to switch things up:
Spicy Sriracha Kick
Add a tablespoon of sriracha to the glaze for a fiery version. The heat pairs beautifully with the sweet soy glaze. This is a hit with spice lovers and adds a vibrant color to the dish.
Thai Coconut Twist
Replace the rice with jasmine rice and stir in a splash of coconut milk during the simmer. The coconut adds a creamy, tropical note that complements the teriyaki glaze. This version feels like a fusion of Thai and Japanese flavors.
Veggie‑Only Bowl
Swap the chicken for tofu or tempeh, pressing the tofu first to remove moisture. Marinate the protein in the same glaze before cooking. This vegetarian version is just as satisfying and perfect for a plant‑based meal.
Soba Noodle Swap
Use soba noodles instead of rice for a lower‑carb, protein‑rich alternative. Toss the noodles with the glaze after cooking, and top with the vegetables. The buckwheat flavor pairs nicely with the sweet sauce.
Pineapple Pineapple
Add diced pineapple to the skillet during the last five minutes of cooking. The pineapple’s natural sweetness and acidity balance the richness of the sauce. This tropical twist is a crowd‑pleaser.
Bacon‑Laced Delight
Crisp a few strips of bacon, crumble them, and sprinkle over the finished bowl. The smoky, salty bacon adds a contrasting flavor that elevates the dish. It’s a hearty, indulgent variation that works well for brunch.
Storing and Bringing It Back to Life
Fridge Storage
Store the cooked bowl in an airtight container for up to 3 days in the refrigerator. The rice will stay moist, and the glaze will thicken slightly, which is actually beneficial. When you’re ready to eat, reheat on the stovetop with a splash of water to loosen the sauce.
Freezer Friendly
For longer storage, freeze individual portions in freezer bags for up to 2 months. Thaw overnight in the refrigerator before reheating. The texture remains good, and the flavors meld beautifully.
Best Reheating Method
Reheat the dish in a skillet over medium heat, adding a tablespoon of water or broth to keep the sauce from drying. Stir gently until hot, then sprinkle fresh green onions and sesame seeds. This method restores the glossy glaze and ensures the rice remains fluffy.