I remember the night I was halfway through a marathon of Netflix, craving something sweet and chewy, when I realized I had no sugar and no oven. I stared at the pantry, my eyes flicking over a jar of peanut butter, a bag of old‑fashioned oats, and a tub of dark chocolate chips that had been waiting for an excuse to escape the shelf. That moment of culinary desperation turned into a revelation: a no‑bake chocolate oat bar that could satisfy a midnight craving without a single trip to the kitchen. The next morning, I was still humming the same tune, convinced that I had stumbled onto the ultimate snack.
Picture this: a warm, buttery aroma drifting through the air as the chocolate melts into a glossy, velvety sauce that coats the oats like a silky blanket. The sound of the saucepan clinking against the heat is the soundtrack of anticipation, while the sight of the glossy mixture shimmering under the stove lamp feels almost cinematic. When you press a bar into your hand, the oats give a satisfying crunch that gives way to the smooth melt of chocolate, and a hint of nutty richness lingers on the tongue. The texture is a paradoxical blend of chewy, crunchy, and melt‑in‑your‑mouth, all wrapped in a single bite.
What sets this version apart is not just the combination of flavors but the way the ingredients dance together to create a bar that is both indulgent and wholesome. The oats provide a hearty base that keeps the bars from feeling like a sugary candy; the nut butter adds creaminess and protein; the honey or maple syrup offers natural sweetness; and the chocolate chips bring depth and a hint of bitterness that balances everything. The coconut oil binds it all together while giving a subtle tropical note that lifts the flavor profile. The result is a bar that feels like a dessert but can double as a quick energy boost for a busy day.
And here’s the kicker: I discovered a technique that turns a simple mixture into a silky, glossy coating that clings to the oats without making the bars sticky. A tiny splash of warm water in the chocolate mix creates a micro‑emulsion that gives the chocolate a smooth finish, almost like a fine‑glass glaze. This subtle tweak is the secret that elevates the bars from “good” to “mind‑blowing.” Ready to learn the steps that will make you wonder how you ever made chocolate oat bars any other way?
What Makes This Version Stand Out
- Taste: The combination of dark chocolate and nut butter delivers a rich, bittersweet flavor that satisfies the sweet tooth while keeping the sugar content in check. The natural sweetness of honey or maple syrup complements the chocolate without overpowering it.
- Texture: The oats provide a satisfying crunch that contrasts with the melt‑in‑your‑mouth chocolate coating, creating a multi‑sensory experience in every bite.
- Convenience: No oven, no baking, no waiting—just mix, press, chill, and you’re done. Ideal for busy mornings, lunch boxes, or a quick afternoon pick‑me‑up.
- Nutrition: Packed with fiber, protein, and healthy fats, these bars offer a balanced snack that fuels the body without the crash associated with refined sugar.
- Versatility: The base recipe is a playground for flavor experiments—swap nuts, add dried fruit, or sprinkle sea salt for a sweet‑savory twist.
- Make‑Ahead: The bars hold up beautifully in the fridge for up to a week and freeze for longer storage, making them perfect for meal prep.
- Ingredient Quality: Using high‑quality dark chocolate and natural nut butter ensures each bite is full of depth, not artificial flavor.
- Audience: From kids who love chocolate to health‑conscious adults, these bars appeal to a wide range of palates.
Alright, let’s break down exactly what goes into this masterpiece…
Inside the Ingredient List
The Flavor Base
The 2 cups of old‑fashioned oats are the backbone of this recipe. They provide a hearty, chewy texture that balances the sweetness of the chocolate. Oats also add a subtle nutty undertone that complements the nut butter. If you skip the oats, the bars become too soft and lose that satisfying bite.
The ¾ cup nut butter—peanut or almond—acts as the creamy binder that holds everything together. It brings protein, healthy fats, and a silky mouthfeel to the mix. Choosing a natural nut butter with no added sugars preserves the clean flavor profile. If you prefer a dairy twist, a spoonful of Greek yogurt can replace a portion of the nut butter for a tangy contrast.
The Sweetener
Half a cup of honey or maple syrup is the sweetener that brings the mixture together. Honey adds floral notes and a golden sheen, while maple syrup offers a deeper, caramel-like sweetness. Both options keep the sugar content natural and avoid the harsh spike associated with refined sugar. If you’re vegan, opt for maple syrup to keep the recipe plant‑based.
The Unexpected Star
One and a half cups of dark chocolate chips are the star of this recipe. Dark chocolate brings depth, bitterness, and a velvety texture that coats the oats perfectly. The higher cocoa percentage (70% or more) ensures a rich flavor without excessive sweetness. If you want a milder chocolate taste, use milk chocolate chips, but be prepared for a sweeter bar.
Two tablespoons of coconut oil are the secret binding agent that keeps the chocolate from seeping into the oats. Coconut oil also adds a subtle tropical aroma and helps the bars set into a firm yet tender consistency. If you’re avoiding coconut, a teaspoon of melted butter works, but the texture will shift slightly.
The Final Flourish
Chopped nuts, dried fruits, and vanilla extract are the finishing touches that elevate the flavor profile. Nuts add crunch and healthy fats; dried fruits contribute bursts of sweetness and chewiness. Vanilla extract ties everything together with a warm, aromatic note that enhances both chocolate and nuts. Skipping any of these components will change the overall experience, so keep them on hand for a truly balanced bar.
Everything’s prepped? Good. Let’s get into the real action…
The Method — Step by Step
- Heat the saucepan over medium heat and pour in the coconut oil. Allow it to melt completely, watching for a slight sheen that signals readiness. This step is crucial because it ensures the oil is fully liquefied before adding the chocolate, preventing clumping. When the oil is ready, remove the pan from heat to avoid over‑cooking the chocolate.
- Add the dark chocolate chips to the hot oil, stirring constantly until fully melted and smooth. The chocolate should have a glossy finish that looks like liquid silk. If the chocolate starts to brown, lower the heat immediately to prevent bitterness. This is the moment of truth—your chocolate must be silky, not gritty.
- Stir in the nut butter until the mixture is homogeneous. The nut butter should blend seamlessly with the chocolate, creating a thick, pourable sauce. This step ensures the oats will be evenly coated. If the mixture looks too thick, add a teaspoon of warm water to loosen it slightly.
- Pour in the honey or maple syrup and vanilla extract, whisking until the mixture is smooth and glossy. The sweetness should be balanced, not overpowering. The vanilla adds a subtle depth that enhances both the chocolate and the nut butter. This mixture should smell like a sweet, nutty, chocolatey dream.
- Fold in the oats, ensuring each oat is coated with the chocolate mixture. The oats should be evenly distributed, creating a uniform texture. If you notice clumps, gently stir again until everything is evenly coated. This step is where the magic happens—oats meet chocolate, forming the core of the bar.
- Add the chopped nuts and dried fruits, gently tossing them in so they’re evenly dispersed. The nuts add crunch, while the dried fruits introduce chewy bursts of sweetness. Be careful not to over‑mix, as you want the nuts and fruits to retain their shape. This is the moment to experiment—add a sprinkle of sea salt for a sweet‑savory twist if you’re feeling adventurous.
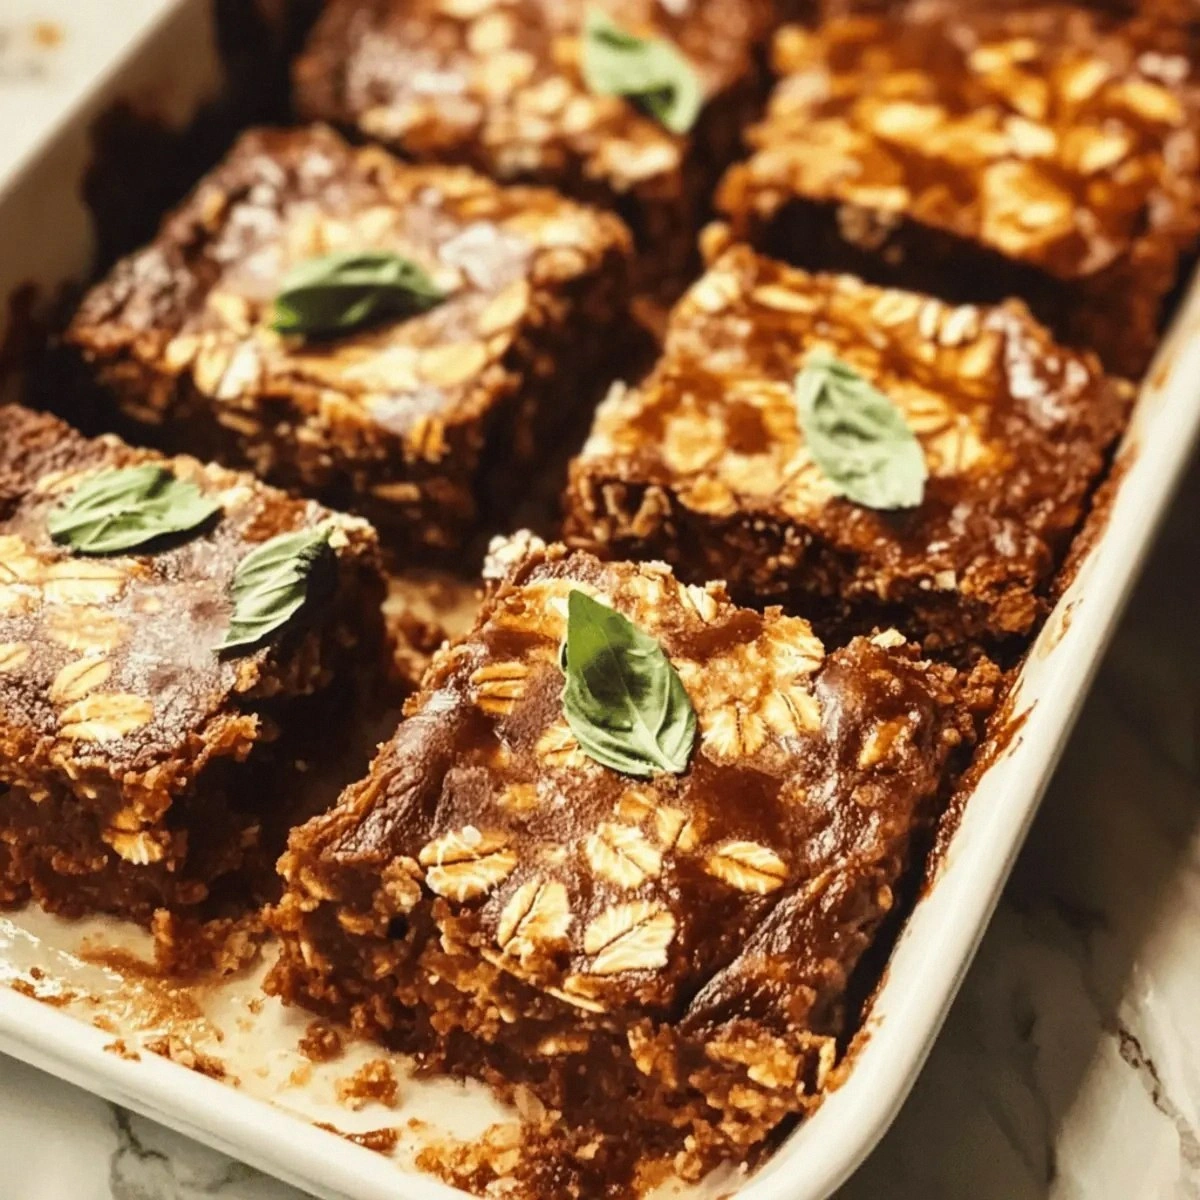
- Line a 9×9-inch square pan with parchment paper, leaving overhang on the sides for easy removal. Pour the mixture into the pan, using a spatula to press it down firmly and evenly. The more you press, the firmer the bars will set. This step ensures the bars hold together and slice cleanly later.
- Refrigerate the pan for at least 30 minutes, or until the mixture has set into a firm slab. The bars should feel solid and cool to the touch. Once set, lift the bars out of the pan using the parchment overhang and cut them into squares or rectangles. Store the bars in an airtight container at room temperature or in the fridge for up to a week.
That’s it—you did it. But hold on, I’ve got a few more tricks that will take this to another level…
Insider Tricks for Flawless Results
The Temperature Rule Nobody Follows
Chocolate is temperamental; the key is to keep it below 90°F (32°C) during melting. A thermometer is a small investment that pays off in a silky finish. If you don’t have a thermometer, test the chocolate by dipping a spoon; if it cools to a glossy sheen within 10 seconds, it’s ready.
Why Your Nose Knows Best
Before you pour the oats, give the mixture a sniff. A faint nutty aroma indicates the nut butter is well integrated, while a strong chocolate scent suggests the chocolate has taken over. Smell is the fastest way to gauge balance and avoid over‑sweetening.
The 5-Minute Rest That Changes Everything
After adding the oats, let the mixture sit for 5 minutes before pressing it into the pan. This brief rest allows the oats to absorb the chocolate coating, creating a cohesive structure. Skipping this step often results in a crumbly bar that falls apart.
The “Press Hard, Slice Easy” Technique
Use a flat-bottomed glass or a clean cutting board to press the mixture. Pressing firmly compacts the bars, ensuring they hold together when sliced. If you’re using a silicone mold, press the mixture with a spatula to eliminate air pockets.
The Secret of Even Cooling
Cool the bars at room temperature for 10 minutes before refrigerating. This step prevents condensation, which can make the bars soggy. Once the bars are firm, you can store them in airtight containers to maintain freshness.
Creative Twists and Variations
Nutty Banana Bliss
Replace half the nuts with mashed banana for a tropical twist. The banana adds natural sweetness and a creamy texture that pairs beautifully with the chocolate. This variation is perfect for those who love a fruity, nutty combo.
Spiced Chai Crunch
Add a pinch of ground cinnamon, cardamom, and ginger to the chocolate mixture. The spices bring warmth and depth, turning the bars into a cozy, aromatic treat. Ideal for chilly evenings or a chai‑themed snack.
Sea‑Salt Caramel Crunch
Swap the dried fruits for caramelized sugar crystals and sprinkle sea salt on top before chilling. The caramel adds a buttery sweetness, while the salt balances the richness. The result is a bar that feels indulgent yet balanced.
Almond‑Coconut Delight
Use almond butter and shredded coconut instead of regular nut butter. The coconut adds a chewy texture and a subtle tropical aroma. This version is a favorite among coconut lovers and those looking for a different flavor profile.
Vegan Dark Chocolate Surprise
Use a plant‑based chocolate chip and maple syrup as the sweetener. Add a splash of coconut milk to the mixture for a creamier texture. This vegan variation maintains the same mouthfeel while staying plant‑based.
Protein‑Packed Power Bar
Stir in a scoop of vanilla protein powder after the chocolate has melted. The protein powder adds a subtle flavor and boosts the bars’ protein content. Great for post‑workout snacking or a mid‑day energy boost.
Storing and Bringing It Back to Life
Fridge Storage
Store the bars in an airtight container in the refrigerator for up to one week. The cold environment keeps the chocolate firm and the oats from becoming soggy. When you’re ready to enjoy, let the bars sit at room temperature for 10 minutes for a soft, chewy bite.
Freezer Friendly
For longer storage, place the bars in a freezer‑safe bag or container and freeze for up to two months. When you’re ready to eat, thaw them at room temperature for 20 minutes. This method preserves the bars’ texture and flavor without compromising quality.
Best Reheating Method
If the bars have hardened, warm them in the microwave on low power for 10‑15 seconds. Add a tiny splash of water before reheating to steam the mixture back to perfection. This simple trick restores the bars’ silky, melt‑in‑your‑mouth quality.