Picture this: it’s 7 a.m., the alarm has been snoozed three times, and you’re already standing over a cold, empty kitchen countertop, wondering how you’re going to pull together a breakfast that doesn’t taste like a rushed microwave disaster. I’ve been there, staring at a half‑cooked egg that looks more like a sad, yellow puddle, and I vowed to never let another morning start that way again. After a series of burnt toast catastrophes and a particularly tragic incident involving a splattered skillet, I decided to take matters into my own hands and create the ultimate make‑ahead breakfast sandwich. This isn’t just any sandwich; it’s a gourmet, handheld sunrise that you can assemble on a Sunday, freeze, and then pull out on a hectic weekday like a culinary time‑machine.
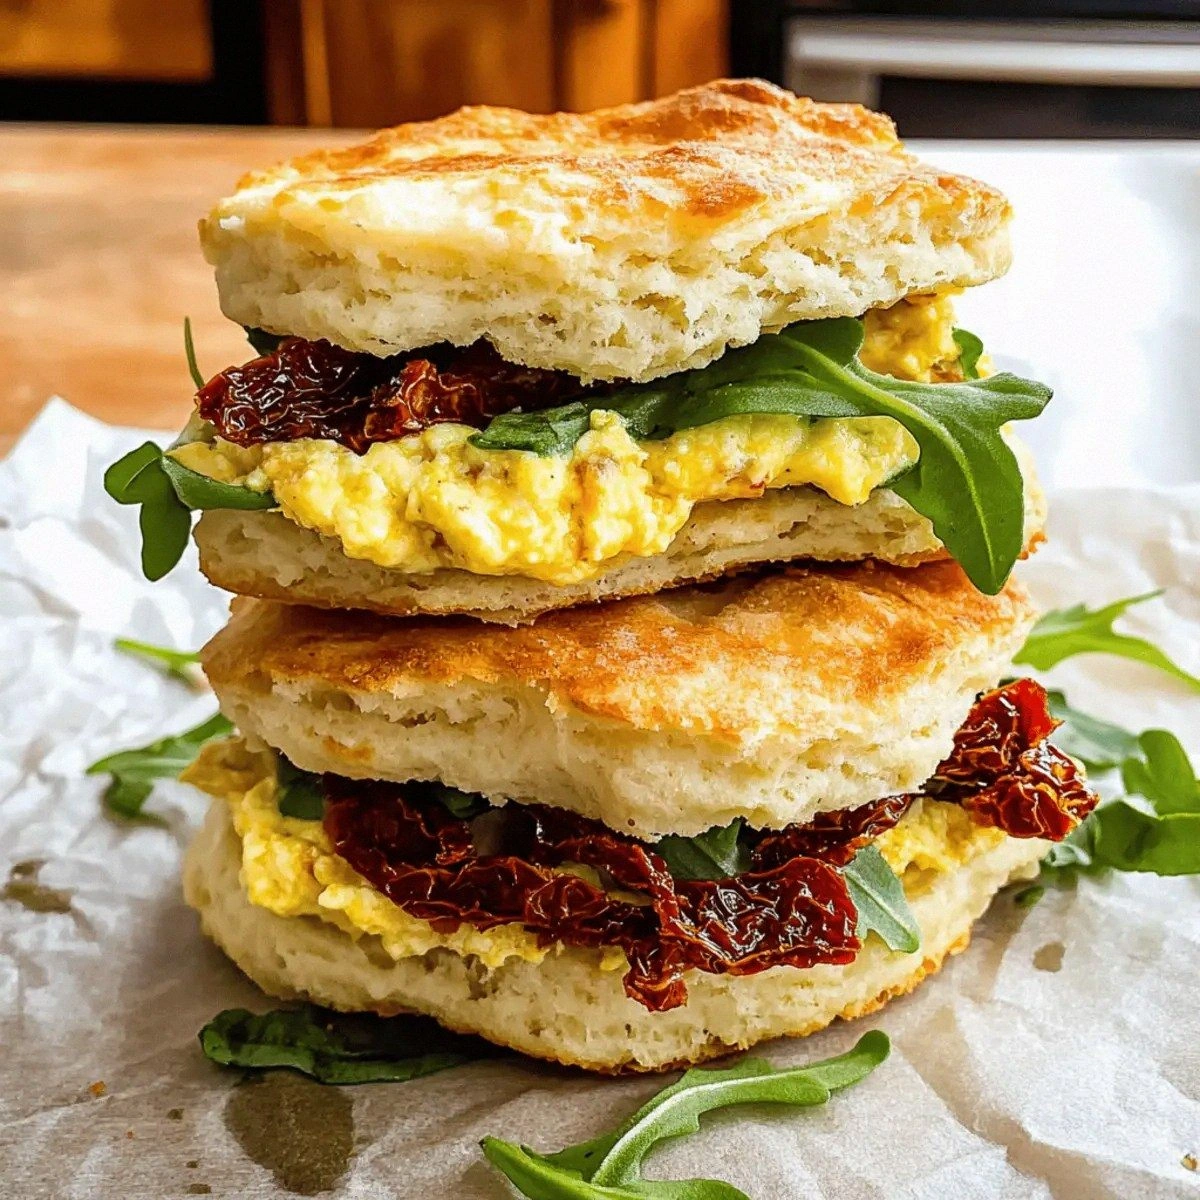
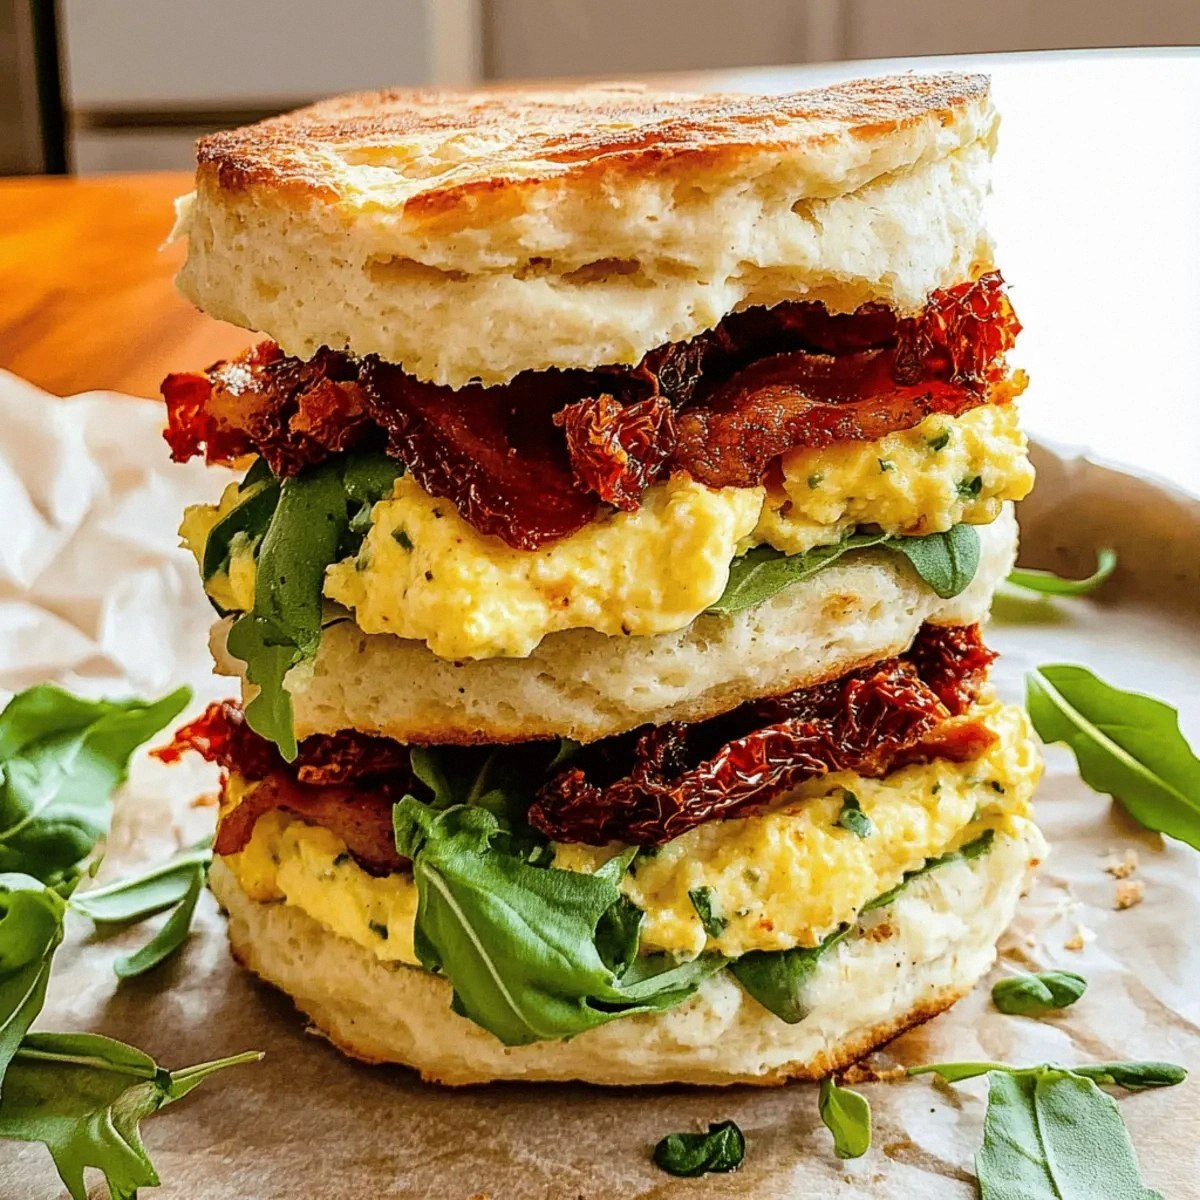
The moment you open the freezer drawer and hear the soft thud of these perfectly stacked biscuits, your nose will be greeted by a warm, buttery aroma that whispers “you’ve got this”. Imagine the first bite: a crisp biscuit exterior that gives way to a silky interior, layered with smoky bacon, a velvety egg‑and‑cheese custard that coats your palate like a luxurious blanket, and a tangy sun‑dried tomato‑garlic mayo that adds just enough zing to keep things interesting. The textures play off each other like a well‑rehearsed orchestra—crunch, cream, melt, and snap—all in perfect harmony. If you’ve ever struggled to get a breakfast that’s both satisfying and portable, this version will change the game.
Most recipes get the balance between flavor and make‑ahead convenience completely wrong. They either skimp on the sauce, leaving the sandwich dry, or they overload on moisture, resulting in a soggy mess after freezing. Here’s what actually works: a buttery biscuit base that stays tender after reheating, a carefully calibrated egg‑cheese mixture that sets into a custard rather than a rubbery slab, and a bright, herb‑infused mayo that refuses to freeze out its flavor. The secret ingredient that most home cooks overlook is a splash of lemon juice in the mayo, which cuts through the richness and keeps the sauce lively even after a week in the freezer.
Okay, ready for the game‑changer? I’m about to walk you through every single step—from assembling the biscuit dough to the final flash‑freeze technique—so that by the end, you’ll wonder how you ever made breakfast any other way. I dare you to taste this and not go back for seconds. Let’s dive in and make breakfast the best part of your day, every day.
What Makes This Version Stand Out
- Flavor Explosion: The combination of smoky bacon, sharp Parmesan, and tangy sun‑dried tomato mayo creates a layered taste that evolves with each bite, delivering umami, acidity, and a hint of sweetness.
- Texture Symphony: A flaky, buttery biscuit exterior meets a creamy egg‑cheese custard interior, while the crisp bacon adds a satisfying crunch that never gets soggy.
- Make‑Ahead Magic: Every component is designed to survive the freezer, so you can prep a batch on Sunday and have gourmet breakfasts ready all week long.
- Simple Ingredients, Elevated Result: Using store‑bought Pillsbury Grand Buttermilk Biscuits saves time, yet the added cheese and herbs transform them into something restaurant‑worthy.
- Crowd‑Pleaser Factor: Whether you’re feeding a family, a brunch crowd, or just yourself, these sandwiches earn rave reviews and disappear faster than you can say “second round”.
- Ingredient Quality: High‑fat butter in the biscuits, real bacon, and fresh garlic give depth that cheap shortcuts can’t match.
- Cooking Method: Baking the assembled sandwiches ensures even heat distribution, locking in moisture while creating a golden crust.
- Freezer Friendly: The sandwich holds up to a full week in the freezer without losing structural integrity, thanks to the careful balance of moisture and fat.
Inside the Ingredient List
The Flavor Base
The sun‑dried tomato mayo is the unsung hero of this sandwich. Sun‑dried tomatoes bring a concentrated, sweet‑tart flavor that pairs beautifully with the richness of butter and cheese. When blended with mayonnaise, garlic, and a splash of lemon juice, the mixture becomes a silky spread that coats each bite like velvet. If you skip this, you’ll miss out on the bright contrast that prevents the sandwich from feeling overly heavy. A quick tip: use the oil from the sun‑dried tomatoes for extra depth, but be mindful of the added fat.
The Texture Crew
Biscuits are the foundation, and the Pillsbury Grand Buttermilk Biscuits are a game‑changer because they already contain the perfect ratio of flour, butter, and leavening. This ensures a light, airy crumb that stays tender after freezing. The eggs, combined with milk and cheeses, create a custard that sets into a silky layer—think of it as a breakfast version of a soufflé. If you over‑beat the eggs, you’ll get a rubbery texture; whisk just until blended. For a richer custard, you can swap half the milk for heavy cream, but the recipe works beautifully as written.
The Unexpected Star
Bacon brings smoky crunch, but the secret is to use cooked strips that are still a touch pliable. This allows the bacon to meld into the sandwich without breaking apart during the freeze‑thaw cycle. If you love extra crunch, crisp the bacon a little longer, but be careful—over‑cooked bacon can become brittle and crumble. A handy swap: turkey bacon works for a lighter version, though you’ll lose some of that deep, porky flavor.
The Final Flourish
Parmesan and mozzarella cheeses work together to give a sharp bite and a melt that stretches like a sunrise. Parmesan adds a salty, nutty edge, while mozzarella contributes a creamy pull. The dried herbs and spices—think oregano, thyme, and a pinch of red pepper flakes—bring aromatic depth that awakens the senses. If you’re feeling adventurous, a dash of smoked paprika can elevate the smoky profile. Remember, seasoning is your best friend; taste the custard mixture before assembling and adjust accordingly.
Everything's prepped? Good. Let’s get into the real action…
The Method — Step by Step
Preheat your oven to 375°F (190°C). While the oven warms up, line a large baking sheet with parchment paper. This is the moment of truth: the heat must be steady, not a rollercoaster, because a consistent temperature ensures the biscuits rise evenly and the custard sets without curdling. If you hear a faint sizzle as the biscuits hit the sheet, you’re on the right track.
Separate the Pillsbury biscuits and flatten each one into a 4‑inch circle using a rolling pin. Place a spoonful of the egg‑cheese mixture (see step 4) in the center of each circle, then fold the edges over to create a pocket, sealing the edges with a gentle pinch. This technique creates a sealed envelope that prevents the filling from leaking during baking. Pro tip: brush the tops lightly with melted butter for a golden finish.
Kitchen Hack: If the biscuit dough tears, press the edges together with a fork; the tines create a decorative seal and add extra crunch.Arrange the stuffed biscuits on the prepared baking sheet, leaving a half‑inch of space between each. Sprinkle the cooked bacon strips over the tops, pressing them lightly so they adhere to the buttered biscuit surface. The bacon’s fat will melt into the biscuit, adding flavor and keeping the interior moist during the freeze‑thaw cycle.
In a mixing bowl, whisk together the 6 large eggs, 0.25 cup milk, 0.5 cup Parmesan, 0.5 cup mozzarella, 0.5 cup mayonnaise, 0.25 cup sun‑dried tomatoes, the minced garlic clove, and the tablespoon of lemon juice. Season with dried herbs, spices, and a pinch of salt. Watch Out: Over‑whisking will incorporate too much air, leading to a fluffy but unstable custard that can separate when reheated.
Watch Out: Adding the lemon juice too early can cause the mayonnaise to curdle; blend it in at the very end for a smooth emulsion.Transfer the mixing bowl to the stove over medium‑low heat. Stir constantly with a silicone spatula, scraping the bottom and sides, until the mixture thickens and coats the back of the spoon—about 5‑7 minutes. You’ll notice the edges start pulling away from the pan; that’s your cue that the custard is ready. Remove from heat and let it cool slightly before filling the biscuit pockets.
Kitchen Hack: To speed up cooling, spread the custard on a shallow dish; the larger surface area releases heat faster.Fill each biscuit pocket with a generous spoonful of the cooled custard, then top with the bacon strips if you haven’t already done so. Press the edges together once more to seal the sandwich completely. This final seal is crucial; it prevents the custard from oozing out during the freeze‑thaw process, keeping everything tidy and delicious.
Place the assembled sandwiches back on the baking sheet and bake for 12‑15 minutes, or until the biscuit tops turn a deep golden‑brown and the custard is set in the middle. You’ll know they’re done when a gentle jiggle in the center stops and the edges pull away from the pan. Let the sandwiches cool on a wire rack for at least 10 minutes; this cooling step locks in the texture and prevents sogginess when you freeze them.
Once completely cooled, wrap each sandwich individually in parchment paper, then place them in a freezer‑safe zip‑top bag. Press out as much air as possible to avoid freezer burn. For extra protection, store the bag in a sturdy airtight container. When you’re ready to eat, simply pop a sandwich into the oven at 350°F for 10‑12 minutes, or microwave for 90 seconds, adding a splash of water to keep it moist.
That’s it — you did it. But hold on, I've got a few more tricks that'll take this to another level. Stay with me here — this is worth it.
Insider Tricks for Flawless Results
The Temperature Rule Nobody Follows
Never bake these sandwiches at a temperature lower than 350°F. Lower heat causes the biscuit to dry out before the custard sets, resulting in a rubbery interior. I once tried a “gentle bake” at 325°F and learned the hard way that the biscuits turned into bread‑like discs. The correct heat creates a crisp crust while the inside stays soft and creamy. Trust the oven; it’s your secret weapon.
Why Your Nose Knows Best
Before you even open the oven, let your nose do the tasting. A subtle buttery aroma signals that the biscuits are perfectly baked, while a faint cheesy perfume tells you the custard is set. If you smell any burnt notes, pull the tray out immediately—over‑baking can happen quickly, especially near the edges. Your sense of smell is a reliable gauge for doneness, more accurate than a timer alone.
The 5‑Minute Rest That Changes Everything
After baking, let the sandwiches rest on a wire rack for exactly five minutes. This short pause allows the steam to escape, preventing soggy bottoms when you freeze them. It also gives the custard a chance to firm up, making it easier to wrap without spilling. Skipping this rest is a common mistake that leads to a mushy mess later.
Freezer‑Proof Packaging
Use parchment paper between each sandwich before sealing the bag. This prevents them from sticking together, so you can pull out a single sandwich without a battle. I’ve tried stacking them directly, and the result was a frozen pancake of biscuits—hardly appetizing. The paper acts as a tiny barrier that also absorbs any excess moisture.
Reheat Like a Pro
When reheating, add a teaspoon of water to the sandwich before covering it with foil. The steam generated revives the biscuit’s fluffiness and prevents the custard from drying out. If you microwave, use a microwave‑safe cup of water alongside the sandwich; the steam in the cup will gently re‑hydrate the bread. This trick saves you from a rubbery, overcooked texture.
Creative Twists and Variations
This recipe is a playground. Here are some of my favorite ways to switch things up:
Spicy Southwest
Swap the sun‑dried tomato mayo for a chipotle‑lime aioli, add a slice of avocado, and replace the Parmesan with cotija cheese. The smoky chipotle pairs beautifully with the bacon, while the lime brightens the overall profile.
Herb‑Garden Delight
Incorporate fresh basil, chives, and dill into the custard, and use a pesto‑infused mayo instead of the sun‑dried tomato version. This gives the sandwich a garden‑fresh vibe that’s perfect for spring brunches.
Cheesy Bacon Explosion
Double the mozzarella and sprinkle a thin layer of sharp cheddar on top before baking. The extra cheese creates a gooey pull that rivals the best grilled cheese, while the bacon becomes even more indulgent.
Veggie‑Boosted
Add thinly sliced sautéed spinach or roasted red peppers to the custard mixture. The veggies add color, nutrition, and a subtle sweetness that balances the salty bacon.
Breakfast for Dinner
Serve the sandwiches with a side of roasted potatoes and a drizzle of hot sauce. The hearty carbs and heat turn this breakfast staple into a satisfying dinner option.
Storing and Bringing It Back to Life
Fridge Storage
If you plan to eat the sandwiches within three days, store them in an airtight container in the refrigerator. They’ll stay fresh for up to 72 hours, and you can reheat them in a toaster oven for a quick snack.
Freezer Friendly
For longer storage, wrap each sandwich individually in parchment paper, then place them in a zip‑top freezer bag. They’ll keep for up to seven days without losing texture or flavor. Remember to label the bag with the date so you don’t lose track.
Best Reheating Method
Preheat your oven to 350°F, remove the parchment, and place the frozen sandwich on a baking sheet. Bake for 12‑15 minutes, or until the biscuit is golden and the interior is steaming. For a faster option, microwave on high for 90 seconds, then finish under the broiler for 1‑2 minutes to crisp the top. Add a tiny splash of water before reheating to create steam and revive the biscuit’s fluffiness.