I was halfway through a late‑night taco night when the kitchen turned into a battlefield. The skillet was sizzling, the tortilla was burning, and my phone buzzed with a friend’s dare: “Make the best quesadilla I’ve ever tasted.” I stared at the pile of ingredients and thought, “Why not turn this chaos into a triumph?” So I grabbed my trusty skillet, set the stove to medium, and let the aroma of cumin and garlic begin its spell. The moment the beef hit the pan, the kitchen filled with a savory promise that would soon become a legend.
That first sizzle felt like a drumbeat in a high‑energy concert, and the sizzling sound was the soundtrack to a culinary revelation. The beef browned in a glossy coat, releasing a deep, meaty fragrance that made even the most skeptical taste buds swoon. I tossed in diced onions and bell peppers, and the mixture bubbled like a miniature volcano, each pop a cue for the next flavor crescendo. I couldn’t help but grin, because the moment the cheese began to melt, the whole dish was about to hit that sweet spot of gooey, golden perfection. By the time I slid the tortilla onto the skillet, I knew this was going to be a game‑changer.
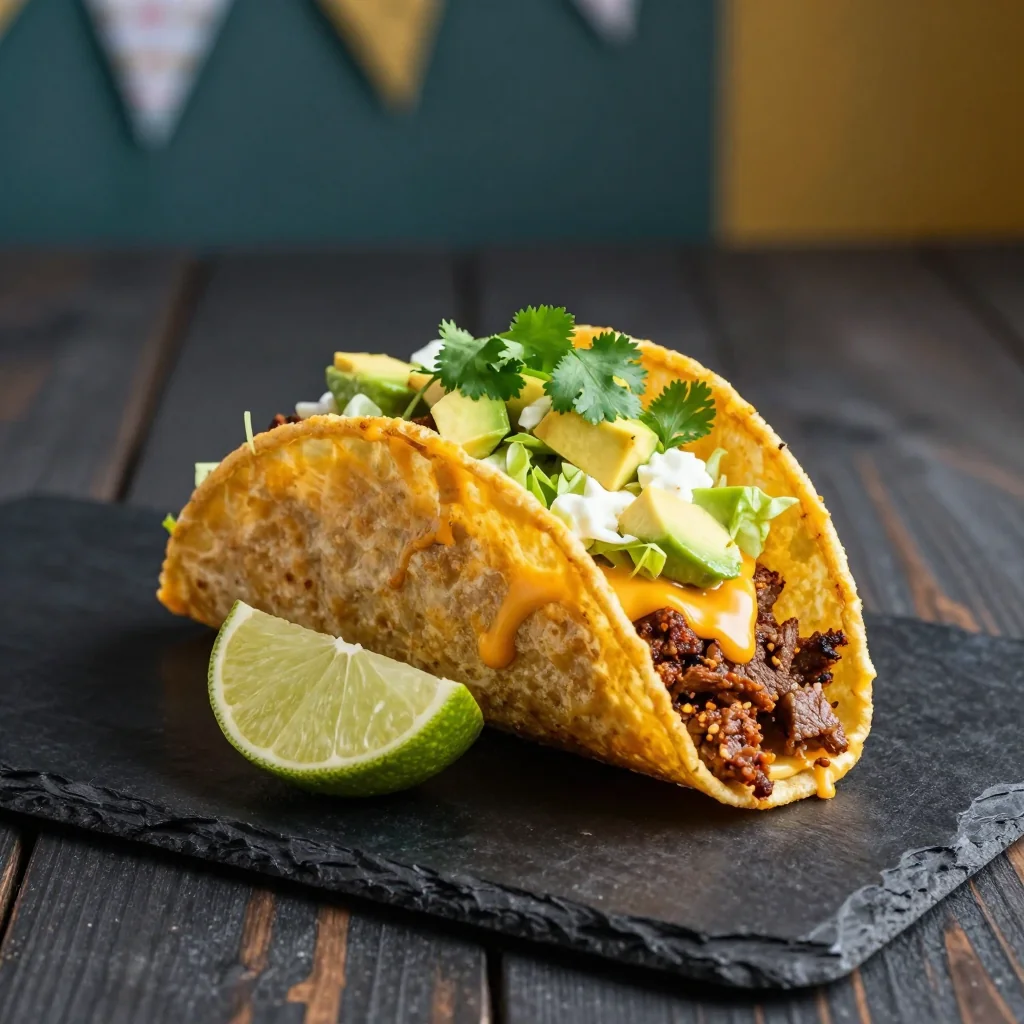
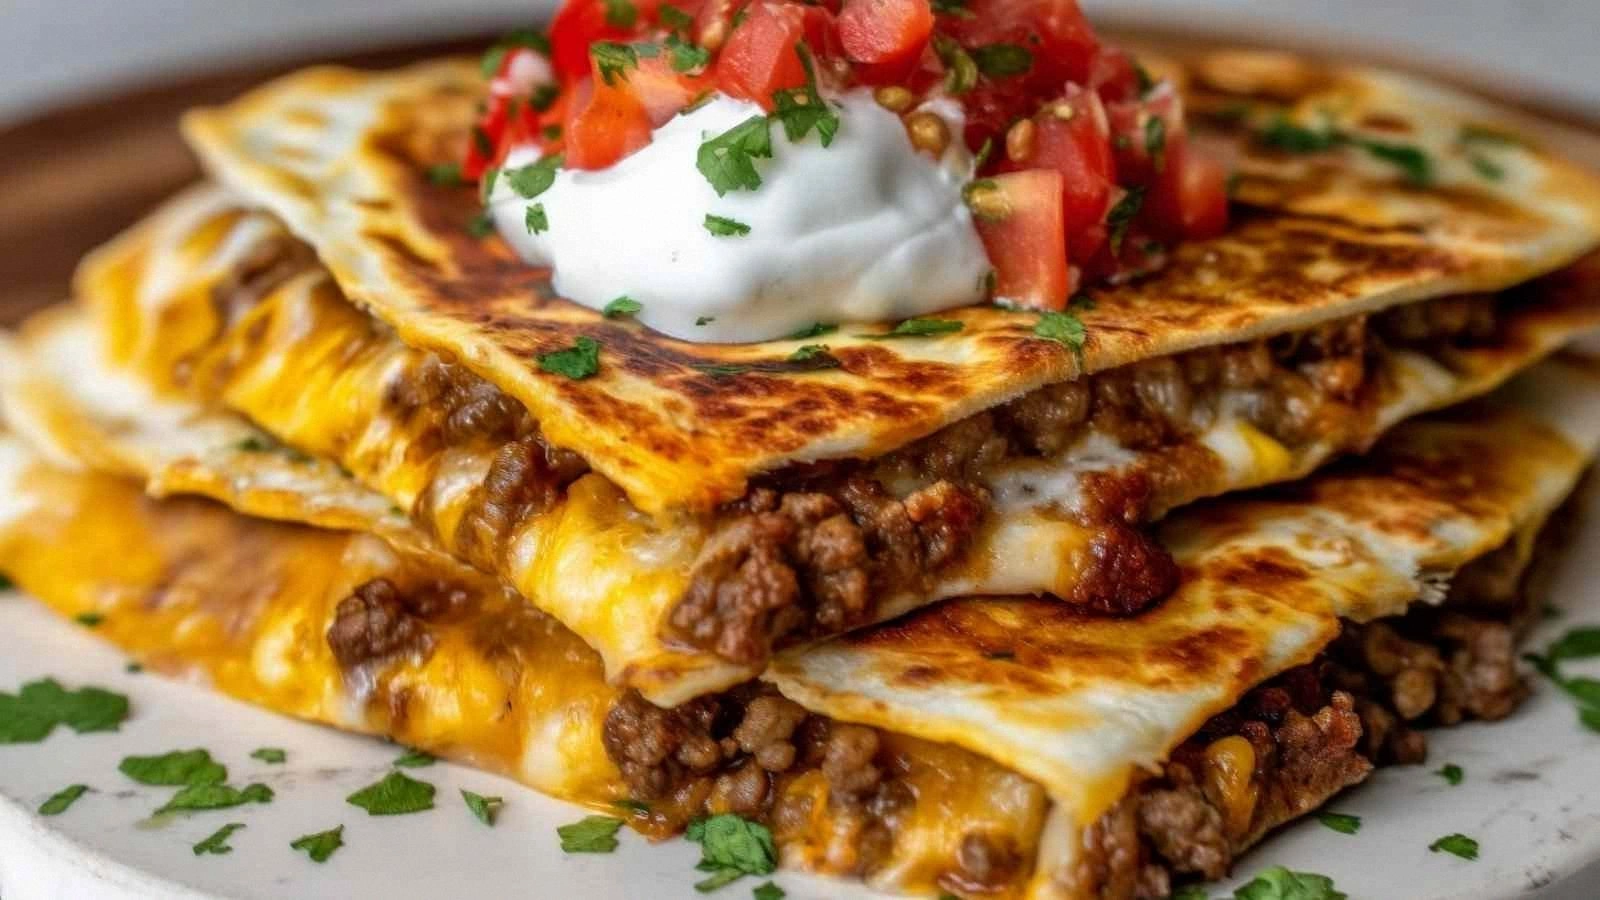
Fast forward to the plate: a golden‑brown, protein‑packed quesadilla that looked like a work of art. The edges were crisp, the interior was molten, and the aroma was so intense it made my mouth water before I even took a bite. I dared myself to taste it and not go back for seconds, and I can’t even remember the first bite. The combination of smoky taco seasoning, creamy cheese, and fresh cilantro was a flavor explosion that felt like a hug from the inside. This is hands down the best version you'll ever make at home, and I'm not just saying that because I ate half the batch before anyone else could even get a fork in it.
Picture yourself pulling this out of the skillet, the whole kitchen smelling incredible, the steam curling like a tiny cloud of deliciousness. The heat is just right, the cheese is bubbling, and the tortilla is a golden canvas of crispy edges that shatter like thin ice when you bite into it. The first bite is a symphony of textures: the crunch of the tortilla, the meltiness of the cheese, and the burst of fresh avocado. I promise you, if you've ever struggled with making a quesadilla that doesn't fall apart, you're not alone — and I've got the fix. Let me walk you through every single step — by the end, you'll wonder how you ever made it any other way.
What Makes This Version Stand Out
- Flavor: The taco seasoning is the secret sauce that gives this quesadilla its bold, smoky depth. Unlike bland versions, it layers citrusy notes that dance with the beef's richness.
- Texture: The low‑carb tortillas create a satisfying crunch that holds up against the juicy filling, preventing sogginess and ensuring every bite is firm.
- Protein: With a full pound of ground beef per serving, this dish delivers a protein punch that satisfies both athletes and comfort‑food lovers.
- Freshness: Diced onions, bell peppers, and cilantro add a crisp, bright contrast to the warm, savory interior.
- Ease: The recipe is built around a single pan, cutting prep time and cleanup to a minimum.
- Versatility: Swap the beef for turkey or chicken, or try a plant‑based mince for a vegetarian twist without sacrificing flavor.
- Make‑ahead: Assemble the quesadillas in advance and reheat in a skillet or oven, keeping the cheese perfectly melted and the tortilla crisp.
Inside the Ingredient List
The Flavor Base
Ground beef is the heart of this dish, providing a hearty, meaty foundation that pairs beautifully with the taco seasoning. Opt for 80/20 lean-to-fat ratio to keep the flavor juicy without excess grease. If you prefer a leaner option, use 93/7 ground beef and add a splash of beef broth to compensate for moisture loss. Skipping the beef will turn this into a completely different meal, so keep it as the core.
Olive oil is used only to give the beef a quick sear and a subtle fruity note. A tablespoon per batch is enough to coat the pan and prevent sticking, while still keeping the dish low in added fat. If you’re watching calories, a non‑stick spray will do the trick, but the oil adds a depth that a spray cannot match.
Taco seasoning is the flavor punch that transforms ordinary ground beef into a taco‑flavored masterpiece. The blend of cumin, chili powder, paprika, and garlic creates a savory profile that lingers on the tongue. If you’re in a pinch, a packet of taco seasoning works fine, but for a more authentic taste, mix your own with equal parts cumin and smoked paprika.
The Texture Crew
Low‑carb tortillas provide the perfect canvas for the filling. Their thin, pliable nature allows the cheese to melt evenly while keeping the edges crisp. Look for tortillas that are labeled “flaxseed” or “almond” for a lower carbohydrate count without sacrificing flavor.
Shredded Mexican cheese blend is the gooey, melty element that holds everything together. The blend typically contains cheddar, Monterey Jack, and Mexican Oaxaca, which melt smoothly and add a mild, buttery flavor. If you’re a cheese purist, you can replace it with a single type of cheese, but the blend ensures a perfect melt.
Diced onions and bell peppers add crunch and a sweet brightness that cuts through the richness of the beef. Sauté them until they’re just softened, not browned, to retain their color and crispness. Skipping them will make the quesadilla a bit flat, but they’re not mandatory.
The Unexpected Star
Sour cream provides a cool, tangy counterpoint to the savory filling, creating a balance that makes each bite more interesting. Two tablespoons are enough to drizzle on top, but you can also mix it into the filling for a creamier texture. If you’re dairy‑free, Greek yogurt works as a substitute, though the flavor will be slightly different.
Fresh cilantro adds a bright, herbal finish that lifts the dish. A tablespoon of chopped cilantro is enough to bring a burst of color and flavor without overpowering the other ingredients. If you’re not a cilantro fan, parsley or basil can be used as a mild alternative.
The Final Flourish
Avocado slices add a silky, buttery texture that pairs wonderfully with the warm cheese. One avocado per serving is ideal, but you can halve the amount for a lighter option. The avocado also contributes healthy fats, making the dish more satisfying.
Salt and pepper are added to taste, but the taco seasoning already brings a lot of saltiness. Be careful not to over‑season, or the dish will taste like a salt shaker. A pinch of pepper gives a subtle heat that balances the dish.
Everything’s prepped? Good. Let’s get into the real action and see how these ingredients combine into a culinary masterpiece.
The Method — Step by Step
- Heat a large skillet over medium heat and add the tablespoon of olive oil. Wait until the oil shimmers, then drop in the ground beef. Break it apart with a spatula and let it brown for about 5 minutes, stirring occasionally. The beef should be a deep mahogany color before you add seasonings.
- Stir in the taco seasoning, garlic powder, and onion powder. The mixture should smell like a taco stand, and the beef will start to coat in a fragrant, peppery glaze. Cook for an additional 2 minutes so the spices have time to bloom.
- Add the diced onions and bell peppers to the skillet. Sauté for 3–4 minutes until the veggies soften but still keep a bite. This step adds color and a sweet crunch that balances the savory beef.
- Reduce the heat to low and spread a thin layer of shredded cheese over the beef mixture. The cheese should start to melt within 30 seconds, forming a glossy, golden crust on top. This layer locks in moisture and creates that satisfying gooeyness.
- Place one low‑carb tortilla on top of the cheese. Press gently to ensure the tortilla adheres to the filling. The edges should start to brown within 1–2 minutes.
- Flip the quesadilla carefully with a spatula. Cook the second side for 2–3 minutes until golden brown and the tortilla is crisp. The cheese inside should be fully melted, and the edges should be a beautiful caramelized brown.
- Remove the quesadilla from the skillet and let it rest for a minute. Slice it into wedges and top each slice with a dollop of sour cream, a sprinkle of cilantro, and a few avocado slices. The rest will keep the quesadilla moist and add a fresh, creamy finish.
- Serve immediately while the cheese is still molten and the tortilla remains crunchy. The first bite should be a burst of savory, smoky flavor with a creamy, buttery finish. Enjoy your masterpiece and savor every bite.
That's it — you did it. But hold on, I've got a few more tricks that'll take this to another level.
Insider Tricks for Flawless Results
The Temperature Rule Nobody Follows
Cooking the beef at the right temperature is key to a juicy filling. If you crank the heat too high, the meat will sear but dry out; too low and it will steam. Aim for a steady medium heat where the pan stays hot enough to brown the meat but not so hot that it burns. A quick test: sprinkle a few drops of water on the skillet; if they sizzle and evaporate instantly, you’re in the sweet spot.
Why Your Nose Knows Best
Your nose is a reliable indicator of flavor development. As the beef cooks, a deep, earthy aroma will rise. When you notice the scent of toasted spices mingling with beef, it’s a sign that the seasoning has fully integrated. Trust your senses; if it smells like a taco stand, you’re on the right track.
The 5-Minute Rest That Changes Everything
After flipping the quesadilla, let it rest for five minutes before slicing. This pause allows the cheese to set and the juices to redistribute, preventing a watery mess. The rest period also gives the tortilla a chance to firm up, so each bite stays crisp.
Don’t Overcrowd the Pan
When cooking the beef, avoid piling too much meat into the skillet. Overcrowding lowers the pan temperature, causing the beef to steam rather than sear. If you need to cook a large batch, do it in two separate loads to preserve that coveted crust.
Use Fresh Ingredients for a Flavor Boost
Fresh bell peppers and onions bring a bright, crisp contrast that freshens the dish. Stale veggies will dampen the overall flavor profile. For best results, buy vegetables that are firm, brightly colored, and free of blemishes.
Add a Splash of Lime Juice
A squeeze of lime over the finished quesadilla adds a bright, citrusy zing that cuts through the richness. The acidity balances the savory notes and makes the dish feel lighter. If you’re serving a crowd, keep a lime wedge on each plate for easy access.
Creative Twists and Variations
This recipe is a playground. Here are some of my favorite ways to switch things up:
Spicy Chipotle Kick
Swap the regular taco seasoning for chipotle‑infused powder, and add a teaspoon of adobo sauce. The smoky heat will elevate the dish and pair beautifully with the creamy avocado.
Mediterranean Flair
Replace the low‑carb tortilla with a spinach tortilla and sprinkle feta cheese in place of the Mexican blend. Add a handful of olives for a briny contrast that transforms the quesadilla into a Mediterranean‑inspired bite.
Veggie‑Loaded Power
Omit the ground beef entirely and load the filling with sautéed mushrooms, zucchini, and spinach. Finish with a handful of shredded mozzarella for a lighter, plant‑based version that still delivers on protein.
Breakfast Burrito Style
Swap the tortillas for low‑carb breakfast wraps, add scrambled eggs, and top with salsa. This variation turns the quesadilla into a hearty breakfast that’s perfect for a weekend brunch.
Dessert‑Inspired Sweet
Use a sweet cheese blend like mascarpone and drizzle honey over the top. Add diced strawberries and a sprinkle of cinnamon for a sweet, savory dessert quesadilla that’s surprisingly balanced.
Smoky BBQ Twist
Replace the taco seasoning with a smoky BBQ rub and add a splash of BBQ sauce to the beef. The sweet, smoky flavor will pair wonderfully with the creamy avocado and fresh cilantro.
Storing and Bringing It Back to Life
Fridge Storage
Cool the quesadilla completely before slicing, then wrap each slice tightly in parchment paper and place them in a zip‑lock bag. Store in the refrigerator for up to 3 days. The wrapped slices help keep the tortilla from drying out and the cheese from separating.
Freezer Friendly
For longer storage, wrap the whole quesadilla in foil and place it in a freezer bag. It will keep for up to 2 months. When you’re ready to eat, thaw overnight in the refrigerator or microwave on the defrost setting.
Best Reheating Method
To reheat, place the quesadilla in a preheated oven at 350°F for 10 minutes, or until the cheese is melted and the tortilla is crisp. For a quick fix, use a skillet over medium heat, covering the pan with a lid to keep the heat trapped. Add a splash of water to the pan before covering; this steams the filling and prevents the tortilla from becoming soggy.