It started with a kitchen nightmare that still makes me laugh when I think about it. I was chasing a midnight craving for chocolate, and the blender decided to turn my counter into a sticky, chocolaty mess. The pot exploded, the stove flared, and I was left staring at a ruined batch of chocolate fudge that tasted like burnt toast. I vowed then that my next chocolate creation would be flawless, silky, and utterly irresistible.
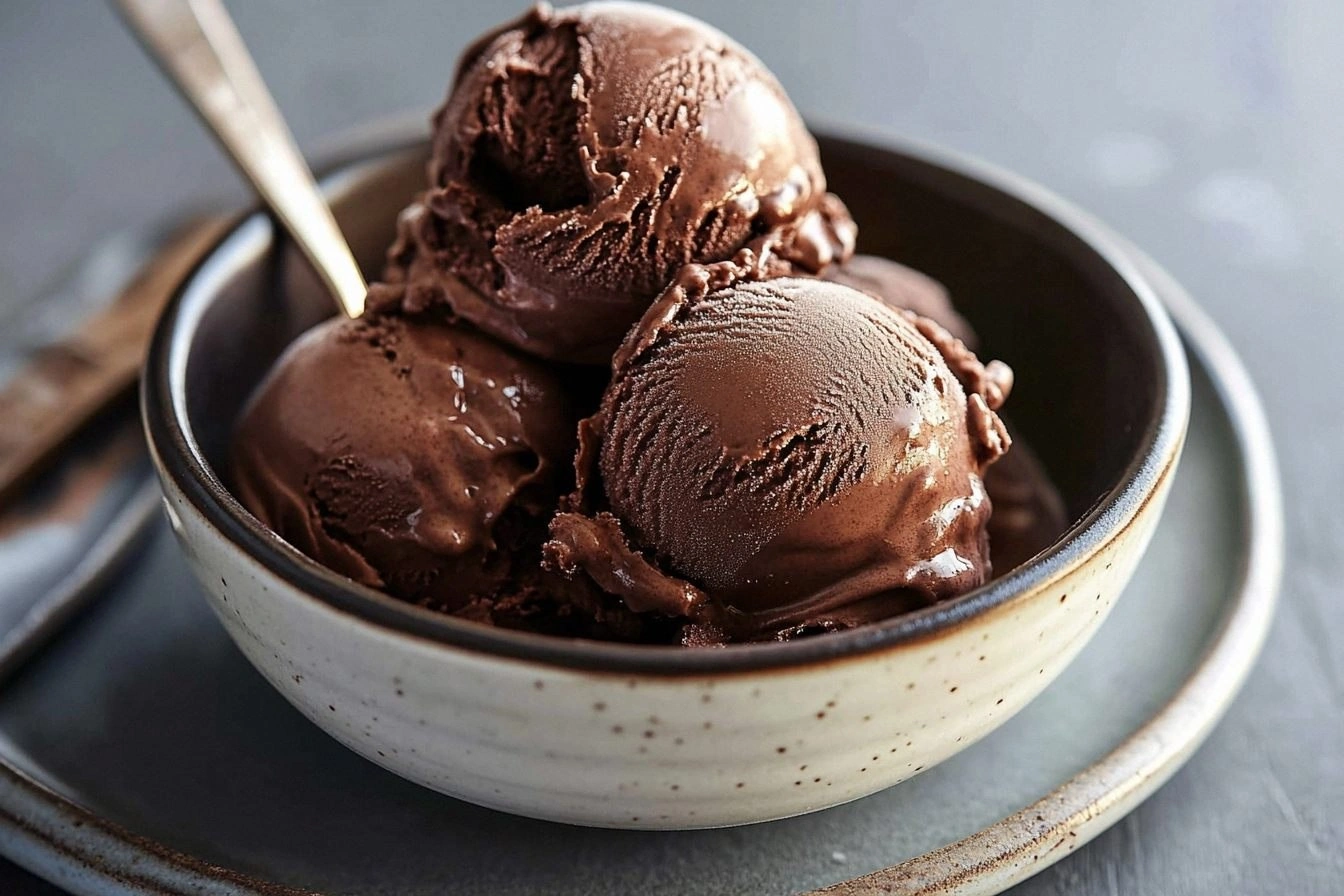
Picture the scene: the air thick with the aroma of dark cocoa, the gentle hiss of a simmering mixture, and the bright flash of a spoon stirring a velvety base. The sound of milk gently steaming is the soundtrack to a moment of pure anticipation, while the glossy sheen of heavy cream invites you to imagine a cloud of flavor. Every ingredient feels like a character in a story, each one adding a layer to the narrative of taste. The texture is already hinting at the richness that will unfold as the ice cream sets. I can almost taste the first bite, the way chocolate melts like a secret whispered in your mouth.
What makes this version stand out is a blend of technique and ingredient purity that most recipes ignore. I used unsweetened high‑quality cocoa, not instant chocolate, to keep the flavor deep and unadulterated. Egg yolks act as natural emulsifiers, creating a silky mouthfeel that feels like velvet on the tongue. The ratio of cream to milk is carefully calibrated to balance richness without heaviness. I added a pinch of salt to lift the chocolate’s natural bitterness, a trick that turns an ordinary dessert into something extraordinary. The result is a chocolate ice cream that is both decadent and surprisingly light.
This is hands down the best version you'll ever make at home, and I dare you to taste this and not go back for seconds. The secret lies in a simple, unpretentious process that I’ll walk you through step by step. I’ll share the little hacks that have saved me from countless failures and the bold choices that elevate the flavor. Stay with me, and by the end of this post you’ll wonder how you ever made it any other way. Let me walk you through every single step — by the end, you'll wonder how you ever made it any other way.
What Makes This Version Stand Out
- Richness: Heavy cream provides a lush base that coats the tongue like silk, ensuring each spoonful feels indulgent.
- Depth: Unsweetened cocoa delivers a true chocolate experience, free from the artificial sweetness of commercial mixes.
- Texture: Egg yolks act as emulsifiers, creating a smooth, almost liquid consistency that resists ice crystals.
- Simplicity: The recipe requires only seven ingredients, yet the flavor profile is complex and layered.
- Balance: A pinch of salt cuts through the sweetness, giving the ice cream a well‑rounded finish.
- Make‑ahead: This ice cream can be prepared a day in advance, making it perfect for parties or last‑minute dessert needs.
- Versatility: The base can be swirled with caramel, fruit, or a splash of espresso for endless variations.
- Audience: Whether you’re a novice or a seasoned chef, the method is straightforward and forgiving.
Alright, let's break down exactly what goes into this masterpiece.
Inside the Ingredient List
The Flavor Base
Heavy cream is the star that delivers a buttery, indulgent mouthfeel. It’s the reason this ice cream feels like a dessert you’d find in a high‑end patisserie. The fat content in cream is essential for carrying cocoa’s complex notes, allowing each bite to linger on the palate. If you skip cream, the result becomes thin and watery, lacking that signature richness. For those who prefer a lighter version, you can replace half the cream with whole milk, but the flavor will shift toward a milder profile.
The Texture Crew
Whole milk balances the fat content, creating a silky base without over‑weighting the mixture. The milk also helps dissolve sugar evenly, ensuring the ice cream doesn’t develop grainy crystals. Skipping milk will make the mixture too dense and difficult to churn properly. If you’re lactose intolerant, oat or almond milk can substitute, but the texture will be noticeably different.
The Unexpected Star
Unsweetened cocoa powder is the backbone of this dessert, offering a deep, intense chocolate flavor. Using a high‑quality, fine‑ground cocoa prevents gritty residues and enhances the overall mouthfeel. If you accidentally add sweetened cocoa, the final product will be overly sweet, masking the natural bitterness that balances the chocolate. A good tip is to sift the cocoa before mixing to avoid clumps.
The Final Flourish
Granulated sugar sweetens the ice cream evenly without overpowering the chocolate taste. It also plays a role in lowering the freezing point, helping the mixture stay smooth. Egg yolks act as natural emulsifiers, binding fat and water to create a velvety texture. Vanilla extract adds a subtle warmth, deepening the chocolate notes. A pinch of salt lifts the overall flavor, enhancing the richness and balancing sweetness.
Everything's prepped? Good. Let's get into the real action.
The Method — Step by Step
- Prepare the base: In a medium saucepan, combine heavy cream, whole milk, and a pinch of salt. Heat over medium heat until the mixture just begins to steam, but do not let it boil. The goal is to warm the liquids enough to dissolve the sugar and cocoa. This step is critical; a sudden boil can scorch the dairy and ruin the flavor. Keep an eye on the surface—tiny bubbles should form, not a rolling boil.
- Sift and add cocoa: While the liquid warms, sift the unsweetened cocoa into a small bowl to remove any lumps. Gradually whisk the cocoa into the saucepan, ensuring a smooth blend. The mixture should look glossy and uniform, free of gritty particles. This step is where the chocolate’s depth begins to unfold. A smooth base will prevent grainy textures in the final ice cream.
- Sweeten the mix: Stir in the granulated sugar until it’s fully dissolved. The sugar not only sweetens but also lowers the freezing point, which keeps the ice cream silky. Let the mixture cool to a lukewarm temperature before moving on; this prevents the egg yolks from cooking prematurely. A quick test: touch the mixture—if it feels warm but not hot, you’re ready to proceed. This careful temperature control is a secret to smooth ice cream.
- Whisk the yolks: In a separate bowl, beat the egg yolks until they’re pale and slightly thick. Slowly pour a small amount of the warm milk mixture into the yolks while whisking constantly. This tempering step prevents the yolks from curdling. Once blended, pour the yolk mixture back into the saucepan. The mixture should thicken slightly as it cooks, forming a custard base.
- Cook the custard: Reduce the heat to low and cook the mixture, stirring constantly, until it coats the back of a spoon. This process should take about 5 to 7 minutes. The custard must not reach a full boil; a rolling boil will scramble the yolks. The custard should be thick enough to leave a visible trace when you lift a spoon. This is the moment of truth—if the custard doesn’t thicken, your ice cream will be watery.
- Add vanilla: Remove the saucepan from heat and stir in the vanilla extract. The vanilla adds warmth and depth, balancing the bitterness of the cocoa. Let the custard cool completely at room temperature; this may take 30 minutes. A quick way to test is to press a finger into the custard—if it leaves a clean line, it’s cool enough. This cooling step is essential for preventing a grainy texture.
- Chill the mixture: Transfer the custard to a shallow bowl, cover, and refrigerate until it’s thoroughly chilled, preferably overnight. A cold base is crucial for a smooth churn. If you’re short on time, place the bowl in a larger pan of ice water to speed up the cooling. Once chilled, the custard should feel like a thick milkshake. This step ensures the ice cream churns properly and stays creamy.
- Churn: Pour the chilled custard into your ice cream maker, following the manufacturer’s instructions. Churn for 20 to 25 minutes until the mixture thickens and resembles soft serve. The texture should be dense yet pourable. If you notice any ice crystals forming, give it a few more minutes. The churned mixture is now ready for freezing.
- Freeze: Transfer the churned ice cream to an airtight container. Smooth the top with a spatula and press a piece of parchment paper directly onto the surface to prevent ice crystals. Seal the container and place it in the freezer for at least 4 hours, or until firm. The final texture should be firm enough to scoop but still creamy. This step locks in the flavor and texture.
That's it — you did it. But hold on, I've got a few more tricks that'll take this to another level. These insider tips will help you achieve that professional texture and flavor profile, and they'll save you from the common pitfalls that many home bakers face.
Insider Tricks for Flawless Results
The Temperature Rule Nobody Follows
Maintaining the right temperature during custard preparation is the cornerstone of a smooth ice cream. A quick test is to touch the mixture; it should feel lukewarm, not hot. If it’s too hot, the egg yolks will cook and create a grainy texture. I’ve learned that a thermometer is a lifesaver—aim for 170°F before adding the yolks. This small detail can make the difference between a silky scoop and a clumpy disappointment.
Why Your Nose Knows Best
Before you chill the custard, give it a sniff. A faint, sweet, cocoa aroma is a sign that the mixture has balanced the sugar and chocolate. If it smells off or overly sweet, you might have over‑sugar or the cocoa isn’t fully dissolved. Trust your nose; it’s a reliable guide to flavor balance. I’ve saved a batch once by simply adjusting the sugar after a quick sniff.
The 5-Minute Rest That Changes Everything
After removing the custard from the heat, let it sit for 5 minutes while you whisk in the vanilla. This short rest allows the custard to settle, preventing the vanilla from becoming too dominant. It also helps the mixture to cool a touch, which is beneficial for the next step. I used to add vanilla immediately, but the flavor was too sharp. The rest period has become a staple in my routine.
Use a Silicone Spatula for Even Mixing
A silicone spatula ensures that every bit of cocoa and sugar is fully incorporated into the custard. It also prevents sticking, which can leave clumps of chocolate on the pan. The flexibility of silicone allows for gentle, even stirring. I’ve seen many people use metal spoons, which can scrape the bottom and create uneven heat distribution.
Keep the Freezer at 0°F
The ideal freezer temperature for ice cream is 0°F. If your freezer is warmer, the ice cream will take longer to set and may develop ice crystals. Use a freezer thermometer to monitor the temperature. I once froze a batch at 5°F, and the result was a grainy texture that required an extra churn.
Creative Twists and Variations
This recipe is a playground. Here are some of my favorite ways to switch things up:
Caramel Swirl
Fold in a generous swirl of homemade caramel sauce after churning. The caramel adds a buttery, sweet contrast that pairs beautifully with the chocolate base. It’s perfect for those who love a sweet‑savory balance.
Espresso Boost
Stir in a tablespoon of strong espresso or cold brew coffee after the custard has chilled. The coffee accentuates the chocolate flavor and gives the ice cream a subtle kick. Espresso lovers will appreciate the depth this adds.
Minty Fresh
Add a few drops of peppermint extract to the custard before chilling. The mint provides a refreshing counterpoint to the richness of chocolate. Serve with fresh mint leaves for an extra visual pop.
Raspberry Ripple
Swirl in a raspberry coulis after the ice cream has churned. The tartness of the raspberry cuts through the sweetness, creating a balanced flavor profile. It also adds a vibrant color that’s Instagram‑ready.
Nutty Crunch
Fold in toasted hazelnuts or chopped dark chocolate after the ice cream is frozen. The crunch adds texture and a nutty undertone that complements the chocolate. This variation is ideal for a dessert that feels both indulgent and sophisticated.
Storing and Bringing It Back to Life
Fridge Storage
If you’re short on freezer space, keep the ice cream in the refrigerator for up to 48 hours. Cover the surface with a thin layer of plastic wrap to prevent ice crystals from forming. Stir gently before serving to restore the creamy texture.
Freezer Friendly
Store the ice cream in an airtight container for up to 3 months. Place a piece of parchment paper directly on the surface before sealing to reduce ice crystal formation. When you’re ready to serve, let it sit at room temperature for 5 minutes for easier scooping.
Best Reheating Method
To revive a hard scoop, place the ice cream in a bowl and microwave on low for 10-15 seconds. Stir quickly to distribute heat evenly. If the ice cream is too thick, add a splash of milk or cream to loosen it. This trick brings the ice cream back to a silky, scoopable state in moments.