I was halfway through a chaotic dinner rush when my phone buzzed with a frantic text from a friend: “I’m craving something sweet, but I’m not in the mood for cake. What’s your secret?” My mind flashed back to that night I accidentally turned a peanut butter sandwich into a dessert by smothering it in cream cheese and strawberries. The result was a silky, creamy confection that still lingers in my memory. I knew I had stumbled onto something that deserved a proper recipe.
Picture this: a dense, luscious cheesecake that feels like a hug in every bite, but with a nutty, buttery punch that cuts through the sweetness. The aroma of toasted graham crumbs mingles with the warm scent of melted butter, while the faint floral hint of vanilla lingers like a whisper. The texture is a paradoxical blend of smoothness and subtle crunch, with a finish that lingers on the tongue like a lingering melody. You can almost hear the faint crackle of the crust as you bite, and the creamy filling sighs against your palate, releasing a cascade of peanut butter and strawberry notes. Every sense is engaged, and you can’t help but smile at how simple yet decadent this creation feels.
What makes this version stand out from the countless peanut‑butter‑cheesecake hybrids you’ll find online is the deliberate layering of flavors and textures. The crust is a buttery graham base that gives the dish a satisfying snap, while the filling’s silky cream cheese is amplified by a generous swirl of smooth peanut butter. The addition of heavy whipping cream and a touch of vanilla elevates the mouthfeel, giving it a cloud‑like airy quality that melts in your mouth. I dare you to taste this and not go back for seconds. This is hands down the best version you’ll ever make at home.
I’ll be honest — I ate half the batch before anyone else got to try it. The rest of the kitchen smelled like a sweet, nutty dream, and the anticipation was palpable. Most recipes get this completely wrong, focusing on either a bland peanut butter layer or an overly heavy crust. Here’s what actually works: a balanced ratio of ingredients, a careful baking temperature, and a final touch of strawberry topping that brightens the whole dish. Picture yourself pulling this out of the oven, the whole kitchen smelling incredible, and the first bite sending a wave of bliss through your senses. Okay, ready for the game‑changer? Let me walk you through every single step — by the end, you’ll wonder how you ever made it any other way.
What Makes This Version Stand Out
- Flavor: The combination of creamy peanut butter with velvety cream cheese creates a layered taste that’s both sweet and savory, unlike the flat sweetness of many desserts.
- Texture: The graham cracker crust provides a buttery crunch that contrasts beautifully with the silky filling, giving every bite a satisfying bite‑and‑melt experience.
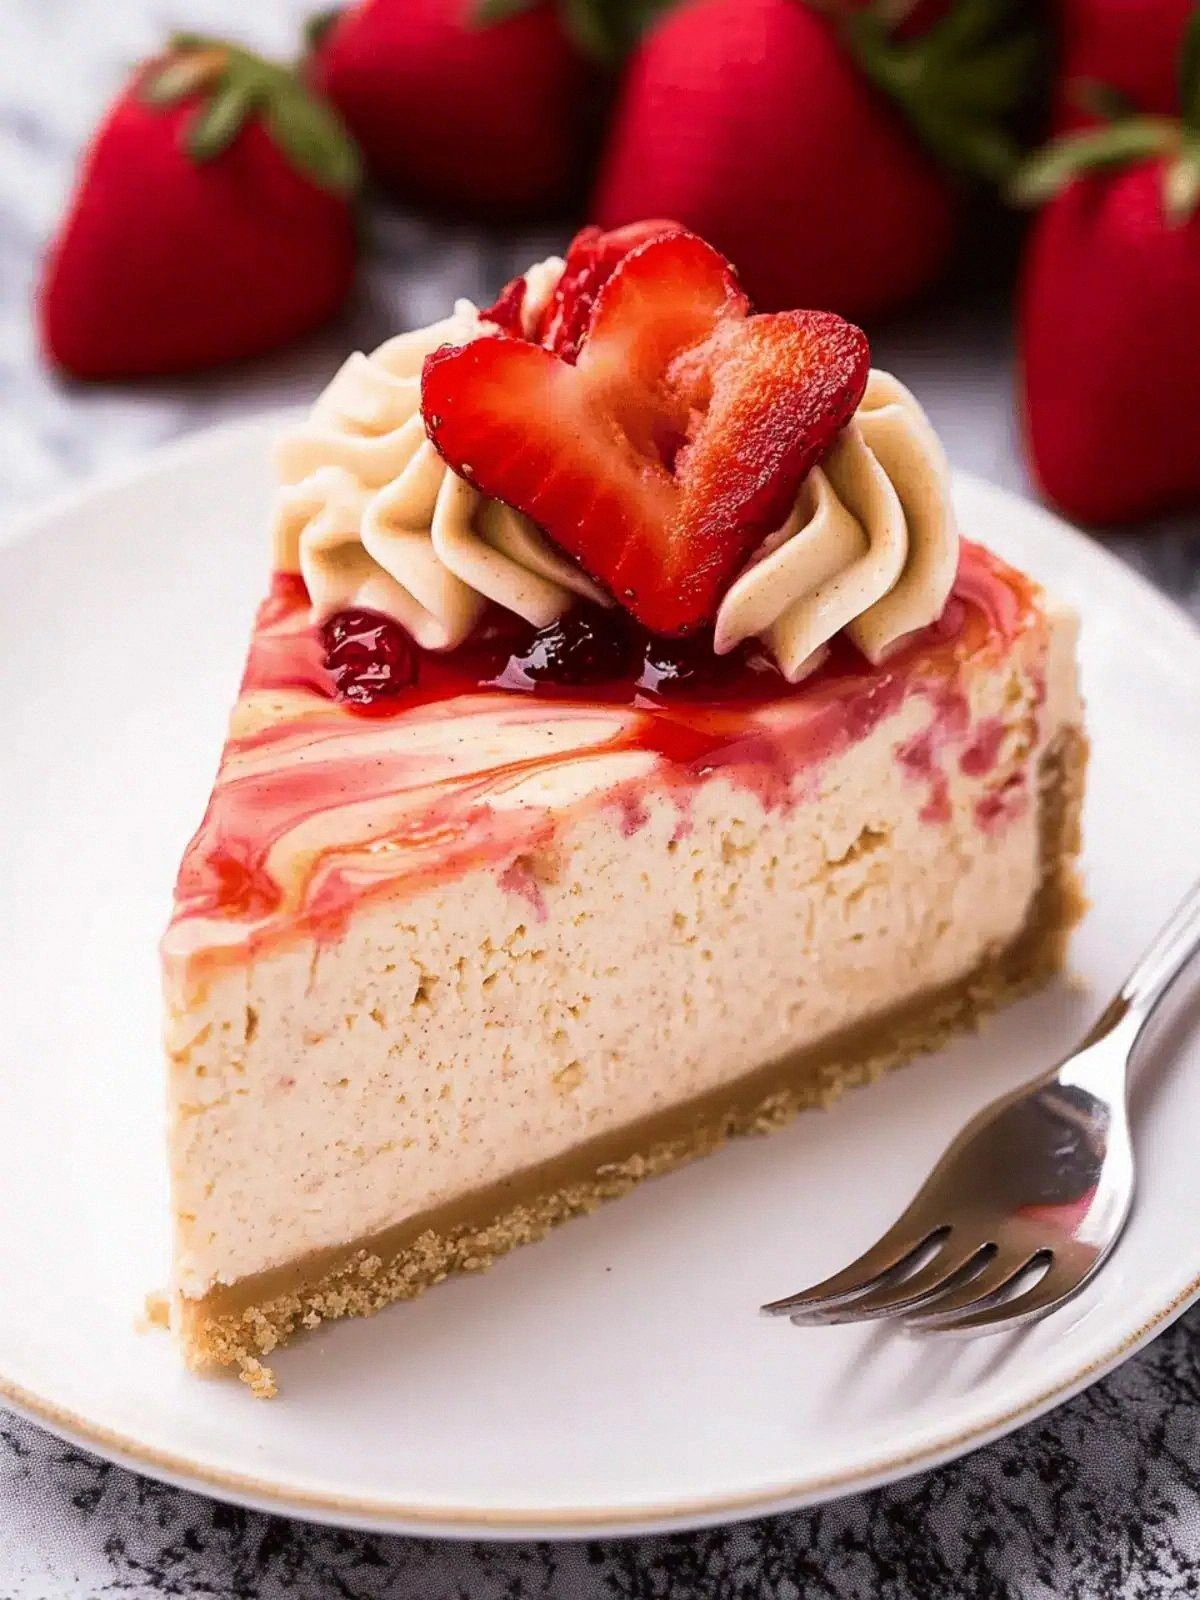
- Visual Appeal: The swirl of strawberry topping on top adds a pop of color and a hint of tartness that draws the eye and balances the richness.
- Ease of Prep: All ingredients are pantry staples, and the method is straightforward, making this a go‑to dessert for busy evenings.
- Make‑Ahead Friendly: The cheesecake can be assembled and chilled in advance, making it perfect for last‑minute gatherings or as a pre‑planned dessert.
- Audience: It’s a crowd‑pleaser that appeals to both peanut butter lovers and those who enjoy a classic cheesecake with a twist.
- Ingredient Quality: Using high‑quality cream cheese and natural peanut butter elevates the flavor profile, turning a simple dessert into a gourmet treat.
- Temperature Control: Baking at a precise temperature ensures the filling sets without cracking, a common issue in cheesecake recipes.
Alright, let’s break down exactly what goes into this masterpiece...
Inside the Ingredient List
The Flavor Base
Graham Cracker Crumbs are the unsung hero that anchors the cheesecake’s flavor profile. They bring a subtle sweetness and a hint of buttery crunch that contrast the creamy filling. If you skip them, the dessert loses its structural integrity and becomes a flat, doughy mess. For the best result, choose a high‑quality brand that’s lightly toasted for a deeper caramel flavor.
Butter, melted and slightly cooled, is the glue that binds the crust together. It adds a rich, silky mouthfeel and ensures the crumbs hold together without becoming soggy. Using salted butter gives a nuanced depth that balances the sweet components. If you prefer a dairy‑free version, coconut oil works as a substitute, but keep an eye on the texture.
The Texture Crew
Cream Cheese is the backbone of this cheesecake, providing a dense, tangy base that carries the peanut butter flavor. Softened to room temperature, it blends effortlessly, preventing lumps and ensuring a silky finish. If you use a low‑fat version, be prepared for a less creamy texture; a higher fat content is key for the right mouthfeel.
Smooth Peanut Butter is the star that delivers nutty richness without overpowering the cheesecake. It coats the palate like velvet, leaving a lingering aftertaste that keeps you coming back for more. Opt for a natural peanut butter with no added sugars to maintain purity of flavor.
Sugar, measured at three‑quarters of a cup, sweetens the mixture without masking the peanut butter’s depth. It dissolves into the cream cheese, creating a uniform sweetness that balances the tang. If you’re watching your sugar intake, you can reduce it slightly, but be aware the texture will shift toward a firmer bite.
Flour, a quarter cup, is a surprising but essential component that stabilizes the filling and prevents cracking during baking. It’s a trick many recipes overlook, but a light dusting of flour ensures the cheesecake remains smooth. You can substitute cornstarch for a gluten‑free version, but keep the amount the same.
Vanilla Extract, a single teaspoon, ties all flavors together, adding a warm, aromatic note that elevates the overall taste. A vanilla bean would be a luxurious upgrade, but the extract is perfectly adequate for a quick, flavorful finish.
The Unexpected Star
Heavy Whipping Cream brings a luxurious, airy texture to the filling. When folded into the mixture, it lightens the density of the cream cheese, giving the cheesecake a cloud‑like mouthfeel that melts in your mouth. If you prefer a lower‑fat option, you can replace it with half‑and‑half, but the result will be slightly denser.
Eggs, three large ones, act as the binder that holds the cheesecake together. They provide structure and help the filling set without cracking. Be sure to whisk them well to avoid any lumps, and add them one at a time to maintain a smooth consistency.
The Final Flourish
Strawberry Topping or Preserves is the finishing touch that adds a bright, tart contrast to the rich filling. It also provides a beautiful visual contrast with its ruby hue. If you’re using preserves, choose a brand with real fruit pieces for added texture. A splash of lemon juice can brighten the flavor even further.
Everything’s prepped? Good. Let’s get into the real action...
The Method — Step by Step
- Prepare the crust. In a medium bowl, combine 1 cup graham cracker crumbs with ½ cup melted butter until the mixture resembles wet sand. Press the crumb mixture firmly into the bottom of a 9‑inch springform pan, creating an even layer. Chill the crust in the fridge for 10 minutes to set. This step ensures a sturdy base that won’t crumble during baking.
- Whip the cream cheese. In a stand mixer, beat 16 oz softened cream cheese on medium speed until smooth and creamy, about 2 minutes. Add ¾ cup sugar and continue beating until the mixture is light and fluffy. The goal is a silky texture that will carry the peanut butter without lumps.
- Incorporate the peanut butter. Fold in 1 cup smooth peanut butter until fully blended. The mixture should be uniform, with no streaks of peanut butter visible. This step is crucial; a well‑blended peanut butter ensures every bite is a balanced explosion of flavor.
- Add the flour and vanilla. Sift ¼ cup flour over the mixture to avoid clumps. Stir in 1 tsp vanilla extract. The flour stabilizes the filling, preventing cracks, while vanilla ties the flavors together.
- Fold in the heavy cream. Gently fold 1 cup heavy whipping cream into the batter. This introduces air and lightness, giving the cheesecake a cloud‑like mouthfeel. Be careful not to over‑mix; you want a silky consistency, not a stiff batter.
- Beat the eggs. In a separate bowl, whisk the 3 eggs until slightly frothy. Add the eggs to the batter, one at a time, mixing gently after each addition. This gradual incorporation keeps the mixture smooth and prevents curdling.
- Pour into the crust. Carefully pour the batter over the chilled crust, smoothing the top with a spatula. The filling should be level and even for a consistent bake.
- Bake at 325°F. Place the springform pan in a preheated oven at 325°F (163°C). Bake for 35 minutes, or until the edges are set and the center still has a slight wobble. The oven should be a stable temperature; any fluctuation can cause cracking.
- Cool and chill. Remove the cheesecake from the oven and let it cool on a wire rack for 15 minutes. Then, refrigerate for at least 4 hours, preferably overnight, to allow the flavors to meld and the texture to firm up. The final chill is where the cheesecake truly transforms.
That’s it — you did it. But hold on, I’ve got a few more tricks that will take this to another level. These subtle adjustments will elevate the flavor and presentation, turning an already amazing dessert into a show‑stopping masterpiece.
Insider Tricks for Flawless Results
The Temperature Rule Nobody Follows
Many bakers bake cheesecakes at 350°F, but that high heat causes the edges to brown too quickly while the center remains undercooked. Baking at a lower, steady 325°F allows the filling to set evenly, preventing cracks and ensuring a creamy interior. Keep an eye on the oven’s temperature with an oven thermometer for consistent results.
Why Your Nose Knows Best
Before you remove the cheesecake from the oven, give it a quick sniff. A faint, buttery aroma signals that the cake is done. If the smell is too sweet, it’s still baking; if it’s more like fresh bread, it’s ready. Your nose is a reliable indicator that saves you from over‑baking.
The 5‑Minute Rest That Changes Everything
Once you remove the cheesecake, let it rest on the wire rack for exactly five minutes before you start the cooling process. This brief rest allows the residual heat to finish the baking, ensuring the center is fully set. Skipping this step can leave the cheesecake too soft and prone to cracks.
The Perfect Swirl Technique
When you add the strawberry topping, use a toothpick to create a gentle swirl. This not only looks elegant but also ensures the strawberry flavor is evenly distributed throughout each bite. A swirling motion also gives the cheesecake a visually stunning marbled effect.
The Chill‑and‑Serve Method
If you’re serving the cheesecake on a busy day, chill it for at least 6 hours. A longer chill time allows the flavors to deepen and the texture to firm up. When you’re ready to serve, let it sit at room temperature for 10 minutes for a smoother bite.
The Garnish Game
Top the finished cheesecake with a drizzle of honey or a sprinkle of crushed pistachios for a crunchy contrast. A few fresh berries on the side add a burst of color and freshness. The garnish is optional, but it elevates the dish from simple to spectacular.
Creative Twists and Variations
This recipe is a playground. Here are some of my favorite ways to switch things up:
Chocolate Peanut Butter Delight
Swirl in a handful of dark chocolate chips during the last mixing step. The chocolate adds a rich, bittersweet layer that complements the peanut butter. Serve with a dusting of cocoa powder for an extra chocolatey finish.
Almond‑Infused Cheesecake
Replace the peanut butter with smooth almond butter for a nutty, slightly sweet flavor profile. Add a handful of toasted almond slivers on top for crunch. This version is perfect for those who love the subtlety of almonds.
Maple‑Glazed Crunch
Drizzle a thin layer of pure maple syrup over the crust before baking. The syrup caramelizes, adding a sweet, caramelized edge. Finish with a sprinkle of sea salt to balance the sweetness.
Citrus Burst Variation
Add a tablespoon of orange zest to the batter for a bright, citrusy undertone. Top with fresh orange segments for a pop of color and tang. The citrus lifts the richness, making it feel lighter.
Berry‑Burst Surprise
Fold in a cup of fresh blueberries into the batter before baking. The berries burst in the mouth, releasing a sweet, tart flavor that contrasts the creamy base. Garnish with a handful of fresh berries for a stunning finish.
Salted Caramel Swirl
Swirl in a swirl of salted caramel sauce before baking. The caramel adds a luscious, buttery sweetness that pairs perfectly with the peanut butter. Finish with a pinch of flaky sea salt on top for an extra kick.
Storing and Bringing It Back to Life
Fridge Storage
Keep the cheesecake refrigerated for up to 5 days in an airtight container. The dense filling holds up well, and the strawberries remain fresh. If you notice any excess moisture, wipe it off gently with a paper towel before serving.
Freezer Friendly
Wrap the cheesecake tightly in plastic wrap and then place it in a freezer bag. It can be frozen for up to 3 months. When you’re ready to enjoy, thaw in the fridge overnight. The texture remains silky, though it may be slightly denser after freezing.
Best Reheating Method
To reheat a frozen slice, place it on a microwave‑safe plate and heat on low power for 30‑45 seconds. Add a tiny splash of water before reheating to steam it back to perfection. This trick prevents the cheesecake from drying out.