It all started on a chaotic Saturday morning when I tried to bake a traditional Easter cake and the oven decided to throw a temper tantrum. The batter exploded in a way that would make a volcano blush, and the kitchen smelled like a burnt marshmallow on a hot day. I stared at the charred mess, realizing that my culinary ambitions had just hit a wall. That moment of panic became the spark that ignited a new obsession with desserts that don't require heat.
Picture the scene: a cluttered countertop, the faint scent of vanilla and lemon drifting from the fridge, and the rhythmic clinking of spoons against a stainless steel bowl. My eyes darted from the burnt cake to the gleaming glass jars lined up like soldiers, ready for a mission. The sound of a gentle hum from the refrigerator was the only music that kept the chaos from turning into a full-on disaster. I could almost taste the sweet promise of something cool, creamy, and utterly irresistible.
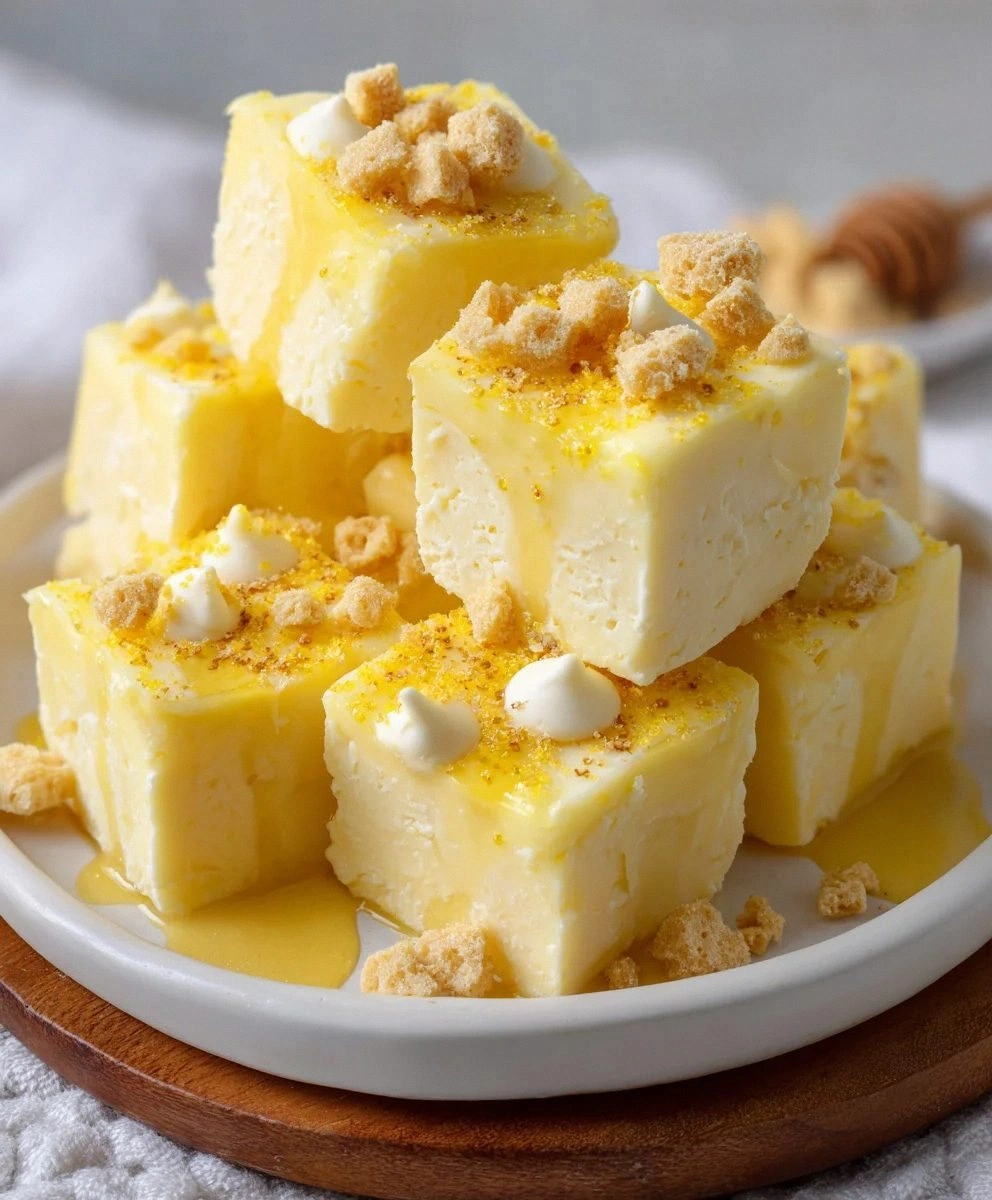
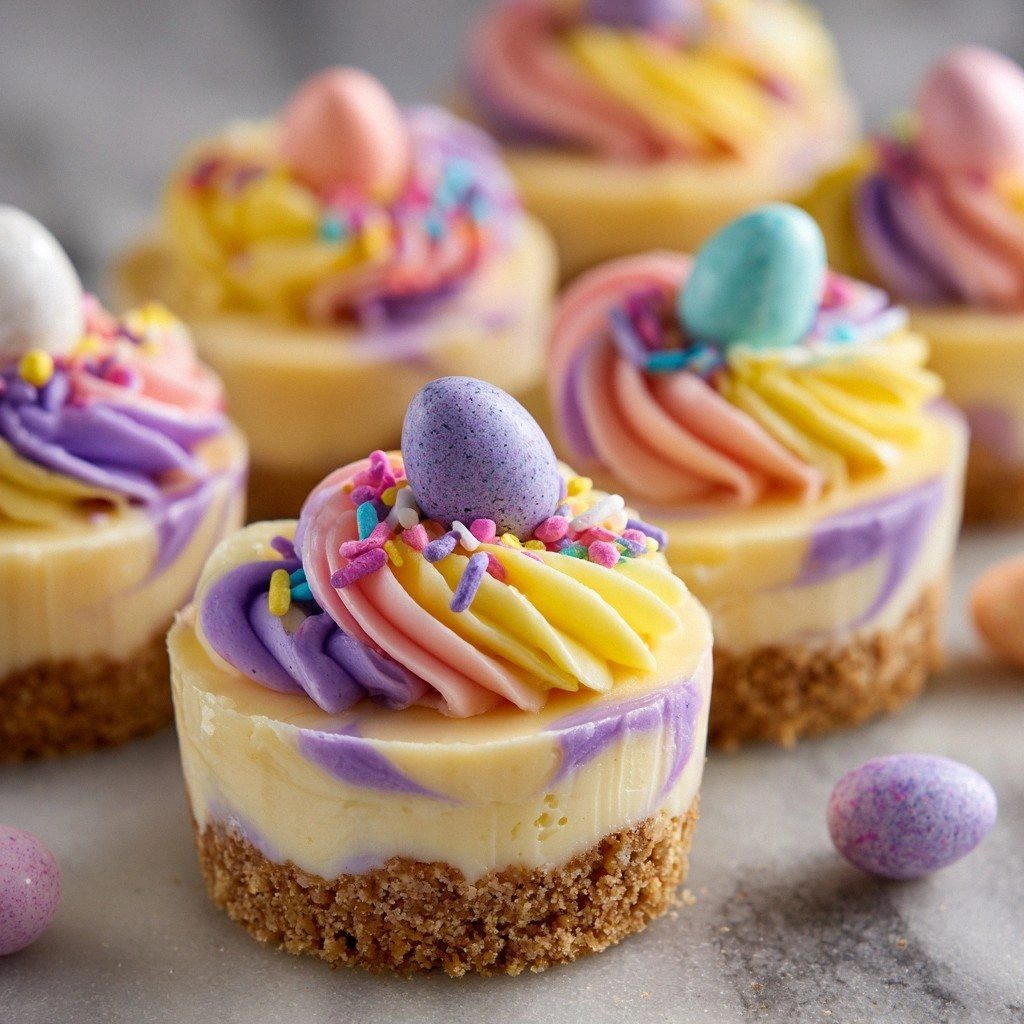
What makes this no-bake mini cheesecake a game changer is not just the fact that it bypasses the oven entirely; it's the way every component works together like a well-rehearsed dance. The graham cracker crust offers a buttery crunch that contrasts with the silky filling, creating a texture profile that feels like a springtime breeze. The lemon zest provides a bright, citrusy lift that keeps the dessert from feeling heavy or cloying. Together, they form a harmony that elevates the humble cheesecake into an Easter celebration.
But there’s a twist that sets this version apart: the use of a quick‑set gelatin blend that locks the filling into place without the need for chilling in a freezer. This technique gives the mini cheesecakes a firm yet tender bite that melts in your mouth like a soft cloud. I dare you to taste this and not go back for seconds. Trust me, the first bite will have you questioning every other cheesecake you’ve ever made.
Okay, ready for the game‑changer? I’m about to walk you through every single step—by the end, you’ll wonder how you ever made it any other way. Picture yourself pulling these mini delights out of the fridge, the whole kitchen smelling incredible, and the little jars gleaming like Easter eggs on a sunny day. The anticipation is almost as delicious as the final product, and the satisfaction of mastering this recipe is the real reward.
My kitchen has never felt so alive. Each jar of crust, each spoonful of filling, each sprinkle of powdered sugar feels like a tiny celebration. I’ve learned that the most memorable desserts are the ones that make you pause, smile, and say, “This is hands down the best version you'll ever make at home.” And if you’re skeptical, just wait until you see the look on your friends’ faces when they taste the first bite.
When I first dared a friend to try this recipe, she laughed, thinking it would be a simple no‑bake affair. She didn’t know that I’d spent hours perfecting the ratio of gelatin to cream cheese, ensuring a flawless set that would hold its shape even when the jar was knocked over. Her eyes widened when she realized how airy the filling was, and she immediately begged for a second jar. That moment confirmed that this recipe was more than just a dessert—it was a conversation starter.
So buckle up, because the journey from a burnt cake to a flawless no‑bake masterpiece is a rollercoaster of flavors, textures, and a few kitchen hacks that will make you feel like a culinary wizard. You’ll learn how to avoid the common pitfalls, how to tweak the recipe for different flavor profiles, and how to store these little gems for a perfect comeback. And yes, I’ll share a few personal confessions along the way, like how I ate half the batch before anyone else got a chance to taste it.
Mini cheesecakes are the perfect size for an Easter gathering, and their no‑bake nature means you can prep them the night before. They’re also a great way to showcase your creativity—just think of the endless possibilities for flavors and toppings. By the end of this post, you’ll have a recipe that’s both reliable and endlessly adaptable. So, let’s dive in and turn your kitchen into an Easter dessert factory.
In a world where most cheesecake recipes scream “oven required,” this one whispers “let’s chill.” The no‑bake approach saves time, energy, and the risk of a burnt cake disaster. It also allows you to focus on flavor, texture, and presentation, giving you the freedom to experiment. That’s why this version stands out from every other recipe out there.
Picture the moment you take the first bite: the crust’s buttery crunch gives way to the creamy filling that feels like a silky cloud. The subtle lemon zest pops on the palate, providing a bright contrast that keeps the dessert from feeling too heavy. The gelatin’s firm set ensures that the mini cheesecake stays in its jar, ready to be served at any time. These details are what make this recipe a standout in the world of desserts.
Now, let’s break down exactly what goes into this masterpiece. The ingredients are simple, but each one plays a crucial role in creating the perfect balance of flavor and texture. I’ll walk you through each group, explaining why they matter and what happens if you skip them. Ready? Let’s get into the real action.
The Flavor Base
The first group of ingredients is all about establishing a solid foundation that supports the creamy filling. Graham cracker crumbs are the backbone; they provide a subtle sweetness and a buttery crunch that contrasts beautifully with the smoothness of the cream cheese. When combined with melted butter, the crumbs become slightly caramelized, adding depth to the flavor profile. If you skip the butter, the crust will be dry and crumbly, lacking the cohesion needed to hold the filling.
Using a high‑quality butter is essential because it carries the flavor of the crumbs and contributes to the overall mouthfeel. A butter with a higher butterfat content will give the crust a richer taste and a more luxurious texture. If you’re on a budget, a regular salted butter works, but be sure to adjust the salt in the filling accordingly. The crumb-to-butter ratio is a delicate balance; too much butter can make the crust soggy, while too little can make it crumble apart.
Some people love to add a touch of sugar to the crumb mixture for extra sweetness, but I prefer to keep the base neutral. This allows the lemon and vanilla flavors in the filling to shine without being masked. The sugar also helps in achieving the perfect caramelized edge, giving the crust a slightly glossy finish that looks as good as it tastes. Remember, the crumb mixture should be moist but not wet; it should hold together when pressed.
Another tip for the flavor base is to toast the crumbs lightly in a dry skillet before adding butter. This step enhances the nutty undertones and gives the crust a warm, comforting aroma. The toasted crumbs also develop a slight crispness that holds up even after the filling sets. If you’re short on time, you can skip this step, but the final product will lack the depth that comes from toasted crumbs.
When it comes to the quantity of crumbs, I recommend using 2 cups for a batch that yields 12 mini cheesecakes. This amount ensures that each jar has a generous crust layer without overwhelming the filling. If you prefer a thinner crust, reduce the crumbs by a quarter cup. The key is to keep the ratio consistent so that each mini has a balanced bite.
The flavor base also sets the stage for the filling’s texture. The butter’s fat content creates a barrier that prevents the filling from seeping into the crumbs. This separation is crucial for a clean presentation and a satisfying bite. Without this barrier, the crumbs could become soggy, ruining the overall experience.
In summary, the flavor base is the unsung hero that supports the entire cheesecake. It’s simple yet powerful, and mastering it will elevate your dessert game. By paying attention to the crumb-to-butter ratio, the quality of butter, and optional toasting, you’ll create a crust that’s both flavorful and structurally sound.
The Texture Crew
The texture crew is all about ensuring the filling is silky, smooth, and perfectly set. Cream cheese is the star, providing richness, body, and a tangy undertone that balances the sweetness. I always use room‑temperature cream cheese because it blends seamlessly with the other ingredients, preventing lumps. If you use cold cream cheese, the filling will be gritty and difficult to pour into the jars.
Powdered sugar is added to sweeten the filling without adding grainy texture. It dissolves quickly, giving the cheesecake a fine, smooth finish. The ratio of powdered sugar to cream cheese is critical; too much sugar can make the filling too soft, while too little can result in a dense, heavy bite. I recommend 1 cup of powdered sugar for 12 mini cheesecakes, which strikes a perfect balance.
Vanilla extract is the subtle flavor enhancer that brings everything together. A teaspoon of vanilla adds depth and a warm aroma that elevates the overall taste profile. If you’re adventurous, try a splash of almond or lemon extract for a different twist. The key is to use high‑quality vanilla for the best flavor impact.
Gelatin is the game‑changer that gives the filling its set without the need for baking. I use powdered gelatin dissolved in a small amount of cold water before adding it to the cream cheese mixture. This ensures the gelatin distributes evenly, preventing clumps. The gelatin’s role is to stabilize the filling, giving it a firm yet tender bite that holds its shape even when the jar is moved.
To achieve a silky texture, I beat the cream cheese and powdered sugar together until smooth before adding the gelatin and vanilla. This step is crucial; any lumps will show up in the final product. Using a hand mixer or a stand mixer on low speed can help achieve the right consistency. Once the mixture is smooth, you can pour it into the jars without hesitation.
When the filling sets, it should be firm but still yield slightly to pressure. If it’s too firm, the cheesecake will feel like a rubber band. If it’s too soft, the filling will leak out of the jars. The gelatin amount, the room temperature of the ingredients, and the chilling time all influence the final texture. By following the recipe closely, you’ll get the perfect set every time.
In short, the texture crew is responsible for the mouthfeel that makes this cheesecake unforgettable. From room‑temperature cream cheese to the right amount of gelatin, each step ensures a silky, firm, and delicious filling. Mastering this crew will give you confidence in creating no‑bake desserts that look and taste like they’ve been made in a high‑end bakery.
The Unexpected Star
While the base and texture are essential, the unexpected star adds a unique twist that makes this cheesecake stand out. I use lemon zest and lemon juice as the unexpected star, bringing a bright, citrusy punch that cuts through the richness of the cream cheese. The zest adds a subtle aroma that lingers on the palate, while the juice provides a fresh, tart contrast. Together, they create a flavor profile that feels light and refreshing, ideal for spring celebrations.
Adding lemon zest is more than just a flavor choice; it also adds a visual element. The tiny orange flecks of zest add a pop of color against the pale filling, making each mini look more inviting. If you prefer a different citrus, try orange or grapefruit zest for a different profile. The key is to use fresh zest, as dried zest can lose its bright flavor.
Leaning on lemon juice also helps with the setting of the filling. The acidity reacts with the gelatin, aiding in its proper activation. This means the cheesecake will set more reliably and maintain its shape. If you’re worried about the filling becoming too tart, you can reduce the amount of lemon juice slightly, but I find the full amount balances the sweetness perfectly.
Some people might think adding citrus to a cheesecake is too bold, but I’ve found that it enhances the overall experience. The lemon’s brightness lifts the richness, making the dessert feel lighter and more balanced. If you’re a fan of lemon desserts, this recipe will feel like a natural extension of your favorite treats.
In essence, the unexpected star is the secret ingredient that transforms a standard no‑bake cheesecake into a springtime sensation. It adds flavor depth, visual appeal, and a subtle acidity that balances the richness of the filling. By including lemon zest and juice, you elevate the dessert to a whole new level of deliciousness.
The Final Flourish
The final flourish is what turns this cheesecake from a good dessert into an unforgettable experience. I top each mini with a swirl of whipped cream or a dusting of powdered sugar to create a delicate contrast in texture and flavor. The whipped cream adds a light, airy layer that complements the dense filling, while the powdered sugar gives a subtle sweetness that balances the lemon’s tartness.
To achieve the perfect swirl, I use a piping bag fitted with a small star tip. I fill the bag with whipped cream and pipe a gentle swirl on top of each cheesecake, creating a visual that’s both elegant and playful. If you don’t have a piping bag, a spoon will do, but the swirl may look less refined. The key is to keep the cream light and airy, so it doesn’t overpower the filling.
For an extra touch, I sprinkle a pinch of crushed pistachios or almond slivers on top of the whipped cream. This adds a subtle crunch and a nutty flavor that complements the lemon zest. The nuts also add a pop of color, making each mini look more vibrant. If you’re looking for a vegan option, use a dairy‑free whipped topping and a sprinkle of coconut flakes.
Another finishing touch is a drizzle of honey or a small amount of raspberry jam. The sweet drizzle adds a glossy finish that catches the light, making the cheesecake look even more appealing. The jam also provides a burst of fruity flavor that contrasts nicely with the lemon. I recommend using a thin layer to keep the filling from getting too sweet.
In conclusion, the final flourish is the finishing touch that brings the entire dessert together. By adding a light swirl of whipped cream, a pinch of nuts, and a drizzle of honey or jam, you create a dessert that’s not only delicious but also visually stunning. This flourish turns a simple no‑bake cheesecake into an Easter masterpiece that’s sure to impress.
Everything’s prepped? Good. Let’s get into the real action.
The Method — Step by Step
- Begin by sifting 2 cups of graham cracker crumbs into a medium bowl. This step ensures a smooth crust without large crumbs that could break the filling. While the crumbs are in the bowl, melt 1 cup of unsalted butter in a microwave or on the stove until liquid. The butter should be warm enough to mix easily but not hot enough to burn the crumbs.
- Add the melted butter to the crumbs and stir until the mixture resembles wet sand. The consistency should be damp enough to hold together when pressed into a jar, but not so wet that it becomes mushy. Let the mixture cool to room temperature, which will help the crumbs set properly once you press them into the jars.
- While the crust mixture cools, prepare the filling. In a large bowl, beat 16 ounces of room‑temperature cream cheese until smooth and creamy. This step is crucial for avoiding lumps that could ruin the silky texture of the cheesecake. Use a stand mixer or hand mixer on low speed for best results.
- Add 1 cup of powdered sugar to the cream cheese and continue beating until fully incorporated. The powdered sugar should dissolve completely, leaving no gritty texture. This also helps to sweeten the filling evenly, ensuring each bite tastes consistent.
- Sift 2 teaspoons of vanilla extract and 1 tablespoon of lemon juice into the cream cheese mixture, then mix until just combined. The vanilla adds depth, while the lemon juice introduces a bright, citrusy note that balances the richness. Be careful not to overmix, as this can cause the filling to become too runny.
- In a separate small bowl, dissolve 1 tablespoon of powdered gelatin in 2 tablespoons of cold water. Let the gelatin sit for 5 minutes to bloom, then gently heat it in a double boiler or microwave until fully dissolved. This step ensures that the gelatin distributes evenly throughout the filling.
- Slowly pour the dissolved gelatin into the cream cheese mixture while stirring continuously. The gelatin will help set the filling, giving it a firm yet tender bite. Stir until the mixture is smooth and glossy, indicating that the gelatin has fully incorporated.
- Add 1 cup of whipped topping to the filling and fold gently until just combined. The whipped topping adds lightness and a subtle sweetness, creating a contrast with the dense filling. Be careful not to overfold, as you want to preserve the airy texture.
- Press the cooled graham cracker crust into the bottom of 12 small jars or ramekins, leaving a small rim for the filling. Use the back of a spoon or a small flat tool to press the crumbs evenly. Make sure the crust is compact and even to avoid cracks when the filling sets.
- Carefully spoon the cream cheese filling over the crust, filling each jar almost to the top. Smooth the surface with a spatula for a clean finish. The filling should be level with the rim of the jar to prevent spills during storage.
- Optional: swirl a small amount of raspberry jam or honey over the top of each filling for a burst of flavor and a glossy finish. This step adds visual appeal and a contrasting sweetness that complements the lemon. If you prefer a vegan option, use a dairy‑free whipped topping and a drizzle of maple syrup.
- Cover each jar with a lid or plastic wrap and refrigerate for at least 4 hours, or overnight, to allow the filling to set. The gelatin will firm up, giving the cheesecake its signature texture. If you’re short on time, chill for 2 hours, but the texture may be slightly softer.
- Once set, remove the jars from the refrigerator and allow them to sit at room temperature for 10 minutes before serving. This step helps the cheesecake soften slightly, making it easier to scoop or spoon out. The final product will be creamy, firm, and ready to enjoy.
That’s it — you did it. But hold on, I’ve got a few more tricks that will take this to another level.
First, let’s talk about the importance of room temperature ingredients. The smoother the cream cheese, the better the final texture. I’ve learned that letting the cream cheese sit out for 20 minutes before beating it is a small step that yields a big payoff. This simple adjustment ensures a silky, lump‑free filling that’s a pleasure to eat.
Next, consider the jars you use. A clear jar showcases the beautiful pastel swirl of the filling, giving your dessert a visual appeal that’s perfect for Instagram. If you’re feeling fancy, line the jars with parchment paper before pressing the crust to prevent sticking and to add a decorative touch. This small detail elevates the presentation and makes serving a breeze.
Another trick is to chill the jars in the refrigerator before filling them. This helps the crust set faster and reduces the risk of the filling leaking or spilling during the chilling process. I’ve found that pre‑chilled jars keep the cheesecake firm and pristine, even after a few days in the fridge.
Lastly, don’t forget to add a small drizzle of honey or a dollop of raspberry jam on top before chilling. This adds a layer of flavor and a glossy finish that makes the cheesecake look more appetizing. The combination of sweet and tart is a crowd‑pleaser that will have your guests asking for more.
Insider Tricks for Flawless Results
The Temperature Rule Nobody Follows
Temperature is the silent hero in any dessert. When the cream cheese is too cold, it won’t blend smoothly, resulting in a lumpy filling. When it’s too warm, the gelatin may not set properly, leading to a runny cheesecake. I keep my ingredients at room temperature for 20 minutes before mixing, which ensures a consistent texture. This small step saves you from a potential disaster.
Why Your Nose Knows Best
Before you start, give the filling a quick sniff. A sweet, vanilla aroma is a sign that the mixture is coming together correctly. If you smell a faint burnt or sour note, it might indicate that the butter or gelatin was overheated. Trust your nose; it’s a reliable guide that can prevent subtle failures.
The 5-Minute Rest That Changes Everything
After mixing the filling, let it rest for 5 minutes before adding the gelatin. This brief pause allows the flavors to meld and the mixture to thicken slightly. It also gives the gelatin time to absorb moisture, ensuring a smoother integration. A rested filling sets faster and has a more cohesive texture.
The Perfect Crust Ratio
Many people overdo the crust, making it too thick and heavy. I recommend a 1:1 ratio of crumbs to butter for a balanced crust. This ratio provides enough structure without overpowering the filling. If you prefer a lighter crust, reduce the butter by 25% and increase the crumbs accordingly.
The Power of a Clean Spoon
When filling the jars, use a clean, dry spoon to avoid introducing moisture. Moisture can cause the crust to become soggy and the filling to separate. I always wipe my spoon with a paper towel before each scoop, ensuring a pristine fill. This tiny habit keeps the cheesecake’s texture pristine.
Now that you’ve mastered the basics, it’s time to explore how to elevate the experience further.
Remember, the joy of cooking comes from experimentation. Once you’ve nailed the base, you can start adding your own personal touches. Whether it’s a splash of espresso, a swirl of chocolate, or a sprinkle of sea salt, the possibilities are endless. Each variation offers a new flavor adventure that will keep your guests coming back for more.
Creative Twists and Variations
Chocolate‑Lemon Dream
Swap the lemon zest for a teaspoon of espresso powder and add a tablespoon of dark chocolate chips to the filling. The coffee undertone pairs beautifully with the rich chocolate, creating a dessert that feels both indulgent and refreshing. Serve with a dusting of cocoa powder for an extra touch of elegance.
Berry‑Burst Surprise
Fold fresh raspberries into the filling before pouring it into the jars. The berries add a burst of color and a juicy, tart flavor that complements the lemon. For a smoother texture, strain the berries to remove seeds, then fold them in. The result is a vibrant, fruity cheesecake that’s perfect for spring.
Nutty Delight
Add 1/4 cup of finely chopped pistachios to the crust for a nutty crunch. The pistachios also add a subtle green hue that enhances the visual appeal. Pair this with a drizzle of honey on top for a sweet, nutty finish. The combination of textures and flavors creates a memorable dessert.
Minty Fresh
Replace the vanilla extract with a teaspoon of fresh mint extract and add a handful of chopped mint leaves to the filling. The mint provides a cooling effect that balances the richness of the cream cheese. Finish with a sprinkle of crushed mint candies for a playful touch. This variation is especially refreshing after a heavy meal.
Caramel Swirl
Stir a tablespoon of caramel sauce into the filling before pouring it into the jars. The caramel adds a sweet, buttery flavor that pairs wonderfully with the lemon zest. Drizzle a thin ribbon of caramel over the top of each cheesecake before chilling. The result is a glossy, decadent dessert that feels like a treat.
Almond Joy
Incorporate 2 tablespoons of almond butter into the filling for a nutty depth. Add a pinch of coconut flakes to the crust for an extra tropical twist. Top each cheesecake with a light dusting of shredded coconut. This variation offers a sweet, nutty, and slightly chewy experience.
These variations are just the beginning. The beauty of a no‑bake cheesecake is its adaptability, allowing you to tailor it to your taste buds or your guests’ preferences. Feel free to experiment and create your own signature version.
One of my favorite things about this recipe is how it invites creativity. The base is solid, but the filling is a canvas waiting to be painted with flavors. Whether you’re a seasoned baker or a kitchen newbie, these twists give you a chance to showcase your culinary personality.
Remember to keep the fillings chilled until you’re ready to serve. The flavors will intensify, and the texture will hold firm, making each bite a delightful experience. With these variations, you can keep the excitement alive, ensuring every Easter gathering is memorable.
Storing and Bringing It Back to Life
Fridge Storage
Store the mini cheesecakes in the refrigerator for up to 5 days. Keep them in their original jars to maintain their shape and prevent the filling from absorbing fridge odors. If you notice the crust becoming soft, place a paper towel inside the jar to absorb excess moisture. This simple trick keeps the crust crisp and the filling creamy.
Freezer Friendly
For longer storage, freeze the cheesecakes in the fridge for up to 2 weeks. Wrap each jar tightly with plastic wrap before placing them in a freezer bag. When you’re ready to serve, thaw them in the refrigerator overnight. This method preserves the texture and flavor, making it a convenient option for busy schedules.
Best Reheating Method
Since the cheesecake is no‑bake, reheating isn’t necessary. However, if you want to soften the filling slightly before serving, let the jars sit at room temperature for 10 minutes. Adding a tiny splash of water to the bottom of the jar before reheating can create steam, keeping the filling moist. This trick is especially useful if the cheesecake has been stored for a few days.
These storage tips ensure that your mini cheesecakes stay fresh, flavorful, and visually appealing for weeks. The key is to keep them in a cool, dry place and to protect the crust from moisture. With these tricks, you’ll always have a ready-to-serve dessert that impresses.
When you’re ready to serve, simply grab a spoon, scoop out a mini, and enjoy the creamy, tangy, and perfectly set cheesecake. The experience is as delightful as the preparation, making this recipe a must‑try for any Easter celebration.
Enjoy the process, savor the flavors, and share the joy with your loved ones. The best part of cooking is seeing the smiles that appear when someone takes that first bite. This no‑bake mini cheesecake is not just a dessert; it’s an experience that will linger in your memories long after the last crumb.