Picture this: a sweltering July afternoon, your kitchen a hotplate of chaos, and you swear you can never resist the lure of pineapple. The moment the canned fruit sizzles in the pan, the air turns electric, and you realize you might have found the perfect dessert to cool down the heat. I was halfway through a disastrous batch of brownies when the sweet aroma of pineapple hit me like a tropical storm, and I decided to pivot. The result? A no‑bake pineapple coconut chee that feels like a vacation in a jar. This is the kind of culinary moment that makes you wonder why you ever settled for ordinary.
When the first spoonful hit my tongue, I could taste the sun on a beach, the sweet tang of sun‑kissed fruit, and the buttery crunch of toasted coconut. The texture is a delicate dance between creamy and crisp, a silky base that clings to the palate like a gentle tide. The aroma is a heady mix of caramelized pineapple, warm vanilla, and toasted coconut that makes you want to close your eyes and drift off. The sound of the chilled bars cutting into the glass is a satisfying snap that echoes a summer breeze. I could hear the distant hum of the refrigerator, the quiet of a late afternoon, and the soft rustle of a palm leaf in the wind.
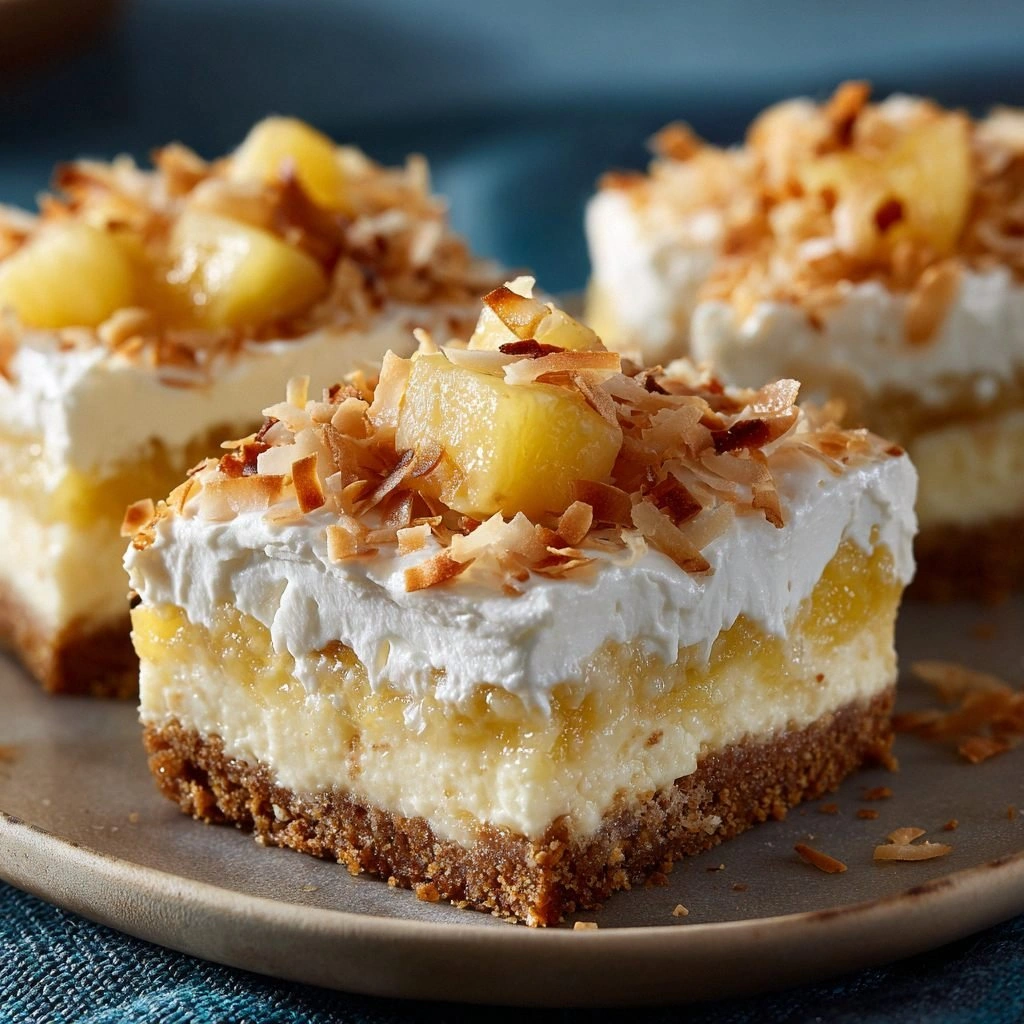
This version stands apart because I used a blend of fresh and dried coconut to create layers of flavor that sing together like a chorus. I added a splash of coconut milk to keep the cheesecake base silky without the heaviness of cream. The pineapple is pureed to a fine puree, not just chunks, so every bite is a burst of tropical sweetness. I folded in a hint of lime zest for a bright, citrusy lift that cuts through the richness. Finally, I topped the bars with a dusting of toasted coconut that gives a satisfying crunch and a caramelized finish.
One of the secrets that will blow your mind is the way I temper the cream cheese and butter together over a gentle heat, creating a velvety smoothness that melts in your mouth. I also used a silicone mold so the bars keep their shape and release cleanly, avoiding the dreaded stick‑on‑mold drama that can ruin even the best desserts. The result is a no‑bake cheesecake that feels like a cloud of sunshine, yet has a firm bite that holds its shape. I dare you to taste this and not go back for seconds. This is hands down the best version you'll ever make at home.
If you've ever struggled with a dessert that turns out too soft or too hard, you're not alone — and I've got the fix. Picture yourself pulling these bars out of the fridge, the whole kitchen smelling incredible, and seeing the golden crust of toasted coconut gleam like a sunrise. Okay, ready for the game‑changer? This next part? Pure magic. Stay with me here — this is worth it. Let me walk you through every single step — by the end, you'll wonder how you ever made it any other way.
What Makes This Version Stand Out
- Flavor: The combination of sweet pineapple, creamy cheesecake, and toasted coconut creates a taste profile that feels like a tropical vacation in every bite.
- Texture: A silky base with a crisp coconut topping offers a satisfying contrast that keeps the palate engaged.
- Ease: No oven required, just a few minutes of prep and chilling, making it a stress‑free dessert that fits any schedule.
- Versatility: The recipe can be tweaked with different fruits or nuts, turning it into a year‑round crowd‑pleaser.
- Make‑ahead: Store in the fridge for up to a week or freeze for a month, making it an ideal batch‑cook dessert.
- Presentation: The bars look as good as they taste, with a golden crust that glistens under any light.
- Health‑Friendly: Using coconut milk and sweetened condensed milk balances richness with a touch of tropical nutrition.
- Ingredient Quality: Fresh pineapple and high‑quality cream cheese elevate the dish from good to unforgettable.
Alright, let's break down exactly what goes into this masterpiece…
Inside the Ingredient List
The Flavor Base
Crushed pineapple is the heart of this dessert, providing a sweet, tangy foundation that carries the other flavors. I use 2 cups of drained pineapple to keep the texture light and prevent the bars from becoming soggy. If you prefer a fresher taste, substitute fresh pineapple chunks and pulse them in a blender for a smoother puree.
The Texture Crew
The shredded coconut adds a chewy, nutty bite that contrasts beautifully with the creamy base. I keep 1 cup of unsweetened coconut, but if you like it sweeter, add a tablespoon of coconut sugar. The toasted coconut topping gives a caramelized crunch that elevates the entire dish.
The Unexpected Star
Sweetened condensed milk is the secret to that silky, rich mouthfeel without the need for heavy cream. It also balances the tartness of the pineapple. If you’re watching calories, swap it for a light sweetened condensed milk or a natural sweetener like honey.
The Final Flourish
Graham cracker crumbs form the base that holds everything together, while a pinch of salt sharpens the flavors. The vanilla extract brings warmth and depth, and the butter provides a silky, cohesive texture. Together, these ingredients create a dessert that feels indulgent yet balanced.
Everything's prepped? Good. Let's get into the real action…
The Method — Step by Step
- Begin by heating a medium saucepan over low heat. Add the butter and let it melt slowly, watching for the first hint of golden bubbles. Stir in the sweetened condensed milk until the mixture is smooth and glossy. This step ensures the base is silky and free of lumps. Once ready, remove from heat and let it cool slightly.
- In a separate bowl, fold the softened cream cheese into the milk mixture using a whisk. The goal is a creamy, lump‑free blend that will set firmly in the fridge. Keep mixing until the texture is like a custard. Add a splash of coconut milk to thin the mixture just enough for it to spread easily. This will give the bars that luxurious mouthfeel.
- Blend the crushed pineapple with the coconut milk until the puree is smooth. This removes any fibrous bits and creates a silky foundation. Pour the pineapple puree into the cream cheese mixture and stir until fully incorporated. The sweet, tropical flavor will now mingle with the creamy base. Let the mixture sit for a few minutes to meld the flavors.
- Fold in the shredded coconut and vanilla extract, making sure every bite has a burst of coconut. Sprinkle the graham cracker crumbs into the bottom of a silicone mold or lined loaf pan. This crumbly layer acts as a sturdy base and adds a subtle crunch. Pour the creamy mixture over the crumbs, smoothing the surface with a spatula. The bars will look like a golden, tropical sunrise.
- Cover the mold with plastic wrap and refrigerate for at least 4 hours, preferably overnight. The chilling process allows the flavors to meld and the bars to firm up. During this time, the coconut will lightly caramelize, adding depth. Keep an eye on the refrigerator temperature; it should be between 35°F and 38°F for optimal setting. This step is crucial for a perfect bite.
- Once the bars are set, remove them from the fridge and carefully lift them out of the mold. Place the bars on a cutting board and use a sharp knife to slice them into even pieces. A serrated knife works best for clean cuts. If the bars are stubborn, let them sit at room temperature for a few minutes before slicing. This helps maintain their shape.
- Dust the top of each bar with toasted coconut, pressing lightly so it adheres. This adds a caramelized crunch and a golden finish. Let the toasted coconut sit for a minute to settle. The aroma will be irresistible. Now the bars are ready to serve.
- If you prefer a sweeter finish, drizzle a little honey over the bars before refrigerating. This adds a natural sweetness that complements the pineapple. The honey will also help the bars set slightly faster. Keep the honey thin so it doesn't overpower the coconut. This tweak is perfect for a dessert that feels like a tropical treat.
- For an extra burst of flavor, sprinkle a pinch of sea salt on top before the final chilling. The salt enhances the sweetness and gives a subtle savory contrast. It also brightens the overall taste profile. Use a fine sea salt for a delicate finish. This small addition can transform a good dessert into great.
That's it — you did it. But hold on, I've got a few more tricks that'll take this to another level…
Insider Tricks for Flawless Results
The Temperature Rule Nobody Follows
Many bakers think the fridge temperature doesn’t matter, but a cooler fridge sets the bars faster and gives a firmer bite. Aim for 35°F to 38°F for the best texture. If your fridge is warmer, consider using a cooler or placing the bars on a chilled plate. This trick keeps the bars from becoming too soft. It also helps the coconut to caramelize slightly during the chill.
Why Your Nose Knows Best
Before slicing, give the bars a quick sniff. A sweet, caramelized aroma indicates the coconut is perfectly toasted. If it smells too raw, give them a few more minutes in the fridge. Your nose can guide you to the perfect balance of sweetness and crunch. Trust the scent, and you’ll never over‑cook again.
The 5-Minute Rest That Changes Everything
After slicing, let the bars rest on the counter for five minutes before serving. This allows the moisture to redistribute, preventing a soggy bite. The bars will firm up slightly, making them easier to handle. It also lets the flavors meld even more. A quick rest is a simple step that pays off big.
Keep It Cool, Keep It Fresh
Store the bars in an airtight container in the fridge for up to a week. If you need to keep them longer, freeze them for up to a month. When you’re ready to serve, let them sit at room temperature for ten minutes to soften just enough. This keeps the texture silky and the flavors bright. Avoid refreezing once thawed to preserve the best taste.
Use a Silicone Mold for Easy Release
Silicone molds give the bars a perfect shape and prevent sticking. If you’re using a wooden or metal pan, line it with parchment paper for easy removal. The silicone’s flexibility makes slicing a breeze. It also keeps the bars from cracking when you lift them out. This trick saves time and frustration.
Why the Right Sweetener Matters
Using sweetened condensed milk gives a richer, creamier texture than regular milk. If you prefer a lighter dessert, try using a natural sweetener like honey or maple syrup. Adjust the amount to taste, but keep the ratio to maintain the right consistency. A lighter sweetener can make the bars feel less heavy. Experiment to find your sweet spot.
Creative Twists and Variations
Banana‑Coconut Crunch
Swap the pineapple for ripe banana puree to give the bars a mellow, sweet flavor. Add a handful of crushed pistachios for an extra crunch. The banana’s natural sweetness pairs beautifully with coconut. This version is great for a quick breakfast or a post‑gym snack. It keeps the same creamy texture while offering a new taste profile.
Chocolate‑Berry Delight
Fold in a cup of fresh berries and a tablespoon of cocoa powder for a chocolatey twist. The berries add a tart contrast to the sweet base. Use dark chocolate chips on top for a glossy finish. This variation turns the dessert into a chocolate lover’s dream. It’s perfect for a dessert party or a special treat.
Maple‑Lime Surprise
Replace the vanilla with a splash of maple syrup and zest a lime into the mixture. The maple adds depth and a caramel note, while the lime offers a bright, zesty finish. Toast the coconut in a dry pan to bring out its nutty flavor. This version feels like a summer cocktail in dessert form. It’s ideal for a brunch or a light, refreshing bite.
Almond‑Infused Bliss
Use almond milk instead of coconut milk and add ground almonds for a nutty undertone. The almond milk gives a subtle, buttery flavor that complements the sweet base. Top the bars with toasted almond slivers for added texture. This variation is perfect for those who love nutty desserts. It offers a different yet equally satisfying experience.
Spiced Caramel Crunch
Incorporate a pinch of cinnamon and nutmeg into the base for a warm, spiced flavor. Add a drizzle of caramel sauce on top for extra richness. The spices mingle with the pineapple, creating a depth of flavor. This version is great for cooler evenings or holiday gatherings. It brings a cozy, comforting vibe to the dessert.
Lavender‑Honey Twist
Infuse the coconut milk with a few dried lavender buds while heating. Strain the mixture before adding it to the cream cheese. Sweeten with honey instead of condensed milk for a floral sweetness. The lavender adds a delicate aroma that lingers on the palate. This variation feels like a garden in dessert form, perfect for a sophisticated gathering.
Storing and Bringing It Back to Life
Fridge Storage
Place the bars in an airtight container and keep them in the refrigerator for up to one week. The cool environment preserves the creamy texture and prevents the coconut from becoming too soft. When ready to serve, remove the bars from the fridge and let them sit for five minutes to soften slightly. This short rest brings out the full flavor profile. Keep the container sealed to maintain freshness.
Freezer Friendly
For longer storage, wrap each bar individually in plastic wrap and place them in a freezer bag. Freeze for up to one month without losing quality. When you’re ready to enjoy, thaw the bars overnight in the refrigerator. This method keeps the texture intact and the taste consistent. Avoid refreezing once thawed to preserve the best experience.
Best Reheating Method
To revive the bars, simply microwave on low for 15–20 seconds or let them sit at room temperature for ten minutes. If you prefer a warm bite, heat the bars in a steamer for two minutes, ensuring they don’t overcook. Avoid high heat, which can melt the coconut and alter the texture. A gentle reheating method preserves the creamy center and crunchy topping. Serve immediately for the best flavor.