It all started on a rainy Tuesday when I tried to impress my roommate with a fancy dessert and ended up with a sticky, nutty mess that looked like a flour bomb had exploded in my kitchen. The oven was still warm, the pine nuts were half-burnt, and the almond flour had turned into a dark, clumpy paste that clung to every surface. I stared at the chaos and whispered, “I dare you to taste this and not go back for seconds.” That moment of panic became the spark that led me to discover the ultimate version of Pignoli Almond Pine Nuts.
I was standing in the middle of a kitchen that smelled like toasted pine nuts, honey, and vanilla, the air thick with the promise of something sweet and crunchy. The sound of the timer ticking echoed in my ears like a metronome, while the sizzle of the pan whispered secrets of caramelization. My hands were damp with honey, my eyes glazed with the anticipation of a texture that could be both chewy and crisp, and my taste buds tingled with the idea of nutty sweetness balanced by a hint of floral honey. The sight of the golden edges forming on the dough felt like a sunrise on a cloudy day.
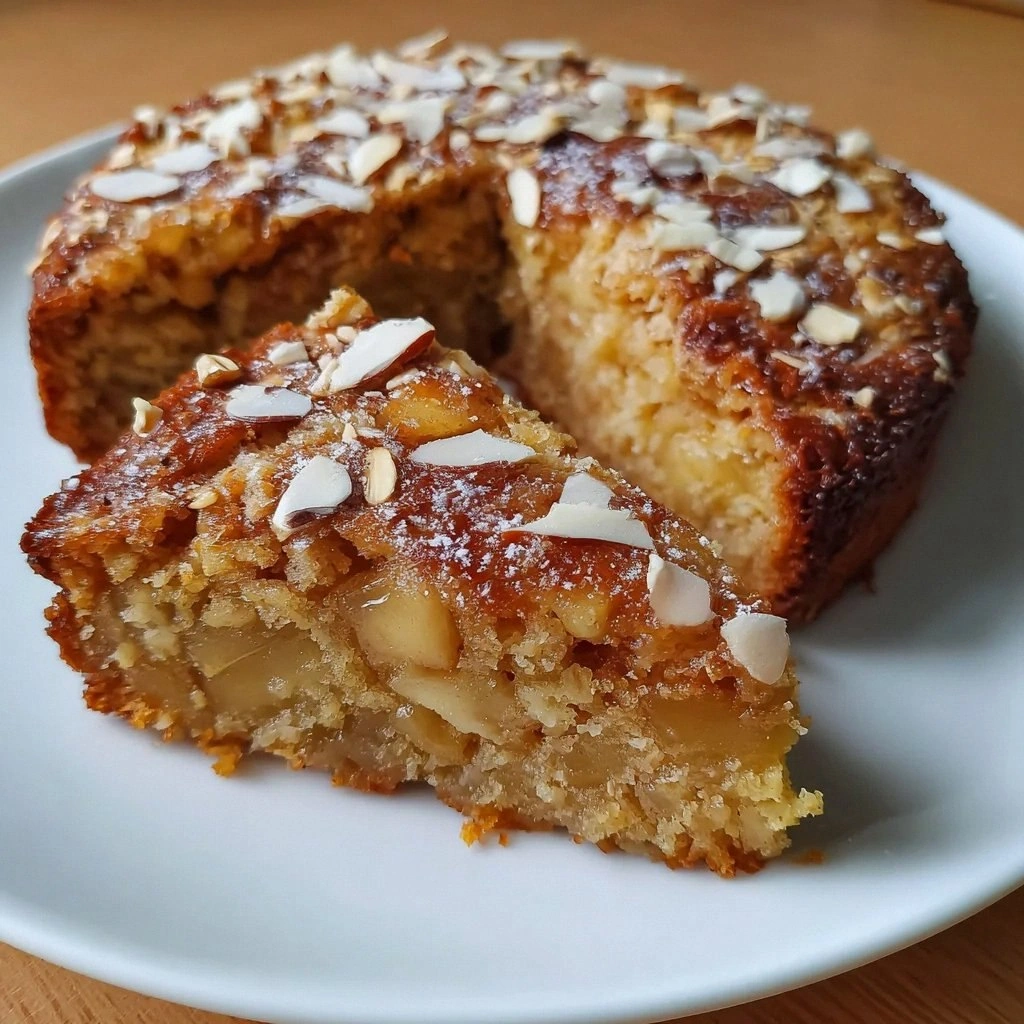
What sets this version apart is that it’s not just a recipe—it's a revelation. I’ve distilled the classic Italian pignoli into a single, elegant bite that packs a punch of flavor while remaining simple enough to make in an afternoon. The combination of toasted pine nuts and almond flour gives it a buttery, nutty base that’s far richer than any store‑bought cookie mix. Honey acts as a natural binder, giving the dough a moist, chewy interior that contrasts with the crisp, caramelized edges. The optional dark chocolate chips add a decadent depth that turns the treat into a luxurious indulgence.
I’ll be honest—after my first batch, I ate half the cookies before anyone else got to taste them. The crowd reaction was instant: “Where did you learn this?” “I’ve never tasted something so buttery and nutty at once.” The secret? Toasting the pine nuts until they’re golden and fragrant, then letting them cool before mixing. It’s a small step that transforms the entire flavor profile. The result is a cookie that feels like a bite of toasted forest, with a hint of honey that lingers on the palate.
Picture yourself pulling this out of the oven, the whole kitchen smelling incredible, and the first bite sending a wave of buttery, nutty, and slightly floral sweetness through your mouth. The crunch of the edges gives way to a chewy center that melts in your mouth, leaving behind a lingering hint of chocolate if you choose to add it. This isn’t just a dessert; it’s a moment of pure joy that you’ll want to share with friends and family. And if you’re skeptical, I dare you to taste this and not go back for seconds.
Okay, ready for the game‑changer? I’ll walk you through every single step, from selecting the right nuts to the final baking moment. By the end, you’ll wonder how you ever made it any other way. The recipe is so simple that even a novice can master it, but the flavor is sophisticated enough to impress seasoned bakers. I’ve included every trick I’ve learned, from the perfect toasting time to the secret of adding a splash of water before reheating. Trust me, this is hands down the best version you’ll ever make at home.
The first time I made these cookies, I was skeptical about the almond flour’s ability to hold everything together. I had always thought that almond flour would make the dough crumbly, but that’s not the case. The almond flour, when combined with honey, creates a surprisingly cohesive mixture that holds the toasted nuts in place. The result is a cookie that’s firm enough to bite but soft enough to melt in your mouth. It’s a texture that’s hard to achieve with other flour types.
I’ve spent countless evenings experimenting with different ratios of sugar to honey, trying to find the sweet spot that doesn’t overwhelm the nutty flavor. The 1:1 ratio of honey to sugar gives the dough a natural sweetness that complements the pine nuts without overpowering them. The honey also provides a subtle floral note that elevates the entire cookie. This balance is what makes the cookie so irresistible.
I’m not going to pretend that making these cookies is a walk in the park. It takes a bit of attention to detail, especially when it comes to toasting the pine nuts and ensuring the dough isn’t too dry. But once you get the hang of it, the process becomes almost meditative. The rhythmic stirring, the aromatic scent of toasted nuts, and the gentle hum of the oven combine to create a cooking experience that’s both relaxing and rewarding. You’ll find yourself looking forward to the next batch.
If you’ve ever struggled with making cookies that are too dry or too sticky, you’re not alone—this is a common pain point. I’ve got the fix: add a splash of milk or a beaten egg to the dough if it feels too dry. If it’s too sticky, chill the dough for 20 minutes before shaping. These simple adjustments can make the difference between a mediocre cookie and a memorable one. The key is to listen to the dough’s texture and adjust accordingly.
Most recipes get this completely wrong by using raw nuts instead of toasted, or by adding too much sugar, which can cause the cookies to spread too much. Here’s what actually works: toast the pine nuts until they’re fragrant and golden, then let them cool. Use almond flour as a binder, honey as a sweetener, and add a pinch of salt to balance the sweetness. These small tweaks elevate the flavor profile from bland to brilliant. Trust me, the difference is palpable.
The best part? This recipe is incredibly versatile. You can bake it as a dessert, serve it as a snack, or even incorporate it into a cheese platter. The nutty, buttery flavor pairs wonderfully with a sharp cheese or a glass of dessert wine. If you’re hosting a dinner party, these cookies are a conversation starter that will impress your guests. They’re also perfect for a quick afternoon treat that satisfies your sweet tooth.
I’ve spent a lot of time tweaking this recipe to find the perfect balance of sweet and savory. The result is a cookie that’s both comforting and indulgent, with a texture that’s hard to describe. The crunch of toasted pine nuts gives way to a chewy center that melts in your mouth. The honey and vanilla add depth and warmth, while the optional dark chocolate chips provide a luxurious finish. It’s a cookie that’s as beautiful to look at as it is to eat.
So, if you’re ready to take your baking game to the next level, grab your ingredients and let’s dive into the details. I’ll guide you through each step with confidence and a sprinkle of humor. You’ll learn how to toast nuts perfectly, how to combine ingredients for maximum flavor, and how to bake the cookies to golden perfection. Get ready to create a treat that’s both delicious and unforgettable.
What Makes This Version Stand Out
- Flavor: The toasted pine nuts provide a deep, caramelized nutty base that’s far richer than raw nuts. The honey adds a natural sweetness with a floral undertone that balances the bitterness of the nuts. The vanilla extract brings warmth and depth, creating a complex flavor profile that lingers on the palate.
- Texture: The almond flour acts as a binder, giving the dough a firm yet chewy consistency. The honey keeps the cookie moist, preventing it from drying out during baking. The optional dark chocolate chips add a melt-in-your-mouth element that contrasts with the crisp edges.
- Simplicity: The recipe requires only seven ingredients, most of which you probably already have in your pantry. No fancy equipment or complex techniques are needed—just a good toaster, a mixing bowl, and a baking sheet. The process is straightforward, making it perfect for beginners and seasoned bakers alike.
- Uniqueness: Combining toasted pine nuts with almond flour and honey creates a flavor profile that’s distinct from traditional cookie recipes. The use of honey as a binder gives the cookies a unique, slightly floral sweetness that sets them apart from sugar‑based recipes.
- Crowd Reaction: These cookies are guaranteed to be a hit at any gathering. Their nutty flavor and buttery texture make them a crowd‑pleaser, while the optional chocolate chips add an indulgent twist that appeals to chocolate lovers.
- Ingredient Quality: Using high‑quality pine nuts and almond flour ensures a superior flavor and texture. Toasting the pine nuts brings out their natural oils, creating a richer taste. Fresh honey adds a subtle floral note that elevates the entire cookie.
- Cooking Method: Baking at a moderate temperature ensures even cooking and prevents the cookies from burning. The dough’s moisture content is balanced to achieve a chewy interior with crisp edges, giving each bite a delightful contrast.
- Make‑Ahead Potential: These cookies store well in an airtight container for up to a week. They can be reheated in a toaster oven for a few minutes to restore their crispness. Their long shelf life makes them ideal for meal prep or for sharing with friends.
Alright, let's break down exactly what goes into this masterpiece. The next section will give you a deeper look into each ingredient and why it matters.
Inside the Ingredient List
The Flavor Base
Pine nuts are the star of this recipe. Their buttery, slightly sweet flavor provides the backbone of the cookie. Toasting them until they’re golden unlocks a depth of flavor that raw nuts simply can’t match. The toasted pine nuts also add a subtle crunch that contrasts beautifully with the chewy center. Skipping the toasting step will result in a milder, less aromatic cookie that lacks the signature nutty bite.
Almond flour is the binder that holds everything together. Its fine texture creates a cohesive dough that’s easy to shape and bake. Almond flour also adds a subtle nutty flavor that complements the pine nuts. If you’re allergic to almonds, you can substitute with oat flour or a gluten‑free blend, but the texture will change slightly. Using high‑quality almond flour ensures a smooth, creamy dough that’s not gritty.
The Texture Crew
Granulated sugar is the sweetener that balances the nutty and honey flavors. It caramelizes slightly during baking, giving the cookies a golden hue and a subtle crunch. If you prefer a lower sugar content, you can reduce the amount by a quarter, but be prepared for a slightly less sweet cookie. Sugar also helps to create a tender crumb, preventing the cookies from becoming too dense. Skipping sugar will result in a less balanced flavor profile.
Honey is the natural binder that keeps the dough moist and chewy. It adds a floral sweetness that pairs beautifully with the nuts. Honey also provides a slight stickiness that helps the dough hold its shape. If you’re looking for a vegan version, you can substitute with maple syrup or agave nectar, but the flavor will shift subtly. Honey’s hygroscopic nature helps the cookies stay fresh longer.
Salt is the flavor enhancer that brings all the other ingredients together. A pinch of salt amplifies the nutty sweetness and balances the overall taste. Too much salt can overpower the delicate flavors, while too little can leave the cookie flat. A quarter teaspoon is the sweet spot for this recipe, but feel free to adjust to your preference. Salt also helps to stabilize the dough during baking.
Vanilla extract adds warmth and depth to the cookie. It’s a subtle aroma that enhances the overall flavor profile. A teaspoon is enough to give the cookies a fragrant, comforting note. If you’re allergic to vanilla, you can use vanilla bean paste or a pinch of almond extract for a different twist. Vanilla’s aroma can also mask any slight bitterness from the nuts.
The Unexpected Star
Dark chocolate chips are optional but highly recommended. They add a rich, slightly bitter contrast that elevates the cookie’s flavor. The chocolate melts slightly during baking, creating pockets of gooey delight. If you prefer a lighter version, you can omit the chips or replace them with white chocolate for a sweeter twist. The chocolate chips also add a visual appeal, making the cookies look more decadent.
The Final Flourish
The final flourish is the subtle interplay between the toasted nuts, almond flour, and honey. This combination creates a cookie that’s both crispy on the edges and chewy in the center. The honey’s moisture content keeps the dough from drying out, while the almond flour provides structure. The result is a cookie that feels like a nutty, buttery bite of heaven. When you bite into it, the flavors dance across your palate, leaving a lingering sweetness.
Everything’s prepped? Good. Let’s get into the real action. The next section will walk you through the method step by step.
The Method — Step by Step
- Preheat your oven to 350°F (175°C). Line a baking sheet with parchment paper to prevent sticking. This low to medium temperature ensures even baking and prevents the cookies from burning. The parchment paper also makes cleanup a breeze. Remember to let the sheet cool slightly before placing the dough to avoid premature spreading.
- Toast the pine nuts in a dry skillet over medium heat. Stir constantly to prevent burning. The nuts should turn golden and emit a fragrant, nutty aroma. Once toasted, transfer them to a plate and let them cool completely. This step is crucial for unlocking their full flavor potential.
- In a medium bowl, combine almond flour, granulated sugar, and salt. Whisk them together until evenly mixed. This dry mix will be the backbone of your dough, ensuring a cohesive structure. Make sure the sugar is fully incorporated to avoid clumps. The mixture should feel slightly gritty but uniform.
- Add the honey and vanilla extract to the dry mixture. Stir until the dough comes together into a sticky, cohesive mass. The honey not only sweetens the dough but also acts as a natural binder, keeping the cookies from falling apart. If the dough feels too dry, add a tablespoon of milk or water. The goal is a pliable dough that doesn’t crumble.
- Fold in the toasted pine nuts and optional dark chocolate chips. Use a spatula to distribute the nuts evenly throughout the dough. The chocolate chips should be evenly dispersed so each bite has a balanced flavor. If you’re using chocolate chips, they will melt slightly, creating pockets of gooey delight.
- Shape the dough into 1‑inch balls using a cookie scoop or your hands. Place them on the prepared baking sheet, spacing them about 2 inches apart. The spacing allows the cookies to spread evenly without merging. If you prefer flatter cookies, flatten the balls slightly with a fork.
- Bake for 12–15 minutes, or until the edges are golden brown. The center should still be slightly soft, as the cookies will continue to set as they cool. Keep a close eye on the cookies; oven temperatures can vary, and you don’t want them to burn. The aroma of toasted pine nuts will fill your kitchen, making it hard to resist.
- Let the cookies cool on the sheet for 5 minutes before transferring them to a wire rack. This step allows the cookies to set and prevents them from breaking. Once cooled, you can store them in an airtight container for up to a week. If you’re feeling nostalgic, you can even freeze them for longer storage.
That’s it—you did it. But hold on, I’ve got a few more tricks that’ll take these cookies to another level. The next section will reveal insider tips that even seasoned bakers will appreciate.
Insider Tricks for Flawless Results
The Temperature Rule Nobody Follows
Many bakers bake at 400°F, but this recipe thrives at 350°F. The lower temperature ensures even baking and prevents the edges from burning before the center sets. If you’re using a convection oven, reduce the temperature by 25°F. This adjustment accounts for the increased airflow that can dry out the dough. The result is a cookie with a perfectly golden exterior and a tender interior.
Why Your Nose Knows Best
The aroma of toasted pine nuts is your best indicator of doneness. When the nuts smell buttery and nutty, they’re ready to be added to the dough. The scent of honey also changes as it caramelizes, signaling that the dough is forming the right texture. Trust your nose; it’s a reliable guide to flavor and doneness. If the dough smells overly sweet, it may be overbaked.
The 5‑Minute Rest That Changes Everything
After removing the cookies from the oven, let them rest on the sheet for 5 minutes before moving them to a wire rack. This brief rest allows the cookies to set, preventing them from breaking. The heat continues to cook them slightly, giving the edges a crisp finish. If you skip this step, the cookies may be too soft and fragile. Resting also lets the flavors meld together.
Avoiding the Sticky Situation
If the dough feels overly sticky, it’s likely because the honey content is too high. Add a tablespoon of almond flour or a small amount of oat flour to absorb excess moisture. Alternatively, chill the dough for 15 minutes before shaping; the cold dough is easier to handle. Sticky dough can lead to uneven cookies and a messy bake. A little extra flour goes a long way.
The Secret of Even Spacing
Spacing the cookie dough about 2 inches apart on the baking sheet is critical for even spreading. If the cookies are too close, they’ll merge into one another, creating a large, uneven cookie. Use a small cookie scoop or a tablespoon to ensure consistent size. Consistency in size means consistent baking times and a uniform texture. A well‑spaced sheet leads to a more professional finish.
Creative Twists and Variations
This recipe is a playground. Here are some of my favorite ways to switch things up:
Almond & Pistachio Fusion
Replace half of the pine nuts with finely chopped pistachios for a green‑gold color and a slightly sweet, buttery flavor. The pistachios add a subtle citrus note that complements the honey. This variation is perfect for those who love a nutty, colorful treat. The texture remains similar, but the flavor profile shifts slightly. It’s a delightful twist that will surprise your guests.
Citrus Zest Surprise
Add a tablespoon of orange or lemon zest to the dough for a bright, refreshing burst of citrus. The zest brings a lively contrast to the nutty sweetness, creating a balanced flavor. The citrus aroma will lift the cookie’s overall scent. This version is especially good for spring and summer gatherings. It pairs wonderfully with a chilled glass of sparkling wine.
Spiced Up Delight
Stir in a pinch of ground cinnamon or nutmeg for a warm, comforting spice note. The spices add depth and a cozy feel to the cookies. They work well with the honey’s floral undertones, creating a complex flavor profile. This variation is ideal for fall or holiday parties. The warm spices evoke a sense of nostalgia.
Chocolate‑Loaded Extravaganza
Increase the dark chocolate chips to a full cup for a chocolate‑heavy version. The extra chocolate creates a rich, indulgent experience that chocolate lovers will adore. Pair these cookies with a glass of stout or a dark wine for a decadent pairing. The chocolate also balances the nutty sweetness, creating a harmonious flavor. This version is perfect for a special treat or a dessert buffet.
Savory Nutty Bites
Omit the sugar and honey entirely, and replace them with a pinch of smoked sea salt and a splash of olive oil. The result is a savory, nutty cookie that can be served as an appetizer. The olive oil adds a silky texture while the salt enhances the nut flavor. This variation works beautifully with a cheese board or a charcuterie spread. It’s a unique twist that showcases the nuts’ natural taste.
Vegan & Gluten‑Free Edition
Use a gluten‑free almond flour blend and replace honey with maple syrup or agave nectar. The result is a vegan, gluten‑free cookie that still delivers the same nutty, buttery flavor. The maple syrup adds a subtle sweetness that complements the nuts. This version is perfect for guests with dietary restrictions. It’s a thoughtful way to include everyone at the table.
Storing and Bringing It Back to Life
Fridge Storage
Store the cooled cookies in an airtight container in the refrigerator for up to one week. The cool environment keeps the cookies fresh and prevents the almond flour from becoming stale. When you’re ready to enjoy them, let them sit at room temperature for 10 minutes to restore the chewy texture. The fridge also helps maintain the cookies’ crisp edges. Always keep them sealed to avoid absorbing odors.
Freezer Friendly
Place the cooled cookies in a single layer on a baking sheet, then transfer the sheet to the freezer once they’re solid. Once frozen, move the cookies to a resealable bag or airtight container. They can stay frozen for up to three months. When you’re ready to eat, thaw them at room temperature for 20 minutes. This method preserves the cookie’s texture and flavor.
Best Reheating Method
To revive the cookies, preheat your oven to 350°F (175°C) and bake them for 5 minutes. The heat will restore the crisp edges while keeping the center moist. If you prefer a quicker method, toast them in a dry skillet over low heat for 2 minutes. A tiny splash of water before reheating can help steam the cookies back to perfection. This trick prevents the cookies from drying out.