Picture this: it’s a humid Saturday afternoon, the kitchen smells like a summer barbecue, and you’re staring at an empty pan. The last time you tried to make cornbread poppers, the batter turned into a sticky, unappetizing mess that left your countertop looking like a flour battlefield. That disaster was the catalyst that pushed me to reinvent the classic Southern cornbread popper, but with a honey butter twist that would make even the most skeptical taste buds swoon. I’m talking about a version that balances sweet and savory, delivers a buttery glaze that coats like velvet, and has a crunch that shatters like thin ice.
From the first whisk, you’ll notice the batter’s silky texture—think smooth, almost custard-like consistency that glides into the pan without clumping. The aroma is a warm, golden invitation: a blend of toasted cornmeal, melted butter, and a sweet whisper of honey that drifts through the room. When it hits the hot skillet, you’ll hear a satisfying sizzle that signals the start of something delicious. The taste is a harmonious duet of sweet honey and savory corn, with a buttery finish that lingers on the tongue. If you’ve ever struggled to get your poppers to hold shape, this version is a game‑changer.
I dare you to taste these poppers and not go back for seconds. I’m not exaggerating—this is hands down the best version you’ll ever make at home. The secret? A precise ratio of ingredients that creates a batter thick enough to hold but thin enough to spread, a honey butter sauce that glazes without soaking, and a cooking technique that locks in moisture while achieving a crisp edge. The result is bite‑size delight that feels like a miniature Southern treat, ready to be devoured with your favorite dipping sauce.
Let me walk you through every single step—by the end, you’ll wonder how you ever made it any other way. Whether you’re a seasoned cook or a kitchen newbie, you’ll find that the process is straightforward, the flavors are unforgettable, and the final product is a crowd‑pleaser that will have guests asking for the recipe. So grab your apron, and let’s dive into the Southern‑Style Honey Butter Co experience.
What Makes This Version Stand Out
- Flavor: The honey butter glaze adds a caramelized sweetness that pairs perfectly with the corn’s natural earthiness.
- Texture: A batter that’s thick enough to stay together but thin enough to spread, giving the poppers a tender crumb inside and a crisp exterior.
- Convenience: All the steps can be done in under an hour, and the poppers are ready to serve immediately after cooking.
- Versatility: Works as an appetizer, side dish, or snack—just add a dip or enjoy on their own.
- Make‑ahead: The batter can be prepared ahead of time and refrigerated, saving you a lot of prep on the day of the event.
- Ingredient Quality: Using high‑quality butter and real honey elevates the flavor profile beyond ordinary.
Alright, let's break down exactly what goes into this masterpiece…
Inside the Ingredient List
The Flavor Base
At the heart of these poppers lies a harmonious blend of all‑purpose flour and cornmeal. The flour provides structure, while the cornmeal adds that unmistakable Southern crunch and a subtle nutty flavor. Together, they create a batter that’s sturdy enough to hold the honey butter glaze without becoming soggy. Skipping the cornmeal would strip the poppers of that essential bite, turning them into plain flatbread.
The Texture Crew
Butter and honey work together like a dynamic duo, each bringing its own texture to the mix. The butter melts into the batter, creating a tender crumb, while the honey adds a silky smoothness that coats the poppers like a glaze. If you omit the butter, you’ll lose the rich mouthfeel and the golden color; if you skip the honey, the poppers will taste flat and dry. A good swap for the butter is ghee, which imparts a nutty flavor and a higher smoke point.
The Unexpected Star
Milk is the secret to achieving that perfect batter consistency. Whole milk gives the poppers a luscious, slightly fatty mouthfeel, while low‑fat milk will produce a leaner result. If you’re lactose intolerant, a splash of almond milk or oat milk works, but remember that the batter might become slightly thinner. The key is to whisk until the mixture is smooth and free of lumps.
The Final Flourish
Eggs act as a binder, ensuring that the batter holds together during cooking. They also add richness and help the poppers rise slightly, giving them that airy interior. If you’re vegan, try flaxseed meal mixed with water as an egg substitute; it will bind the batter but won’t give the same flavor profile. The vanilla extract is a subtle enhancer that rounds out the sweetness, so don’t skip it—your taste buds will thank you.
Everything’s prepped? Good. Let’s get into the real action…
The Method — Step by Step
- Begin by preheating your oven to 400°F (200°C). While the oven warms, line a baking sheet with parchment paper or a silicone mat. This step ensures that the poppers won’t stick and makes cleanup a breeze. The heat will create a crisp exterior while keeping the interior moist.
- In a large bowl, whisk together the all‑purpose flour, cornmeal, sugar, baking powder, and salt. The dry mix is the foundation; a well‑combined dry mix prevents uneven browning and lumps in the batter. The sugar is essential for caramelization, giving the poppers a golden crust.
- In a separate bowl, beat the eggs, then add the milk, melted butter, honey, and vanilla extract. Whisk until the liquid mixture is smooth and the butter is fully incorporated. The honey should be warm enough to flow easily but not so hot that it burns the eggs.
- Pour the wet mixture into the dry ingredients, stirring gently until just combined. Be careful not to overmix; a few lumps are acceptable. Overmixing can develop gluten and result in tough poppers.
- Heat a non‑stick skillet over medium heat and lightly grease it with a dab of butter or oil. Once hot, pour about 1 tablespoon of batter per popper. The batter should spread slightly but not thin out; it should form a small, round mound.
- Cook each popper for 2–3 minutes on the first side, until bubbles form on the surface and the edges lift. Flip carefully and cook for another 2 minutes on the second side. The poppers should be golden brown and firm to the touch.
- Transfer the cooked poppers to the prepared baking sheet and bake in the preheated oven for 8–10 minutes. This final bake ensures even cooking and a crisp crust. The interior should remain moist, not dry or overcooked.
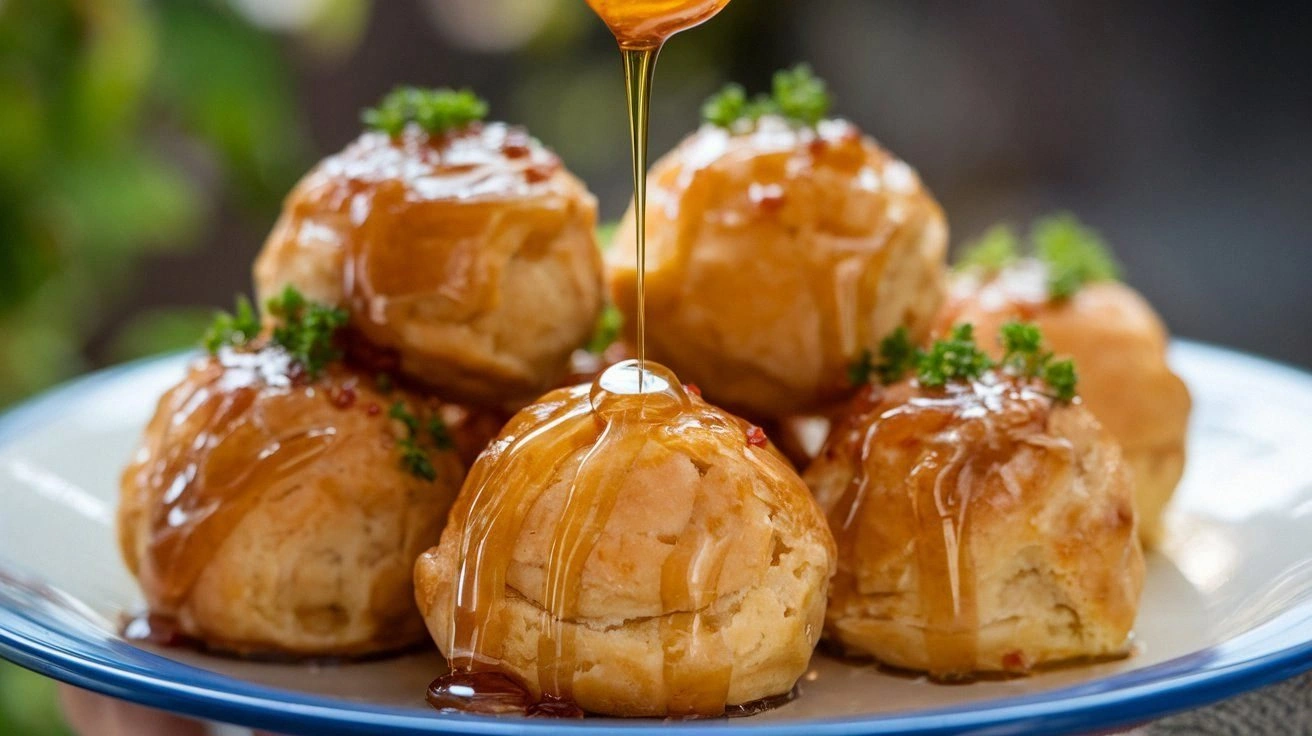
- While the poppers finish baking, whisk together equal parts melted butter and honey in a small saucepan. Heat gently until the mixture is glossy and warm, but do not let it boil. This glaze will be brushed over the poppers for a shiny finish.
- Brush each popper with the honey butter glaze as soon as they come out of the oven. The glaze will set quickly, so work efficiently. The result is a glossy, sweet coating that enhances the flavor profile.
- Serve immediately, either straight from the oven or with a side of your favorite dipping sauce. The poppers are best enjoyed warm, when the glaze is still slightly tacky and the interior is soft. If you need to keep them warm, place them in a low‑heat oven (200°F) on a wire rack.
That's it — you did it. But hold on, I've got a few more tricks that'll take this to another level…
Insider Tricks for Flawless Results
The Temperature Rule Nobody Follows
Many cooks assume that a higher oven temperature will always yield crispier results, but that’s a myth. A steady 400°F (200°C) gives the poppers a golden crust while maintaining a moist interior. If you go too high, the exterior will burn before the inside cooks. Keep the oven at the right temperature and watch the color change as a reliable indicator.
Why Your Nose Knows Best
When the batter is about to set, you’ll notice a sweet, buttery aroma that signals it’s ready to flip. Trust that scent; if you wait too long, the batter will stick to the pan and tear. This sensory checkpoint saves you from a cooking mishap and ensures even cooking.
The 5‑Minute Rest That Changes Everything
After brushing the honey butter glaze, let the poppers rest for 5 minutes before serving. This brief pause allows the glaze to set, preventing it from sliding off when you pick up a popper. It also gives the interior a chance to finish cooking from residual heat.
Keep the Batter Consistent
Mix the batter just until combined; over‑mixing develops gluten, which can make the poppers tough. A few lumps are acceptable and will even create pockets of tenderness. If your batter is too thick, add a splash of milk; if too thin, add a tablespoon of flour.
Serve with a Sidekick
Pair these poppers with a creamy dip like ranch or a spicy aioli. The contrast between the sweet glaze and the savory dip elevates the flavor profile. A simple side of pickles or a light salad also complements the richness.
Creative Twists and Variations
This recipe is a playground. Here are some of my favorite ways to switch things up:
Smoky Chipotle Poppers
Fold in a tablespoon of chipotle powder into the batter for a smoky kick. The heat pairs beautifully with the honey glaze, creating a depth of flavor that’s perfect for a summer cookout.
Cheesy Jalapeño Surprise
Add shredded cheddar and diced jalapeños to the batter. The cheese melts into gooey pockets, while the jalapeños add a subtle heat that balances the sweetness.
Blueberry Bliss
Stir in fresh blueberries before baking. The berries burst with juice, adding a burst of tartness that contrasts the honey butter.
Herb‑Infused Popcorn
Replace half the cornmeal with toasted breadcrumbs and fold in chopped rosemary or thyme. The herbs give a savory depth that turns the poppers into a sophisticated appetizer.
Vegan Delight
Swap butter for coconut oil and use plant‑based milk. Replace eggs with flaxseed meal or commercial egg replacer. The result is a plant‑based version that still delivers on flavor and texture.
Breakfast Boost
Serve the poppers with a drizzle of maple syrup and a side of scrambled eggs. The honey butter glaze works as a sweet topping for a hearty breakfast.
Storing and Bringing It Back to Life
Fridge Storage
Store leftovers in an airtight container in the refrigerator for up to 3 days. The honey butter glaze will soften, so reheat before serving to restore the crispness.
Freezer Friendly
Freeze poppers in a single layer on a parchment‑lined tray before transferring to a freezer bag. They stay good for up to 2 months. Reheat in a low‑heat oven for 10 minutes to revive the texture.
Best Reheating Method
To reheat, add a splash of water to the bottom of a skillet and heat on medium. The water creates steam that keeps the poppers moist while the top crisps up. Cover for the first 2 minutes, then remove the lid to let the tops crisp.