I was sitting on my couch, scrolling through a thousand take‑out menus, when a sudden craving for something cheesy, crunchy, and unapologetically indulgent hit me like a freight train. I tried the fast‑food version, but the moment the first bite hit my tongue, I realized it was missing that deep, home‑cooked heart that only a properly seasoned beef and a melt‑in‑your‑mouth cheese can deliver. I thought, “What if I could recreate that iconic Taco Bell Beefy Melt Burrito in my own kitchen, but with a twist that makes it taste like it was crafted by a Mexican‑American culinary wizard?” That thought sparked a kitchen adventure that lasted three hours, a few spilled beans, and a lot of laughter.
Picture this: the sizzle of lean ground beef hitting a hot skillet, the aroma of taco seasoning spiraling up like a fiesta in a bottle, the buttery melt of cheese as it pools into every crevice, and the satisfying crunch of corn chips that shatter like fireworks in your mouth. The kitchen filled with the scent of cumin, garlic, and a hint of smoky paprika, while the countertop was a battlefield of bright red salsa jars, green sour‑cream tubs, and a mountain of fluffy Mexican rice waiting to be folded into a warm tortilla. My hands were coated in a thin sheen of oil, the heat from the stove warming my cheeks, and the anticipation was palpable—like waiting for the curtain to rise on a Broadway show.
Most home recipes for a “Beefy Melt” either skimp on the cheese or forget the crunchy element that makes the original so addictive. I’ve tried a dozen variations, and they either turned out soggy, bland, or just plain boring. This version stands out because it respects the original’s spirit while adding a few secret weapons: a splash of beef broth to keep the meat juicy, a generous handful of crushed Fritos for that signature crunch, and a warm cheese dip that envelops every bite in silky decadence. I dare you to taste this and not go back for seconds—because once you’ve experienced the perfect balance of textures, you’ll never settle for a mediocre burrito again.
There’s also a little surprise hidden in the preparation that I won’t reveal until later: a quick technique that locks in moisture and creates a crust on the tortilla that’s crisp on the outside yet fluffy on the inside, like a golden‑brown hug. Okay, ready for the game‑changer? Let me walk you through every single step — by the end, you’ll wonder how you ever made it any other way.
What Makes This Version Stand Out
- Flavor Explosion: The combination of taco seasoning, beef broth, and a splash of cheese dip creates layers of flavor that build with each bite, delivering a taste experience that’s both bold and comforting.
- Texture Symphony: Crunchy corn chips, creamy refried beans, and a soft tortilla form a perfect trio of textures that keep your palate entertained from the first chew to the last.
- Simplicity Meets Sophistication: Despite its gourmet feel, the recipe uses pantry staples and requires only basic kitchen tools, making it accessible for cooks of any skill level.
- Unique Crunch Factor: The inclusion of Fritos or Doritos adds an unexpected, addictive crunch that most copycat recipes completely miss.
- Crowd‑Pleaser Status: Whether you’re feeding a family, a group of friends, or just treating yourself, this burrito earns applause and empty plates in equal measure.
- Ingredient Quality: Using lean ground beef and a high‑quality shredded Mexican cheese blend ensures a healthier yet still indulgent bite.
- One‑Pan Efficiency: Most of the cooking happens in a single skillet, meaning less cleanup and more time to enjoy the finished product.
- Make‑Ahead Magic: The components can be pre‑cooked and stored, allowing you to assemble the burritos in minutes when hunger strikes.
Inside the Ingredient List
The Flavor Base
Lean Ground Beef: This is the heart of the burrito, providing a juicy, protein‑packed foundation. Choose 90% lean to keep the fat content reasonable while still delivering that satisfying mouthfeel. If you skip the beef, you lose the savory depth that makes the melt truly “beefy.” For a twist, try ground turkey or a plant‑based mince, but be aware the flavor profile will shift.
Taco Seasoning: A blend of chili powder, cumin, garlic, and oregano that instantly transports you to a Mexican street market. You can buy a premixed packet or create your own—mix 1 tsp each of chili powder, cumin, paprika, and a pinch of cayenne for a custom kick. Skipping this means the meat will taste bland, and the whole burrito loses its signature zing.
The Texture Crew
Refried Beans: These creamy beans act as a moisture barrier, preventing the tortilla from becoming soggy while adding a subtle earthiness. Opt for low‑sodium canned beans or make them from scratch for extra control over salt. If you omit them, the burrito can feel dry and the flavor balance tips too heavily toward beef.
Cooked Mexican Rice: Fluffy rice adds bulk and a gentle sweetness that offsets the spice. Use long‑grain rice cooked with tomato sauce, chicken broth, and a dash of cumin for authenticity. Skipping rice makes the burrito feel thin, and you’ll miss that satisfying bite‑size grain texture.
Fritos or Doritos Corn Chips: The crunchy secret weapon that gives each bite a delightful snap. Crush them just enough to sprinkle throughout the filling without turning the whole thing into a crumbly mess. If you don’t have chips, substitute with toasted corn tortillas cut into strips, but you’ll lose some of the buttery flavor.
The Unexpected Star
Warmed Cheese Dip: This velvety cheese sauce is the glue that binds every component together, creating a molten river that seeps into the beans, rice, and meat. Use a high‑quality processed cheese or melt cheddar with a splash of milk for a smoother texture. Skipping it makes the burrito feel dry and less indulgent.
Shredded Mexican Cheese Blend: A mix of cheddar, Monterey Jack, and queso quesadilla adds a melty, slightly sharp finish. Sprinkle it generously before rolling so it melts into the warm tortilla. If you use only one cheese, you’ll miss the complex flavor that the blend provides.
The Final Flourish
Sour Cream: The cool, tangy dollop balances the heat from the seasoning and the richness of the cheese dip. Add it right before serving for a fresh burst. Leaving it out can make the burrito feel overly heavy.
Salsa: Fresh salsa adds a juicy, acidic punch that brightens every bite. Choose a medium‑spicy tomato‑based salsa or a verde version for a different flavor direction. Skipping salsa means missing that essential layer of moisture and zest.
Large Flour Tortillas: The vessel for all the goodness; they must be soft enough to wrap but sturdy enough to hold the fillings. Look for tortillas labeled “burrito size” (10‑12 inches). If you use a smaller tortilla, you’ll end up with a messy spillover.
Everything's prepped? Good. Let's get into the real action...
The Method — Step by Step
Heat a large skillet over medium‑high heat and add a drizzle of vegetable oil. Once the oil shimmers, crumble the lean ground beef into the pan, spreading it out so it cooks evenly. Let the meat sizzle without stirring for about 2 minutes; that initial sear creates a caramelized crust that locks in juices. Then break it up with a wooden spoon, stirring until it’s browned all over—this should take another 4‑5 minutes. Pro tip: If the pan looks dry, add a splash of water or beef broth to keep the meat moist.
When the beef is nicely browned, sprinkle in the taco seasoning, stirring quickly to coat every morsel. Pour in ¼ cup of water or beef broth, letting the mixture bubble and thicken for about 3 minutes. You’ll hear a gentle hiss as the liquid reduces, creating a glossy sauce that clings to the meat.
Kitchen Hack: Add a pinch of sugar to the seasoning mix; it balances the acidity of the broth and deepens the flavor.While the beef simmers, warm the refried beans in a separate saucepan over low heat, adding a splash of water if they look too thick. Stir constantly to prevent scorching, and once they’re silky smooth, set them aside. The beans should be hot and spreadable, ready to act as a buttery layer inside the tortilla.
In the same skillet used for the beef (no need to wash), add the cooked Mexican rice and let it toast lightly for 2 minutes, allowing the grains to pick up a faint caramel flavor. This step is crucial—if you skip it, the rice will feel bland and separate from the other fillings.
Now, it’s time to assemble the crunch. Place the Fritos or Doritos in a zip‑top bag and crush them with a rolling pin until they’re in medium‑sized pieces. Sprinkle half of the crushed chips into the skillet with the beef and rice, letting them toast for a minute. This brief toasting intensifies their buttery flavor and prevents them from getting soggy later.
Watch Out: Do not over‑crush the chips into powder, or they’ll turn the filling into a mushy mess.Warm the large flour tortillas. The easiest method is to wrap them in a damp paper towel and microwave for 30 seconds, or you can heat them on a dry skillet for 15 seconds per side. The goal is a pliable, slightly toasted canvas that won’t tear when you roll.
Time for the cheese dip. In a small saucepan, melt the cheese dip over low heat, stirring gently until it becomes a smooth, glossy sauce. If it thickens too much, whisk in a tablespoon of milk or broth. Drizzle a generous spoonful over each tortilla, letting it pool in the center—this is the molten river that will bind everything together.
Begin layering: spread a thin layer of warm refried beans on the tortilla, followed by a scoop of the seasoned beef, then a spoonful of toasted rice, and a handful of the remaining crushed chips. Sprinkle the shredded Mexican cheese blend over the top, allowing it to melt into the warm fillings. Finally, add a dollop of sour cream and a spoonful of salsa. Fold the sides in and roll tightly, sealing the edge with a gentle press.
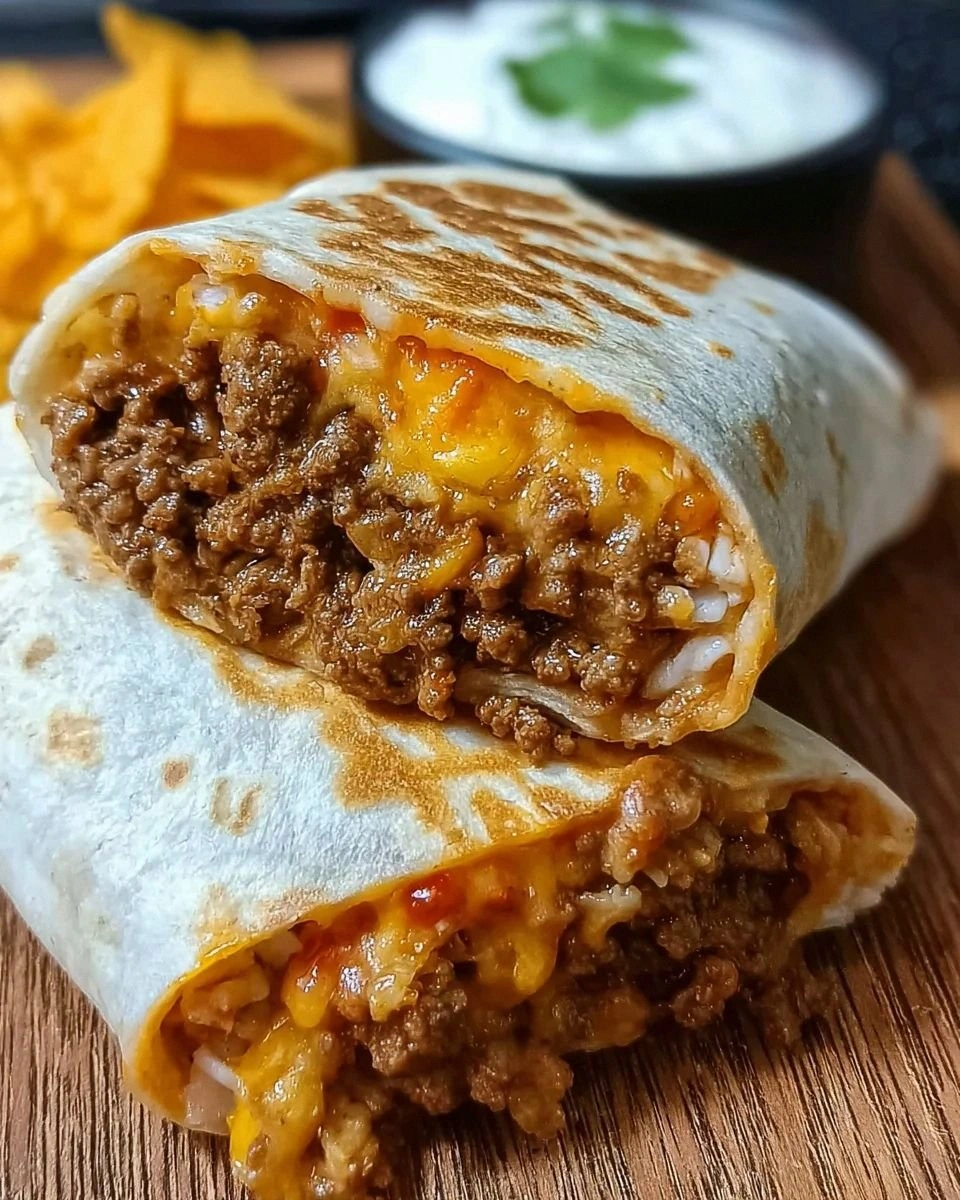
For the finishing touch, return the rolled burritos to the skillet, seam side down, and press lightly with a spatula. Cook for 2‑3 minutes per side until the tortilla turns golden‑brown and the cheese inside is fully melted. You’ll hear a faint crackle as the tortilla crisps—listen for that sound, it’s the sign of perfection. Remove from heat, let them rest for a minute, then slice in half to reveal the molten interior.
That's it — you did it. But hold on, I've got a few more tricks that'll take this to another level...
Insider Tricks for Flawless Results
The Temperature Rule Nobody Follows
Never cook the beef on high heat from the start. Starting at medium‑high and then dropping to medium after the meat releases its juices ensures a juicy interior without burning the spices. I once cranked the heat to full blast, and the seasoning went bitter—my friends still tease me about the “charred disaster.” Keep the heat steady, and you’ll get that caramelized crust without sacrificing flavor.
Why Your Nose Knows Best
Your sense of smell is the ultimate timer. When the beef starts to release a fragrant, earthy aroma, you’re at the perfect point to add the seasoning. If you wait too long, the spices will lose their potency; too early, and they’ll burn. Trust that nose‑twitching moment—it's the secret handshake between you and the pan.
The 5‑Minute Rest That Changes Everything
After searing the burritos, let them sit for five minutes before cutting. This short rest allows the juices to redistribute, preventing a soggy spill when you slice. I used to cut immediately, and the fillings would slide out like a sloppy taco. Give them a breather, and the interior stays perfectly intact.
Crunch Preservation Technique
If you’re planning to make these ahead of time, keep the crushed chips separate until the final sear. Adding them too early will make them soggy, ruining the signature crunch. Store the chips in an airtight container, and sprinkle them just before the last minute of cooking for that fresh‑out‑of‑the‑bag snap.
Cheese Dip Consistency Control
If your cheese dip thickens too much, whisk in a splash of milk, broth, or even a tiny drizzle of water. This keeps it pourable and ensures it seeps into every nook. Conversely, if it’s too runny, simmer it a bit longer to evaporate excess liquid. The right consistency makes the burrito feel like a molten masterpiece rather than a soggy mess.
Creative Twists and Variations
This recipe is a playground. Here are some of my favorite ways to switch things up:
Southwest Veggie Blast
Swap the ground beef for sautéed bell peppers, onions, and black beans. Add a dash of smoked paprika and a handful of corn kernels for a bright, vegetarian version that still delivers that satisfying crunch.
Spicy Jalapeño Inferno
Mix finely diced jalapeños into the taco seasoning and sprinkle extra sliced jalapeños on top before rolling. The heat will climb, making this the perfect challenge for spice lovers who love to feel the burn.
Cheesy Bacon Overload
Crumble cooked bacon into the beef mixture and add a layer of extra shredded cheddar before sealing. The smoky bacon adds depth, while the extra cheese makes every bite a gooey delight.
Tex‑Mex Queso Delight
Replace the standard cheese dip with a homemade queso sauce made from melted cheddar, diced tomatoes, and a splash of beer. The beer adds a subtle malt sweetness that pairs beautifully with the seasoned beef.
Breakfast Burrito Remix
Add scrambled eggs and replace the salsa with a mild pico de gallo. Top with a drizzle of hot sauce for a morning‑kick that feels like brunch meets dinner.
Storing and Bringing It Back to Life
Fridge Storage
Place the assembled burritos in an airtight container and refrigerate for up to 3 days. To keep the tortilla from drying out, lay a damp paper towel over the top before sealing. When ready to eat, reheat in a skillet over medium heat for 3‑4 minutes per side.
Freezer Friendly
Wrap each burrito tightly in plastic wrap, then place them in a freezer‑safe zip‑top bag. They’ll freeze solid for up to 2 months. To reheat, unwrap, microwave for 2 minutes, then finish in a hot skillet to restore crispness.
Best Reheating Method
Add a tiny splash of water (about a teaspoon) to the pan before reheating. The steam will revive the tortilla’s softness while the skillet restores the crunch. Cover the pan briefly to trap steam, then uncover for the final minute to achieve that perfect golden crust.