I was standing in my kitchen, half‑asleep, when the timer on my leftover ube ice cream went off and the sweet, violet perfume burst into the air. I stared at the empty bowl, feeling a pang of betrayal—how could something so vibrant disappear so quickly? That night, I dared my roommate to a midnight snack showdown: whoever could craft the most unforgettable pandesal would win bragging rights and the last slice of mango cake. I was armed with a bag of ube, a block of cream cheese, and a stubborn belief that the classic Filipino roll could be turned into a cloud‑like, cheesy masterpiece. The result? A loaf that sings with violet hue, a buttery crust that cracks like fresh snow, and a creamy center that oozes like sunrise over a rice field.
Picture this: the moment you open the oven, a wave of warm, earthy aroma hits you—like a hug from your abuela, but with a modern twist. The crust is a golden‑brown, slightly crisp edge that gives way to a pillowy interior, speckled with tiny flecks of melted cheddar that melt on your tongue. When you bite, the ube’s natural sweetness mingles with the tang of cream cheese, creating a flavor duet that’s both nostalgic and daring. The crumb is airy, almost as if you’re biting into a sweet, savory cloud that refuses to collapse under the weight of its own decadence. Trust me, I dare you to taste this and not go back for seconds.
Most pandesal recipes get the texture right but fall flat on flavor; they’re just… bread. This version flips the script by weaving ube into the dough itself, infusing every crumb with that iconic violet richness, while a hidden cheese core delivers a surprise that makes every bite a mini celebration. The secret? A two‑step dough‑fold that traps the cheese filling before the final proof, ensuring the melt stays perfectly centered. I’ve tried countless shortcuts—adding ube extract, swapping butter for oil—only to end up with a dense, gummy mess. This is hands down the best version you’ll ever make at home, and I’m about to prove it.
I’ll be honest — I ate half the batch before anyone else got to try it, and the rest vanished within minutes of cooling. The technique that makes this possible is a simple butter‑brush and breadcrumb coating that creates a crisp outer shell while keeping the inside ultra‑soft. It’s a game‑changer, and you’ll wonder how you ever tolerated plain pandesal again. Let me walk you through every single step — by the end, you’ll wonder how you ever made it any other way.
What Makes This Version Stand Out
- Flavor Fusion: The earthy sweetness of ube meets the sharp tang of cheddar, creating a contrast that dances on the palate like a well‑choreographed tango.
- Texture Triumph: A buttery, crisp crust gives way to a cloud‑like crumb, while the molten cheese core adds a surprise melt that feels like a secret treasure.
- Simplicity: Despite the gourmet vibe, the ingredient list is pantry‑friendly and the steps use everyday kitchen tools—no fancy stand mixers required.
- Unique Visuals: The violet‑purple hue of the dough is a show‑stopper, perfect for Instagram feeds and family gatherings alike.
- Crowd Reaction: Even the toughest critics confess to “stealing” a piece before the host can finish serving, and that’s a win in any kitchen.
- Ingredient Quality: Using fresh ube and real cream cheese elevates the flavor profile beyond any artificial coloring or powdered mixes.
- Cooking Method: The double‑proof technique ensures a light, airy crumb while the final bake creates that perfect golden crust.
- Make‑Ahead Potential: These rolls freeze beautifully, so you can have a stash of Filipino bliss ready for any impromptu brunch.
Inside the Ingredient List
The Flavor Base
All‑Purpose Flour forms the structural backbone of any good pandesal. The gluten development gives you that signature chew while still allowing the dough to puff up during proof. If you substitute with whole‑wheat flour, you’ll get a denser crumb that can mask the delicate ube flavor. For the best result, sift the flour twice to aerate it, ensuring a light, airy texture. Tip: Look for a flour brand that lists a protein content around 10‑11% for optimal balance.
Purple Yam (Ube) is the star of the show. Fresh ube provides a natural violet color and a subtle, nutty sweetness that no food coloring can replicate. When grated and boiled, it releases starches that help bind the dough, giving it that melt‑in‑your‑mouth quality. If you can’t find fresh ube, frozen cubes are a solid alternative—just make sure they’re 100% pure, no added sugars. Watch Out: Over‑cooking ube turns it mushy, which can make the dough too wet and hinder proper rising.
The Texture Crew
White Sugar not only sweetens the dough but also feeds the yeast, encouraging a robust rise. Its granules dissolve during the warm milk stage, ensuring even distribution. If you prefer a less sweet profile, you can trim the sugar by a tablespoon without compromising the rise. Salt, on the other hand, balances the sweetness and tightens the gluten network, preventing the dough from becoming overly slack.
Instant Yeast is the magic wand that turns a lump of flour into fluffy bread. Because it’s “instant,” you can mix it directly into the dry ingredients, saving time. However, if you’re using active dry yeast, remember to proof it in warm milk first—otherwise you risk a sluggish rise. The warm milk (around 105°F) acts as a gentle incubator, coaxing the yeast into action without killing it.
The Unexpected Star
Cream Cheese and Shredded Cheddar form the decadent filling that sets this pandesal apart. Cream cheese adds a tangy creaminess that balances the ube’s earthiness, while cheddar contributes a sharp, buttery note that melts beautifully. If you’re lactose‑intolerant, try a dairy‑free cream cheese and a sharp vegan cheddar; the texture will stay lush, though the flavor profile shifts slightly.
Unsalted Butter and Melted Butter are used at different stages—one enriches the dough, the other creates the glossy, crisp crust. The unsalted variety lets you control the salt level precisely, while the melted butter brushed on the rolls before baking encourages a golden‑brown finish. Kitchen Hack: Mix a pinch of garlic powder into the melted butter for an aromatic twist that pairs surprisingly well with ube.
The Final Flourish
Breadcrumbs give the exterior a subtle crunch that contrasts the soft interior, while powdered sugar adds a faint sweetness to the coating, making the crust almost caramel‑like. Vanilla Extract weaves a fragrant thread through the whole loaf, elevating the overall aroma to something you could almost taste with your nose. Finally, a drizzle of melted butter before the final bake locks in moisture, ensuring each roll stays tender for days.
Everything's prepped? Good. Let's get into the real action...
The Method — Step by Step
Start by preparing the ube puree. Peel a medium ube, cut it into cubes, and steam until fork‑tender (about 15‑20 minutes). Transfer to a bowl, mash with a fork or potato masher, then whisk in ¼ cup of warm milk and ¼ cup of white sugar until smooth. The mixture should be glossy and slightly thick—this is your flavor base. Watch Out: If the puree is too watery, let it sit uncovered for a few minutes to evaporate excess moisture.
In a large mixing bowl, whisk together 4 cups of all‑purpose flour, 2 teaspoons of instant yeast, and 2 teaspoons of salt. Make a well in the center and pour in the warm milk, the remaining ½ cup of milk, the egg, ¼ cup of melted butter, and the vanilla extract. Stir with a wooden spoon until a shaggy dough forms.
Introduce the ube puree into the dough. Using your hands (or a dough hook on low speed), knead for about 8‑10 minutes until the dough is smooth, elastic, and slightly tacky. It should pull away from the sides of the bowl but still cling a little to your fingers. This is the moment of truth—if the dough feels too stiff, splash a tablespoon of milk; if too sticky, dust with a bit more flour.
Cover the bowl with a clean kitchen towel and let the dough rise in a warm spot (ideally 80°F) for 1‑1½ hours, or until doubled in size. You’ll know it’s ready when a gentle poke leaves a slow, elastic spring back. While waiting, prepare the cheese filling: combine 8 ounces of softened cream cheese with 1 cup of shredded cheddar, and mix until fully integrated.
Once the dough has risen, punch it down gently to release large air pockets. Transfer to a lightly floured surface and divide into 12 equal portions (about 80‑90 g each). Flatten each piece into a disc, place a generous spoonful of the cheese mixture in the center, then fold the dough over and seal the edges by pinching tightly. This creates a sealed pocket that will melt beautifully inside.
Roll each sealed ball gently into a smooth sphere, then roll it in breadcrumbs for a light coating. Place the coated balls on a parchment‑lined baking sheet, spacing them about 2 inches apart. Brush each roll with a thin layer of melted butter; this step is essential for that golden crust.
Let the shaped rolls undergo a second proof for 30‑45 minutes. They should puff up slightly, and you’ll notice the tops becoming a bit glossy from the butter. This second rise is what gives the interior that airy, melt‑in‑your‑mouth crumb.
Preheat your oven to 375°F (190°C). While the oven heats, give the rolls a final brush of butter and sprinkle a light dusting of powdered sugar for a subtle sweet glaze.
Bake for 18‑22 minutes, or until the tops are a deep golden‑brown and the edges begin to pull away from the parchment. The interior should be fully set but still soft; a gentle tap on the bottom should produce a hollow sound.
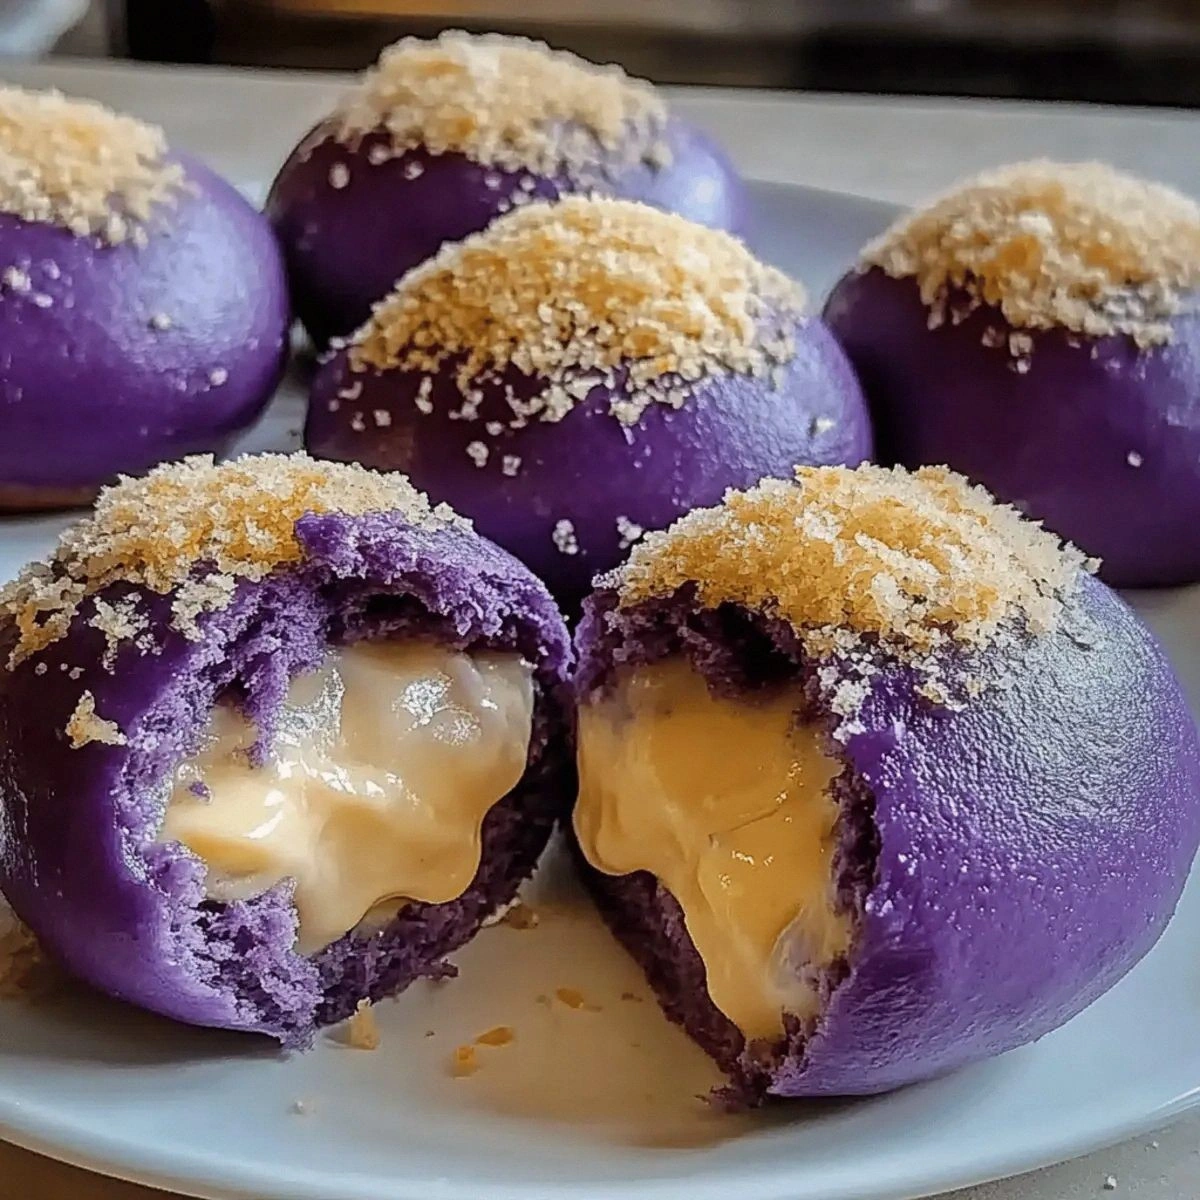
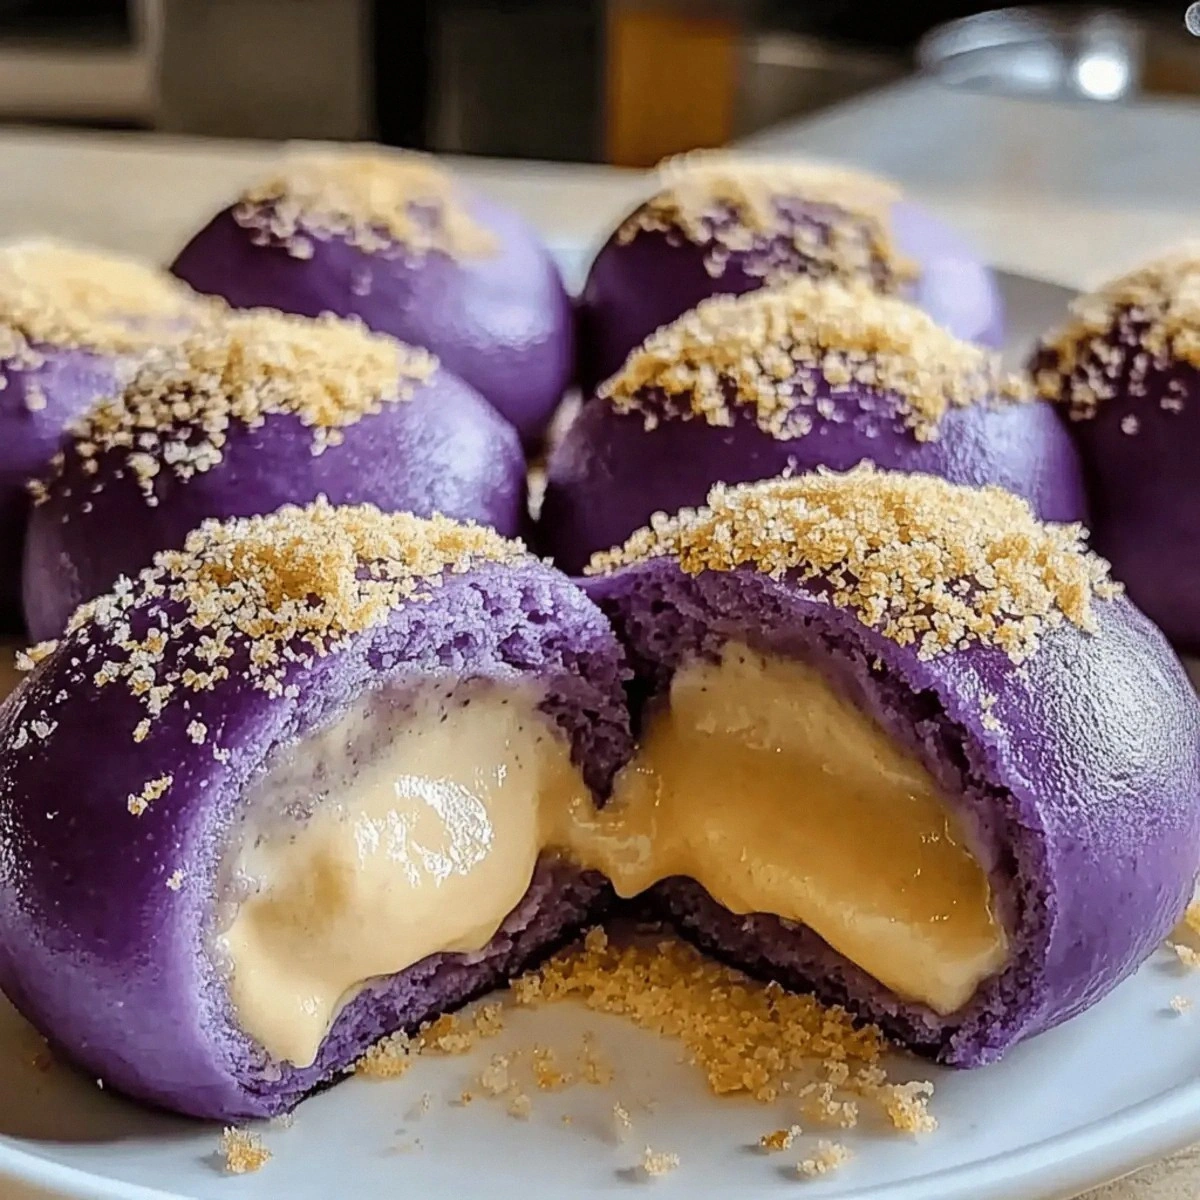
Remove the pandesal from the oven and let them cool on a wire rack for at least 10 minutes. This resting period allows the steam inside to redistribute, keeping the crumb moist. Serve warm, sliced in half to reveal the molten cheese core, and watch as the ube‑infused crumb glistens under the light.
That's it — you did it. But hold on, I've got a few more tricks that'll take this to another level. The next section dives into insider tips that will make your pandesal consistently perfect, even on the days when your kitchen feels like a storm.
Insider Tricks for Flawless Results
The Temperature Rule Nobody Follows
Yeast is fickle; it loves a warm hug but hates a scorching embrace. Keep your milk between 100‑110°F and your proofing environment around 80°F. If your kitchen is cold, create a makeshift proof box by placing the dough bowl inside a turned‑off oven with a pan of hot water. This gentle humidity prevents the crust from forming too soon, allowing the dough to rise fully.
Why Your Nose Knows Best
Before you reach for the timer, trust the scent. A properly risen dough will emit a faint, sweet yeasty aroma—think freshly baked bread at a bakery. If the smell is still flat, give it a few more minutes. This sensory checkpoint saves you from under‑proofing, which leads to dense, heavy rolls.
The 5‑Minute Rest That Changes Everything
After shaping the rolls, let them rest for exactly five minutes before the final butter brush. This short pause relaxes the gluten, preventing the rolls from springing back when you brush them, which ensures the butter adheres evenly. I once skipped this step and ended up with a patchy crust—lesson learned.
Breadcrumb Magic
Use panko breadcrumbs for a lighter, airier crunch, or opt for seasoned Japanese panko if you want an extra flavor boost. Lightly toast the breadcrumbs in a dry pan for 2‑3 minutes before coating the rolls; this adds a toasty note that deepens the overall flavor profile.
Butter Brush Precision
When brushing melted butter, aim for a thin, even layer. Too much butter will cause the rolls to slide on the parchment and lose shape; too little will result in a dull crust. A silicone pastry brush gives you control, and a quick swirl in a shallow dish prevents pooling.
The Secret of the Final Glaze
A quick dusting of powdered sugar right after the bake adds a subtle sweet sheen that catches the light beautifully. If you want a richer glaze, mix powdered sugar with a teaspoon of milk to create a thin icing, then drizzle it over the warm rolls. The glaze sets as the rolls cool, giving a professional‑look finish without extra effort.
Creative Twists and Variations
This recipe is a playground. Here are some of my favorite ways to switch things up:
Mango‑Infused Surprise
Swap half of the ube puree for ripe mango purée and add a pinch of lime zest to the dough. The result is a tropical pink‑orange swirl that pairs beautifully with the cheddar core. Perfect for a summer brunch.
Spicy Sriracha Cheddar
Mix a tablespoon of sriracha into the cheddar cheese before stuffing. The heat cuts through the sweetness of the ube, creating a bold flavor contrast that will wow anyone who loves a little kick.
Vegan Delight
Replace cream cheese with a plant‑based cream cheese alternative and use dairy‑free cheddar shreds. Swap butter for coconut oil in the dough and the brush. The texture remains luxuriously soft, and the flavor stays true to the original.
Nutty Crunch
Add a tablespoon of finely chopped toasted macadamia nuts to the breadcrumb coating. The nuts lend a buttery crunch that complements the soft interior and adds a sophisticated twist.
Cinnamon Sugar Swirl
Before the final proof, sprinkle a mixture of cinnamon and granulated sugar over the rolls and gently roll them in the mixture. This creates a sweet aromatic crust that turns each bite into a warm hug.
Storing and Bringing It Back to Life
Fridge Storage
Place cooled pandesal in an airtight container lined with a paper towel to absorb excess moisture. They stay fresh for up to 4 days. For an extra soft bite, let them sit at room temperature for 10 minutes before serving.
Freezer Friendly
Wrap each roll individually in parchment paper, then seal the batch in a zip‑top freezer bag. They freeze solid for up to 2 months. When you’re ready, move them to the fridge overnight to thaw, then reheat.
Best Reheating Method
Preheat the oven to 350°F (175°C). Place the rolls on a baking sheet, spray lightly with water, and cover with foil for 5 minutes. Remove the foil and bake another 3‑4 minutes until the crust crisps up again. The splash of water creates steam, reviving the soft crumb while the foil protects the cheese from leaking.