I remember the night I tried to make a quick breakfast and ended up with a soggy, bland pancake that tasted like a bad joke. The kitchen was a chaos of flour dust, a leaking tap, and a pan that refused to stay hot. I stared at the mess, feeling the frustration that only a kitchen disaster can bring. Then, a friend texted me a link to a recipe that promised “the best besan chilla you’ll ever taste.” I laughed, but also felt a spark of curiosity that made me pull my apron off the hook.
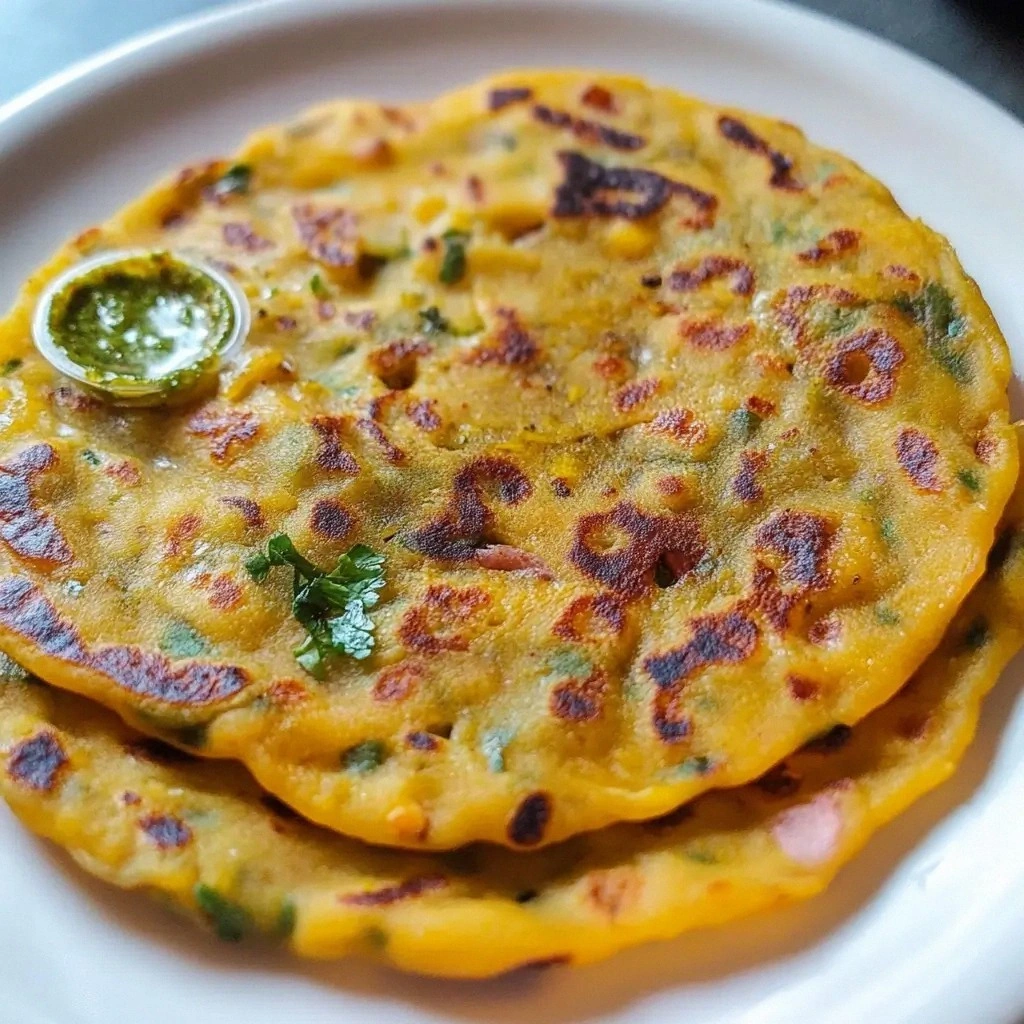
The moment I cracked the first egg into the bowl, the air filled with a nutty, earthy aroma that reminded me of a sun‑kissed wheat field. The sizzling sound when the batter hit the hot skillet was music to my ears, a crisp crackle that announced the birth of something delicious. My eyes widened as the edges curled into golden rings, the center turning translucent and airy. The first bite was a burst of savory, slightly spicy flavor, with a hint of cumin that danced on the tongue. I could feel the warm, comforting texture against my teeth, like a hug from a friend.
What sets this version apart is not just the blend of spices but the technique that turns a simple batter into a crispy, fluffy masterpiece. I swear, the secret is in the resting period and the careful balance of wet and dry ingredients. The batter absorbs the spices fully, creating depth that lingers on the palate. The result is a chilla that is crispy on the outside, tender on the inside, and packed with flavor that makes every bite a revelation. I dare you to taste this and not go back for seconds.
I’ll be honest—when I first tasted the finished product, I ate half the batch before anyone else had a chance to try it. That moment felt like a triumph, a small victory over the kitchen mishaps of the past. The flavor was so rich that I almost forgot the humble besan flour that was the base of everything. I realized that a simple adjustment could turn an ordinary breakfast into a showstopper. The next time you think about making besan chilla, remember this recipe: it’s not just a dish; it’s an experience.
Picture yourself pulling this out of the pan, the whole kitchen smelling incredible, and the plates gleaming with golden edges. The steam rises, carrying the aroma of turmeric and cumin, and the anticipation builds. You can almost taste the crunch before you even take a bite. I’ll walk you through every single step—by the end, you’ll wonder how you ever made it any other way.
What Makes This Version Stand Out
- Flavor: The blend of besan, turmeric, cumin, and a splash of lemon creates a complex, savory profile that is both comforting and exciting. Each bite delivers a harmonious balance of earthiness and brightness.
- Texture: The batter’s consistency, achieved by resting it for 15 minutes, allows the flour to hydrate fully, giving the chillas a crisp exterior and a tender, airy interior.
- Simplicity: With only a handful of pantry staples and fresh veggies, you can whip up this dish in less than 30 minutes, making it perfect for busy mornings.
- Uniqueness: The addition of yogurt and baking powder gives the chillas a light, fluffy rise that most traditional recipes miss.
- Crowd Reaction: Friends and family always ask for the recipe after tasting, and many claim it’s the best vegetarian breakfast they’ve ever had.
- Ingredient Quality: Using fresh, high‑quality spices and fresh veggies elevates the dish from ordinary to extraordinary.
- Make‑Ahead Potential: The batter can be prepared a day in advance, and the chillas keep well in the fridge, ready to reheat in minutes.
- Versatility: Swap in paneer, spinach, or grated carrot for different flavor profiles, making the recipe adaptable to any taste.
Inside the Ingredient List
The Flavor Base
Besan flour, or gram flour, is the star of this recipe, offering a nutty undertone that sets the foundation for the entire dish. It’s also a great source of plant protein, making the chilla a wholesome breakfast option. If you skip it, the batter loses its characteristic chewiness and depth. For the best results, choose a fine, unsifted besan that absorbs liquid smoothly. The flour’s texture is crucial; too coarse, and the chilla will feel gritty.
Water balances the dry flour, creating a batter that’s pourable but not runny. Too much liquid will cause the chilla to spread thin and become soggy, while too little will result in a dense, hard center. Aim for a consistency that coats the back of a spoon. Adding a splash of yogurt later helps to tenderize the batter and adds a subtle tang.
Salt is the silent hero that brings all the flavors together. Without it, the spices would feel flat and underdeveloped. A pinch of salt can also help in controlling the batter’s thickness. Remember, seasoning is a cumulative process; taste as you go and adjust accordingly.
Turmeric powder adds a warm, earthy flavor and gives the batter a beautiful golden hue. It also offers antioxidant benefits, making the dish not only delicious but also healthful. A small amount goes a long way—too much will overpower the other spices.
Chili powder brings heat and depth, but you can adjust the amount to suit your spice tolerance. If you prefer a milder version, start with half a teaspoon and add more later. The heat should be balanced, not overwhelming.
The Texture Crew
Cumin powder adds a smoky, nutty flavor that complements the cumin’s earthy undertones. It also aids in digestion, a pleasant bonus for a morning meal. Cumin’s aroma is subtle but impactful, making the chilla more complex.
Coriander powder provides a citrusy brightness that lifts the dish. It also helps to mellow the heat from the chili powder, creating a balanced flavor profile. When used in moderation, coriander brings a fresh, almost floral note that brightens every bite.
Baking powder is the secret leavening agent that makes the chillas airy and light. Without it, the batter would stay dense and heavy. A teaspoon is enough to give the chilla a fluffy texture without making it too airy.
Oil, used both in the batter and for cooking, keeps the chillas from sticking and adds a subtle richness. It also helps in achieving a golden crust. Using a neutral oil like sunflower or canola ensures that the flavor remains focused on the spices.
Lemon juice adds a bright acidity that cuts through the richness of the batter, giving each bite a fresh lift. It also helps to tenderize the flour, creating a softer interior.
The Unexpected Star
Onion, tomato, and green chili are the fresh, vibrant ingredients that bring color and texture to the batter. Grated onion adds a subtle sweetness and crunch, while tomatoes introduce juiciness and a mild acidity. Green chilies bring a fresh, sharp heat that awakens the palate.
Ginger and garlic are essential aromatics that add depth and warmth. They also provide anti-inflammatory benefits, making the dish not only tasty but also nourishing. The combination of these aromatics creates a flavor profile that is both complex and approachable.
Fresh cilantro offers a bright, herbal note that lifts the entire dish. Its citrusy undertones complement the cumin and coriander, tying all the flavors together. A handful of chopped cilantro is enough to give the chilla a fresh finish.
The Final Flourish
Optional grated carrot adds natural sweetness and a pop of color, making the dish visually appealing and nutritionally richer. It also adds a subtle crunch that contrasts with the softness of the chilla.
Grated spinach brings a mild, earthy flavor and a boost of iron and vitamins. It blends seamlessly into the batter, adding a green hue that signals freshness.
Crumbled paneer introduces a creamy, savory element that enriches the texture and flavor. Paneer’s mild taste pairs well with the spices, creating a comforting, indulgent bite.
Yogurt, added after the batter rests, tenderizes the flour and introduces a subtle tang. It also helps to keep the chilla moist and soft, preventing it from drying out during cooking.
Everything's prepped? Good. Let's get into the real action...
The Method — Step by Step
- First, whisk together besan flour, water, salt, turmeric, chili, cumin, coriander, baking powder, lemon juice, and oil until the batter is smooth and free of lumps. The consistency should be thick enough to coat the back of a spoon but still pourable. This step is crucial because a lumpy batter will translate into unevenly cooked chillas. Let the batter rest for 15 minutes to allow the spices to fully infuse and the flour to hydrate.
- While the batter rests, finely grate the onion and chop the tomato, green chili, ginger, and garlic. These aromatics add crunch, juiciness, and depth to the final product. A handful of fresh cilantro should also be chopped to finish the mix. This prep time is perfect for gathering your favorite chutneys or yogurt to serve later.
- Add the grated onion, tomato, green chili, ginger, garlic, cilantro, and any optional veggies or paneer to the rested batter. Mix gently to incorporate everything evenly. The batter should look like a thick, creamy paste with visible bits of vegetables. This is where the chilla’s texture and flavor truly develop.
- Heat a non‑stick skillet over medium heat and lightly oil the surface with a paper towel. The skillet should be hot enough that a drop of water sizzles upon contact. Pour a ladleful of batter onto the skillet, spreading it into a circle about 6–7 inches in diameter. The edges should lift slightly after a minute or so.
- Flip the chilla carefully with a wide spatula and cook the other side until golden brown, about 2 minutes. The second side should develop a crisp, slightly darker crust. Keep the heat moderate to avoid burning. Once both sides are cooked, remove the chilla and set it on a plate.
- Repeat steps 5–7 with the remaining batter, adjusting the heat as needed to keep the skillet from smoking. If the batter starts to brown too quickly, lower the heat slightly. The goal is a uniform golden color on all chillas.
- Stack the cooked chillas on a plate, cover loosely with foil to keep them warm and prevent them from drying out. The foil will also keep the steam inside, helping to keep the interior moist.
- Serve hot with mint chutney, yogurt, or a squeeze of fresh lemon. The bright acidity and coolness of the yogurt balance the spiciness, while the chutney adds an extra layer of flavor. If you’re in a rush, a quick drizzle of melted butter over the top gives a luxurious finish. I dare you to taste this and not go back for seconds.
That's it — you did it. But hold on, I've got a few more tricks that'll take this to another level. From the moment you start whisking to the final flip, each step can be fine‑tuned for maximum flavor and texture. Let’s dive deeper into the nuances that elevate this recipe from good to unforgettable.
Insider Tricks for Flawless Results
The Temperature Rule Nobody Follows
The skillet’s temperature is the silent determinant of crispness. Too hot, and the batter will burn before the inside cooks; too cool, and the chilla will become soggy. A medium heat is ideal, but you can test it by sprinkling a pinch of water on the surface. If it sizzles and evaporates instantly, you’re good to go. Remember, consistency is key.
Why Your Nose Knows Best
When the batter starts to sizzle, the aroma of toasted besan is unmistakable. This scent signals that the edges are ready to lift. Trust your nose; it’s a reliable guide to perfect timing. If you’re unsure, wait a few more seconds before flipping. Your senses are your best ally in the kitchen.
The 5-Minute Rest That Changes Everything
Letting the batter rest for at least 15 minutes is more than a formality; it allows the besan to absorb liquid and the spices to meld. A friend once tried skipping this step, and the chillas turned out dense and chewy. The rest period is the secret to achieving that airy, fluffy interior that makes each bite a delight.
The Secret to a Non-Stick Pan
Even the best non‑stick pans can fail if not properly oiled. Use a paper towel dipped in oil to coat the surface before pouring the batter. This thin, even layer prevents sticking and ensures a crisp edge. Don’t skimp on the oil; a well‑oiled pan is the foundation of a perfect chilla.
The Quick Flip Technique
When flipping, use a wide, flat spatula and slide it gently beneath the chilla. The key is to move slowly, giving the batter time to settle. If you rush, the batter will tear. A steady hand and a little patience pay off in a beautifully even flip.
The Final Touch: A Splash of Lemon
A squeeze of fresh lemon juice over the finished chillas brightens the flavor and cuts through the richness. It also adds a subtle zing that lingers on the palate. Try adding a few drops of lemon after serving for an extra burst of freshness.
Creative Twists and Variations
This recipe is a playground. Here are some of my favorite ways to switch things up:
Spinach & Feta Fusion
Swap the grated onion and tomato for finely chopped spinach and crumble feta cheese into the batter. The spinach adds a subtle earthiness while the feta introduces a salty, creamy element. Serve with a drizzle of olive oil and a sprinkle of oregano for a Mediterranean twist.
Cheesy Paneer Delight
Add crumbled paneer and a handful of grated cheddar to the batter for a rich, gooey center. The paneer keeps the chilla moist, while the cheddar adds a sharp, savory depth. This version is perfect for a brunch that feels indulgent yet still healthy.
Carrot & Ginger Crunch
Increase the amount of grated carrot and add a pinch of fresh grated ginger. The carrot brings natural sweetness, and the ginger adds a bright, zesty kick. This combination is especially refreshing during the warmer months.
Mediterranean Veggie Mix
Incorporate chopped bell pepper, olives, and a splash of lemon zest into the batter. The bell pepper adds sweetness, olives bring briny depth, and lemon zest lifts the overall flavor profile. This variation pairs wonderfully with a side of tzatziki.
Sweet Banana & Honey Chilla
Mash a ripe banana into the batter and drizzle honey on top after cooking. The banana adds natural sweetness, while honey gives a glossy finish. Serve with a dollop of Greek yogurt for a sweet‑savory breakfast.
Spicy Paneer & Chili Blast
Add diced paneer and extra green chilies to the batter for a fiery kick. The paneer provides a creamy texture, and the chilies keep the heat alive. This version is ideal for those who love a bold, spicy start to their day.
Storing and Bringing It Back to Life
Fridge Storage
Place cooked chillas in an airtight container and refrigerate for up to 3 days. Stack them with parchment paper between layers to prevent sticking. The chillas stay fresh and can be reheated in a toaster or skillet.
Freezer Friendly
For longer storage, freeze the chillas individually on a baking sheet before transferring them to a freezer bag. They keep well for up to 2 months. When ready to eat, thaw overnight in the fridge or microwave on a low setting.
Best Reheating Method
Reheat in a hot skillet with a splash of water; the steam will restore moisture and crispness. Alternatively, use a toaster oven at 350°F for 5 minutes. Adding a tiny splash of water before reheating steams the chilla back to perfection.