I was halfway through a disastrous attempt at a classic chocolate chip cookie when my roommate burst in, waving a half‑eaten bag of white chocolate and a pint of raspberries like a culinary flag. “Bet you can’t make something better than this,” she challenged, eyes glinting with mischief. I laughed, but deep down I felt the familiar spark of a dare that only a true dessert lover can’t resist. The kitchen smelled like burnt sugar and burnt hope, the timer ticked mercilessly, and I was already planning a rescue mission. That moment—half panic, half excitement—became the catalyst for what I now swear is the ultimate cookie experience.
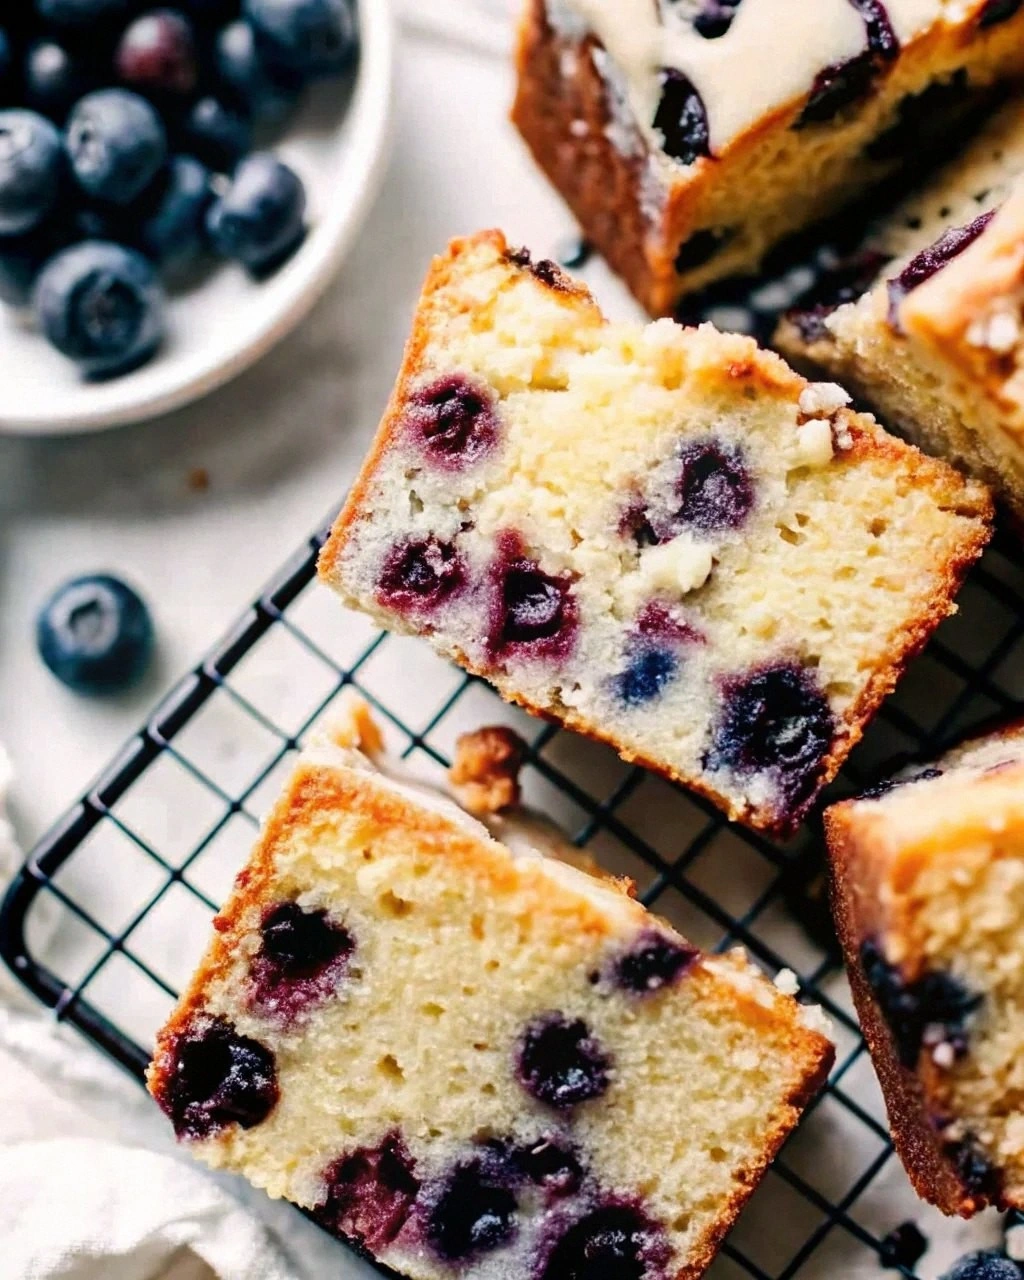
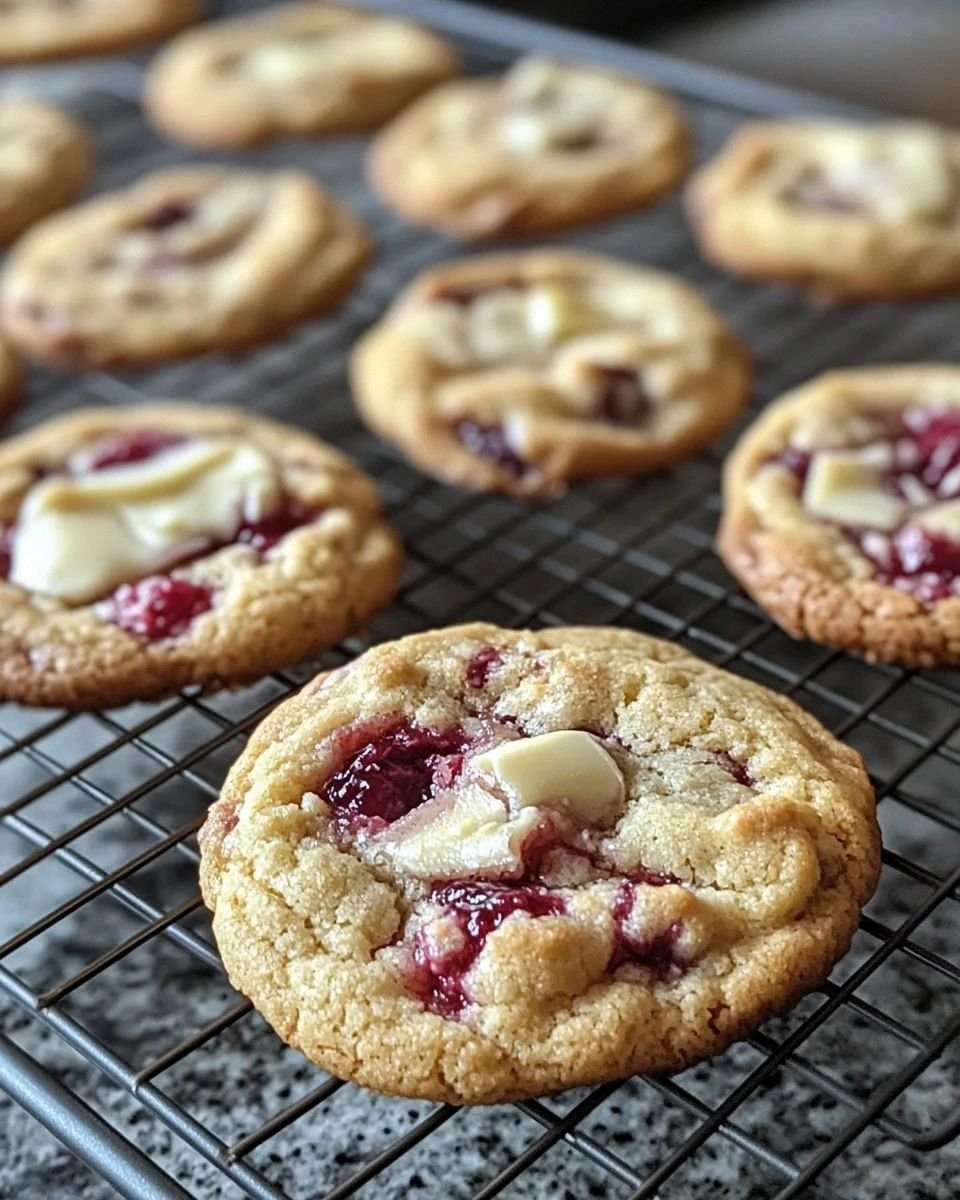
Picture this: a warm, buttery dough that cradles pockets of silky white chocolate, each bite bursting with the tart pop of fresh raspberry. The aroma hits you before the oven door even opens—sweet vanilla mingling with a subtle citrus note, a whisper of caramelized butter, and the faint, intoxicating scent of berries that makes your mouth water before the first crumb even touches your tongue. The sound? A gentle sizzle as the cookies spread, followed by a soft crackle as the edges turn golden. The feel? The dough is soft and pliable, almost like a plush pillow, yet it holds together with a confidence that tells you these cookies won’t fall apart when you lift them.
Most cookie recipes either drown the fruit in sugar or let the chocolate dominate, leaving the raspberry’s bright personality muted. I’ve tried dozens of “white chocolate raspberry” versions, and most get this completely wrong—either the berries turn mushy or the chocolate turns bitter from over‑baking. This version, however, balances the three stars on a perfectly calibrated stage: the white chocolate provides a buttery sweetness, the raspberry adds a zingy freshness, and the dough itself is airy yet chewy, thanks to a precise ratio of butter to flour and a short chill before baking. I dare you to taste this and not go back for seconds; it’s that good.
The secret weapon? A splash of lemon zest that lifts the entire flavor profile, and a quick chill that prevents the cookies from spreading too thin, preserving those glorious, thick centers. I’ll be honest — I ate half the batch before anyone else got a chance to try it, and that was the only crime I committed that day. Okay, ready for the game‑changer? Let me walk you through every single step — by the end, you’ll wonder how you ever made it any other way.
What Makes This Version Stand Out
- Flavor Harmony: The sweet, milky white chocolate pairs with the bright, slightly acidic raspberry, creating a taste duet that feels like a summer concert in your mouth.
- Texture Balance: A crisp edge that shatters like thin ice gives way to a chewy, melt‑in‑your‑mouth center, delivering contrast in every bite.
- Simplicity: Only ten core ingredients, all pantry‑friendly, make this recipe approachable for bakers of any skill level.
- Unique Twist: A pinch of lemon zest lifts the flavor, preventing the white chocolate from feeling cloying.
- Crowd Reaction: Guests invariably ask for the recipe, and the cookie’s visual appeal—pale gold with ruby specks—gets Instagram likes before the first taste.
- Ingredient Quality: Using real white chocolate (not compound) and fresh, plump raspberries makes a world of difference in flavor depth.
- Cooking Method: Chilling the dough for 30 minutes locks in shape, ensuring each cookie stays thick and tender.
- Make‑Ahead Potential: The dough freezes beautifully; bake straight from the freezer for a fresh batch any time.
Inside the Ingredient List
The Flavor Base
All‑purpose flour forms the structural backbone of any cookie. At 2 cups, it provides enough gluten to hold the dough together without making it tough. If you swap in cake flour, you’ll get an even softer crumb, but you risk a crumbly cookie that falls apart. I always recommend sifting the flour with the leavening agents to incorporate air and ensure an even rise.
Granulated sugar and brown sugar work together to create a balanced sweetness and a subtle caramel note. The white sugar helps the cookies spread, while the brown sugar adds moisture and a hint of molasses. Skipping the brown sugar means you’ll lose that chewy interior and the cookies will be overly crisp.
The Texture Crew
Unsalted butter, softened to room temperature, is the star of the texture department. It coats the flour particles, creating a tender crumb, and when creamed with sugar, it traps air for a light lift. Using melted butter will give you a denser, cakey cookie, so keep it soft, not liquid.
Eggs act as emulsifiers, binding the fat and liquid together while adding richness. Two large eggs provide enough structure without making the dough too wet. If you’re allergic, a flax egg (1 tbsp ground flaxseed + 3 tbsp water) can substitute, but expect a slightly nuttier flavor.
The Unexpected Star
White chocolate chips are the luxurious surprise. Real white chocolate contains cocoa butter, milk solids, and vanilla, giving a creamy melt that dark chocolate can’t match. If you’re on a budget, high‑quality compound chocolate works, but the texture will be less silky.
Fresh raspberries bring the bright acidity that cuts through the sweetness. Tossing them lightly in flour before folding prevents them from sinking to the bottom of the cookie. Frozen raspberries can be used, but thaw and pat dry first, or they’ll release excess water and make the dough soggy.
The Final Flourish
A pinch of lemon zest adds a citrusy lift that makes the flavor pop. It’s the secret that turns a good cookie into a great one. If you’re not a fan of citrus, a splash of orange extract works similarly.
Baking soda and baking powder provide leavening. Baking soda reacts with the acidic raspberries, giving a subtle rise and a tender crumb, while the baking powder adds a little extra puff for a fluffy interior. Too much soda can give a metallic aftertaste, so measure precisely.
Everything's prepped? Good. Let’s get into the real action…
The Method — Step by Step
Preheat your oven to 350°F (175°C) and line two baking sheets with parchment paper. While the oven warms, take a moment to smell the butter as it softens on the counter—this is the first hint that something delicious is about to happen. I always set a timer for 5 minutes so the butter doesn’t get too warm; you want it pliable, not melted.
In a medium bowl, whisk together the flour, baking soda, baking powder, and salt. This dry mix is the foundation; whisking introduces air, which later translates to a lighter crumb. If you notice any lumps, give the mixture another quick whisk—lumps are the enemy of even spreading.
In a large mixing bowl, beat the softened butter, granulated sugar, and brown sugar together until the mixture is light, fluffy, and pale yellow. This should take about 3‑4 minutes on medium speed. The sound of the whisk is a satisfying “whoosh” that tells you the butter is properly aerated. Pro tip: Scrape down the sides of the bowl frequently to ensure an even cream.
Add the eggs one at a time, beating well after each addition, then stir in the vanilla extract and lemon zest. The batter should look glossy and slightly thickened. If the mixture looks curdled, keep beating; the emulsion will come together in a minute or two.
Gradually add the dry ingredients to the wet mixture, stirring on low speed until just combined. Over‑mixing here develops gluten, which can make the cookies tough. The dough will look a little shaggy—don’t panic, that’s exactly what we want.
Gently fold in the white chocolate chips and the flour‑tossed raspberries. The berries should be evenly distributed but not crushed; they’ll burst beautifully during baking. If you see a few berries breaking, that’s okay—they’ll add pockets of jammy goodness.
Cover the bowl with plastic wrap and chill the dough for at least 30 minutes. This step is pure magic: the butter firms up, the flour hydrates, and the flavors meld. While you wait, picture the cookies pulling away from the tray as they bake—those edges will start to turn golden and fragrant.
Scoop the chilled dough onto the prepared baking sheets using a 2‑tsp cookie scoop, spacing them about 2 inches apart. The dough should hold its shape; if it feels too soft, give it another quick 5‑minute chill. This is the moment of truth—watch the dough hold its form, then imagine the golden edges that will soon appear.
Bake for 12‑14 minutes, or until the edges are lightly golden and the tops have a faint pink blush from the raspberries. The centers will still look a touch soft—that’s perfect; they’ll continue to set as they cool. I love the aroma at this stage: the buttery scent mingles with a subtle citrus zing, and the kitchen feels like a bakery on a sunny morning.
Remove the cookies from the oven and let them rest on the sheet for 3 minutes before transferring to a wire rack. This short rest lets the cookies finish cooking from residual heat, and it prevents them from breaking apart. As you move them, you’ll hear a faint “snap” as the edges release—a satisfying sound that tells you they’re done.
That’s it — you did it. But hold on, I’ve got a few more tricks that’ll take this to another level…
Insider Tricks for Flawless Results
The Temperature Rule Nobody Follows
Never bake cookies straight from the fridge if your kitchen is already warm; let the dough sit at room temperature for 5 minutes. This small adjustment prevents the cookies from cracking on the edges while still keeping the interior soft. I once baked a batch on a hot summer day and the cookies cracked like tiny shards—lesson learned.
Why Your Nose Knows Best
When the cookies start to smell toasty—about a minute before the timer dings—trust that cue. The visual cue of a golden edge can be deceptive; the aroma is a more reliable indicator of doneness. If you’re ever unsure, open the oven a crack and inhale; if you detect a buttery, slightly caramel scent, pull them out.
The 5‑Minute Rest That Changes Everything
After baking, let the cookies rest on the sheet for exactly 5 minutes before moving them. This rest allows the interior to set without losing the soft chewiness. Skipping this step results in cookies that crumble when you try to lift them, which is a heartbreak no one needs.
Freeze‑And‑Bake for On‑Demand Freshness
If you love having cookies ready for unexpected guests, shape the dough, flash‑freeze on a tray, then transfer to a zip‑lock bag. When you need them, bake directly from frozen—add an extra minute to the bake time. The result? Cookies that taste freshly made, no reheating required.
The Secret of Lightly Dusted Raspberries
Coat the raspberries in a tablespoon of flour before folding them in. This tiny step absorbs excess juice, preventing soggy spots. I once tried adding berries dry, and the dough turned into a berry‑laden mush; the flour coating saved the day.
Creative Twists and Variations
This recipe is a playground. Here are some of my favorite ways to switch things up:
Matcha‑Infused Delight
Swap the lemon zest for 1 tsp matcha powder and add a handful of white chocolate chips infused with matcha. The earthy green notes contrast beautifully with the raspberry’s tartness, creating a sophisticated flavor profile perfect for tea time.
Nutty Crunch Surprise
Fold in ½ cup toasted almond slivers or chopped pistachios. The nuts add a crunchy texture that complements the soft interior, and their buttery flavor deepens the overall richness.
Coconut‑Lime Dream
Replace half of the white chocolate chips with toasted coconut flakes and add 1 tsp lime zest. The tropical twist brightens the cookie, making it a perfect summer treat.
Double Berry Burst
Mix in a quarter cup of dried cranberries alongside the fresh raspberries. The dried fruit adds chewiness and a subtle tartness that pairs well with the white chocolate.
Spiced Holiday Version
Add ½ tsp ground cinnamon and a pinch of ground nutmeg to the dry ingredients, and swap the lemon zest for orange zest. This variation feels festive and works wonderfully for winter gatherings.
Storing and Bringing It Back to Life
Fridge Storage
Place cooled cookies in an airtight container with a paper towel on top to absorb moisture. They’ll stay fresh for up to a week, and the paper towel helps maintain that perfect chew.
Freezer Friendly
Layer cookies between parchment sheets in a zip‑lock bag and freeze for up to three months. When you’re ready, bake directly from frozen at 350°F for 13‑15 minutes; the extra minute ensures they’re heated through.
Best Reheating Method
To revive day‑old cookies, preheat your oven to 300°F, place the cookies on a baking sheet, and add a tiny splash (about a teaspoon) of water to the sheet—cover with foil and heat for 5 minutes. The steam brings back that fresh‑out‑the‑oven softness without drying them out.