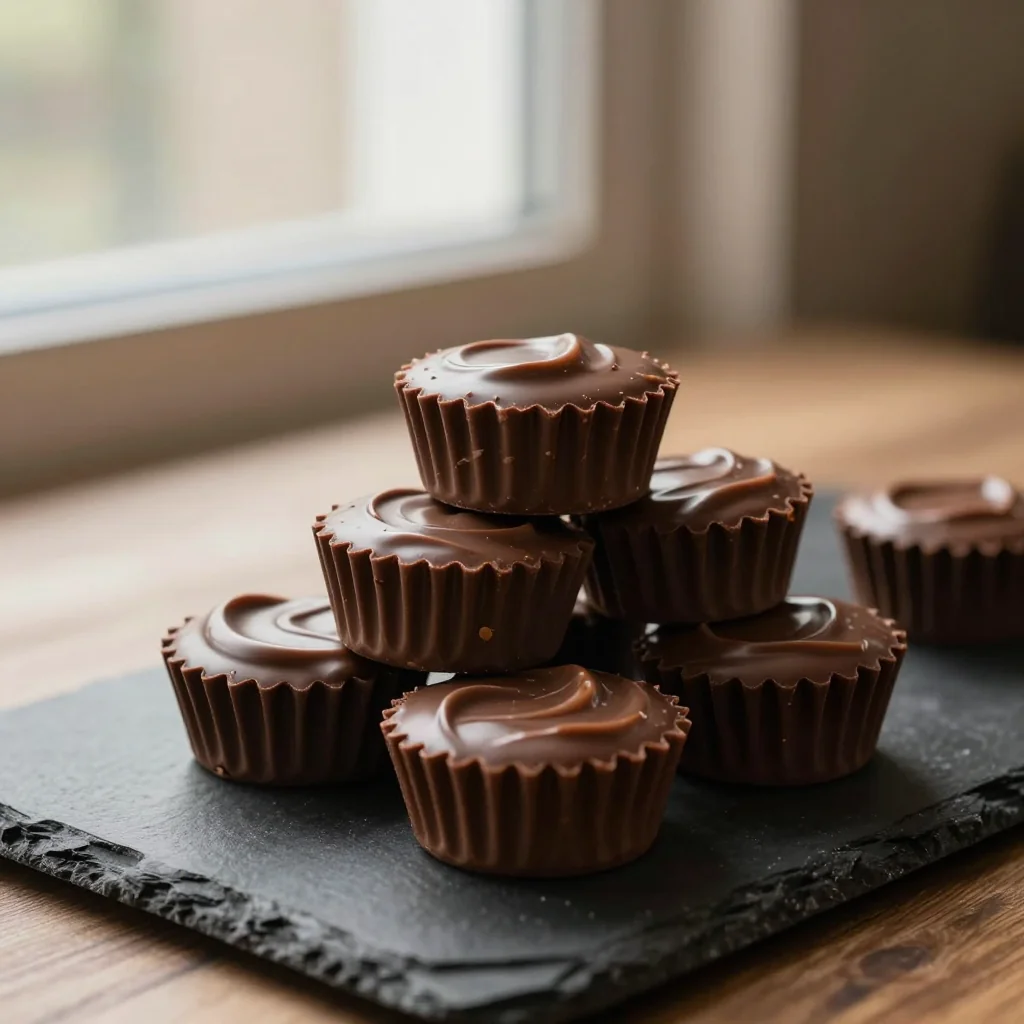
Indulge in silky dark chocolate shells filled with a luscious, salty‑sweet peanut butter center – a timeless treat that feels both nostalgic and luxurious.
When I was eight, my grandmother would melt chocolate in a double‑boiler while I waited impatiently with a wooden spoon, dreaming of the moment the glossy liquid would cascade into tiny paper liners. The kitchen smelled of cocoa and toasted peanuts, and those afternoons felt like secret rituals, a blend of anticipation and pure comfort. Years later, as an adult navigating a bustling culinary career, I still hear that faint sizzle and remember the way the first bite of a homemade peanut butter cup melted on my tongue—rich, buttery, with a whisper of sea salt that made my heart race.
Chocolate Peanut Butter Cups have a surprisingly global lineage. While the modern version we adore today was popularized in the United States during the 1960s, its roots trace back to ancient Mesoamerican cultures that combined cacao with nuts and seeds for ceremonial treats. In contemporary kitchens, they serve as both a nostalgic snack and a sophisticated dessert, perfect for everything from birthday parties to elegant cocktail bars.
In this article, I’ll walk you through a foolproof method that guarantees glossy shells, a perfectly creamy filling, and a finish that looks as good as it tastes. You’ll learn how to temper chocolate without a thermometer, why a dash of sea salt elevates the flavor, and how to scale the recipe effortlessly for any crowd.
Grab your favorite silicone muffin tray, preheat your imagination, and let’s create a batch of chocolate bliss together.
🌟 Why This Recipe Will Captivate You
Chocolate Peanut Butter Cups combine the timeless romance of chocolate with the comforting richness of peanut butter, delivering a bite‑size experience that feels both indulgent and approachable.
- ✨ Perfect Balance of Sweet and Salty: The pinch of sea salt in the filling cuts through the sweetness, creating a sophisticated flavor profile that keeps your palate intrigued.
- ✨ No‑Bake Simplicity: With just a microwave or stovetop and a few minutes of patience, you can achieve a professional finish without turning on the oven.
- ✨ Customizable Texture: Whether you prefer a glossy, snap‑ready shell or a softer, melt‑in‑your‑mouth feel, the technique can be tweaked in seconds.
- ✨ Nutrient‑Boosted Peanut Butter: Using natural, unsweetened peanut butter adds protein and healthy fats, turning a treat into a mini‑energy boost.
- ✨ Crowd‑Pleaser for All Ages: Kids love the fun shape, while adults appreciate the nuanced flavor layers and elegant presentation.
- ✨ Ideal for Gifting: Packaged in a decorative tin or a simple mason jar, these cups become a heartfelt, homemade gift that feels luxurious.
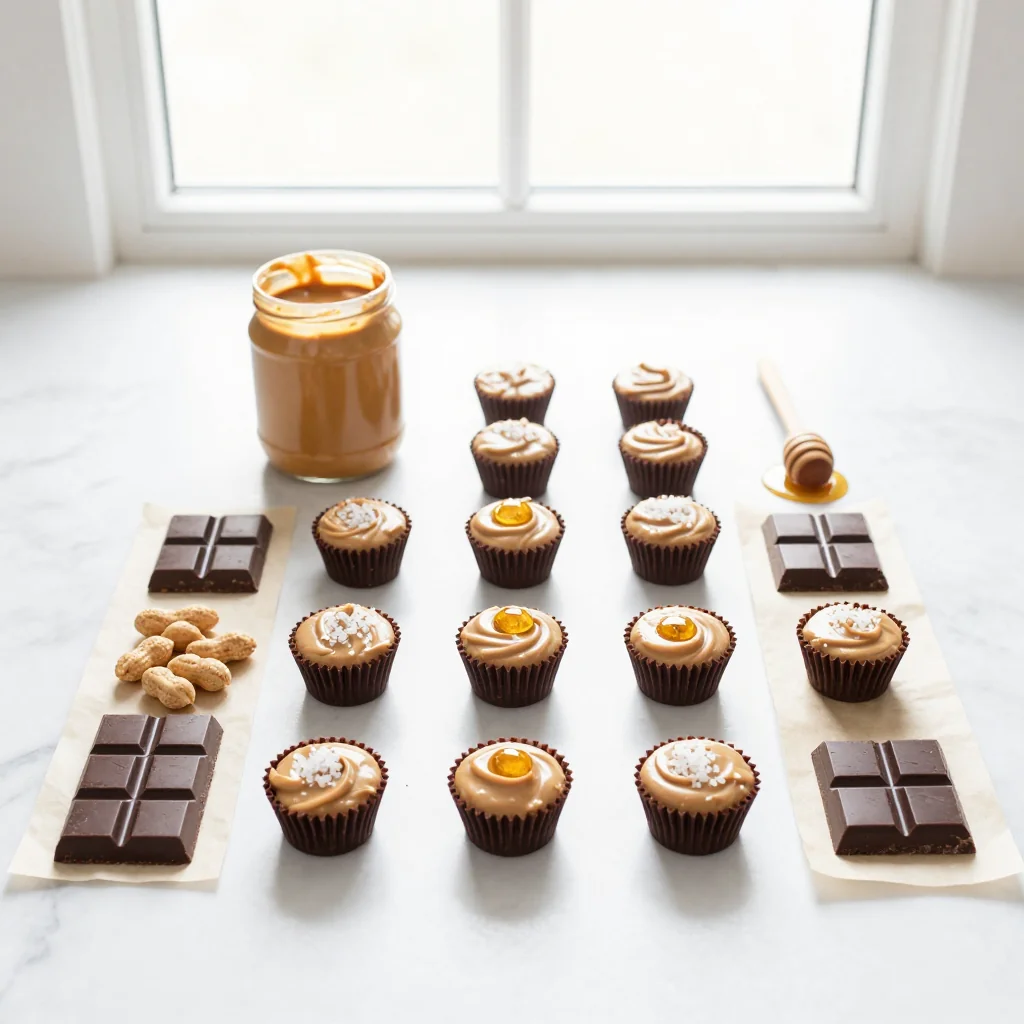
🥗 Ingredients
📝 Complete Ingredient List
For the Chocolate Shells:
- 200 g dark chocolate (70% cocoa)
- 30 g coconut oil (helps the chocolate set shiny)
- 12 paper liners or silicone muffin cups
For the Peanut Butter Filling:
- 120 g creamy natural peanut butter
- 30 g honey (or maple syrup for a vegan version)
- 5 ml vanilla extract
- 1 pinch sea salt
Optional Garnish:
- 1 tbsp crushed roasted peanuts
🔍 Focus on Key Ingredients
Dark Chocolate (70% Cocoa)
Dark chocolate provides the structural backbone of the cup while delivering a bittersweet depth that balances the sweetness of the peanut butter. Choose a bar with at least 70% cocoa to ensure the shells are firm enough to hold the filling without cracking. Look for beans sourced from ethical farms for a cleaner flavor and a conscience‑friendly dessert.
Coconut Oil
Coconut oil acts as a tempering aid, giving the chocolate a glossy finish and a snap when you bite into it. Its low melting point means the chocolate stays fluid enough to coat the liners evenly, yet it solidifies quickly once cooled, preventing a dull, matte appearance.
Natural Peanut Butter
Opt for a natural, unsweetened variety that contains just peanuts and perhaps a pinch of salt. This ensures the filling remains rich and creamy without unnecessary sugars that could interfere with the texture. The natural oils in the peanuts also help the filling set nicely after refrigeration.
🔄 Quick Substitutions
| If you don’t have... | Use instead... |
|---|---|
| Coconut oil | Vegetable oil or melted butter |
| Dark chocolate | Milk chocolate (will be sweeter) or white chocolate (for a different flavor) |
| Natural peanut butter | Almond butter or cashew butter (for a nut‑free variation use sunflower seed butter) |
👨🍳 Step‑by‑Step Instructions
Follow these detailed phases to achieve perfectly tempered chocolate shells and a silky, melt‑in‑your‑mouth peanut butter center.
📋 Phase 1: Preparation & Mise en Place
Gather your tools, measure ingredients, and set up a double‑boiler or microwave safe bowl.
Set Up a Double Boiler
Fill a saucepan with a few centimeters of water, bring it to a gentle simmer, and place a heat‑proof bowl on top. Make sure the bowl doesn’t touch the water. This indirect heat will melt the chocolate evenly and prevent scorching.
Measure and Chop Chocolate
Break the dark chocolate into small, uniform pieces. This increases the surface area, allowing it to melt quickly and uniformly. Place the chopped chocolate in the bowl of your double boiler.
🔥 Phase 2: Melting & Assembly
Temper the chocolate, create the shells, and prepare the peanut butter filling.
Temper the Chocolate
Stir the chocolate continuously until it reaches about 45 °C (113 °F). Add the coconut oil and keep stirring until the mixture is smooth and glossy. If using a microwave, heat the chocolate and oil together in 20‑second intervals, stirring after each, until fully melted.
Coat the Liners
Using a small spoon or a pastry brush, pour a thin layer of melted chocolate into each paper liner, ensuring the sides are fully covered. Tap the tray gently on the counter to release air bubbles and create an even coating. Place the tray in the refrigerator for 5 minutes to set the first layer.
Prepare the Peanut Butter Filling
In a medium bowl, combine the natural peanut butter, honey, vanilla extract, and a pinch of sea salt. Stir until the mixture is smooth and glossy. If the mixture feels too thick, add a teaspoon of melted coconut oil to loosen it slightly.
✨ Phase 3: Final Assembly & Chill
Add the filling, seal the cups, and let them set completely.
Fill the Cups
Spoon a generous dollop (about 1 teaspoon) of the peanut butter mixture onto the set chocolate layer in each liner. Spread lightly if needed, but keep the filling away from the very edge to allow room for the top chocolate layer.
Seal with a Second Chocolate Layer
Re‑heat the remaining chocolate if it has thickened. Pour or brush a second layer over the filling, ensuring the top is completely covered. Tap the tray again to eliminate air pockets.
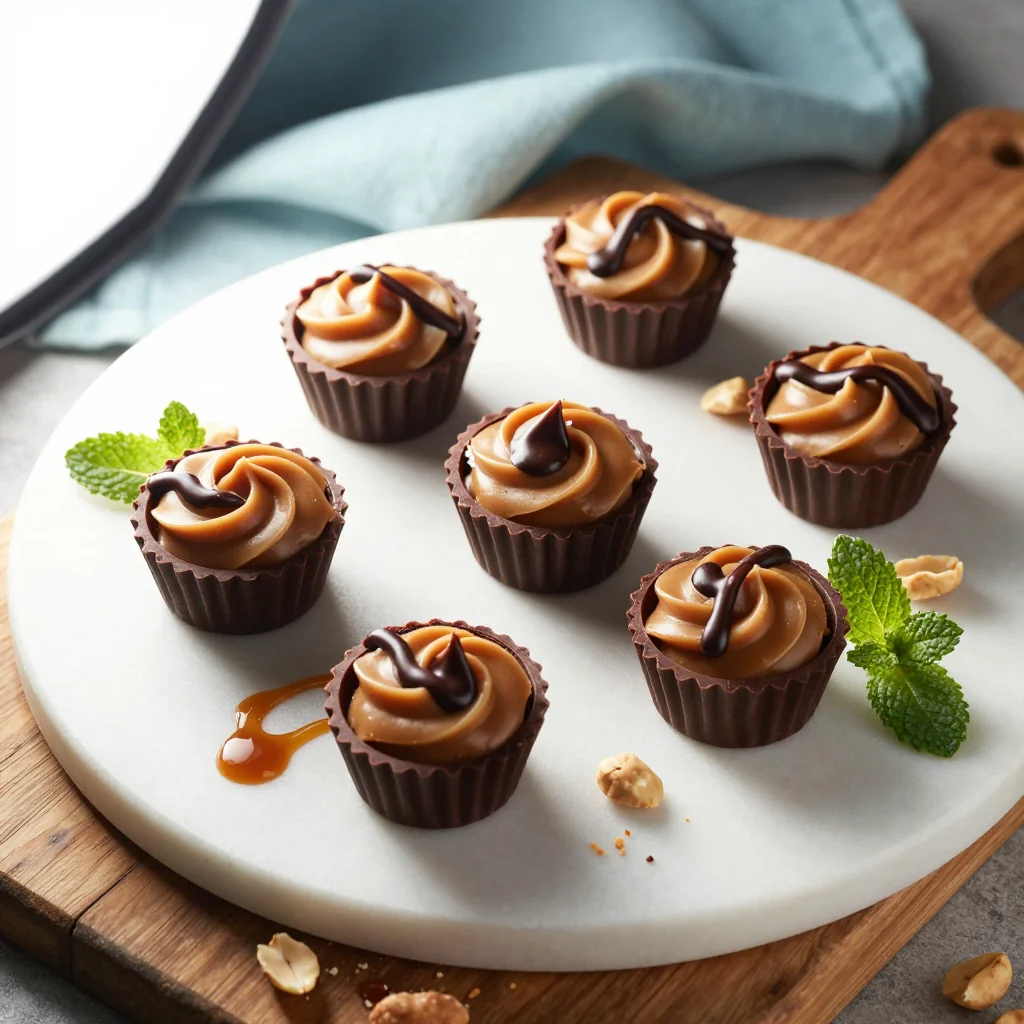
Optional Garnish
Sprinkle crushed roasted peanuts over the top while the chocolate is still soft. This adds a delightful crunch and visual contrast.
Chill Until Firm
Place the tray back in the refrigerator for at least 30 minutes, or until the chocolate shells are completely hardened. This ensures clean removal from the liners.
Serve or Store
Once set, gently pop each cup out of its liner. Serve immediately at room temperature for the best texture, or store in an airtight container in the fridge for up to a week.
💡 Expert Tips & Tricks
🛒 Choosing the Right Ingredients
When selecting dark chocolate, aim for a cacao content of 70% or higher. Higher cacao percentages give a richer flavor and a firmer set, which is essential for a clean snap when you bite into the cup. For peanut butter, avoid brands that contain added sugars or hydrogenated oils; a simple, natural peanut butter provides the purest taste and a smoother texture. If you’re allergic to peanuts, try almond or sunflower seed butter—they both bring a subtle nutty note that pairs beautifully with chocolate.
🔪 Preparation Techniques
Use a silicone spatula to stir the chocolate; it’s heat‑resistant and prevents metal from cooling the mixture too quickly. When coating the liners, a small offset spoon gives you better control over the amount of chocolate, ensuring an even thickness without waste. After the first chocolate layer sets, use a fine‑bristled brush to smooth any rough edges before adding the filling.
🌡️ Mastering the Tempering Process
Temper the chocolate by heating it to 45 °C, cooling it to 27 °C, then reheating to 31 °C. While this full tempering method is ideal for a professional sheen, the simpler method of adding coconut oil works well for home cooks. The key is to keep the temperature stable; if the chocolate cools too fast, it may become grainy. A digital thermometer can be handy, but a visual cue—shiny, fluid chocolate that forms a thin film when drizzled on a spoon—also indicates proper tempering.
🍽️ Presentation & Service
Arrange the finished cups on a marble slab or a dark wooden board for contrast. Dust the platter lightly with cocoa powder or edible gold leaf for an upscale look. Pair each cup with a small dollop of whipped cream infused with a splash of espresso for a sophisticated dessert bar. For a festive twist, drizzle a thin line of caramel sauce across the tops just before serving.
🏆 Pro Tips
Professional chefs treat every detail as an opportunity to elevate flavor, texture, and visual impact.
- 🎯 Precise Temperature Control: Using a chocolate tempering machine or a digital probe ensures the cocoa butter crystals align perfectly, resulting in a glossy finish that doesn’t melt at room temperature.
- 🎯 Layer Thickness Consistency: Aim for a 2‑mm shell thickness. Too thin and the cup may break; too thick and the chocolate can overpower the peanut butter flavor.
- 🎯 Air Bubble Elimination: After filling each liner, gently tap the tray on the countertop three times. This releases trapped air, preventing unsightly pockets that can weaken the shell.
- 🎯 Flavor Infusion: Add a pinch of smoked sea salt or a dash of espresso powder to the chocolate for a nuanced depth that surprises the palate.
- 🎯 Portion Scaling Accuracy: When increasing or decreasing servings, adjust each ingredient proportionally using the portion control script below to maintain balance.
- 🎯 Storage Science: Store cups in a single layer on parchment paper to avoid crushing. A cool, dry environment preserves the snap and prevents bloom.
"The secret to a perfect chocolate confection is patience and precision; rush the process and you lose the magic." — Jacques Pépin
🔄 Variations & Adaptations
Chocolate Peanut Butter Cups are a versatile canvas. Below are several creative twists that let you tailor the recipe to dietary needs, flavor cravings, or seasonal themes.
🥬 Vegetarian / Vegan Version
Swap the honey for maple syrup or agave nectar, and ensure the chocolate is dairy‑free (most dark chocolates are). Replace the natural peanut butter with a plant‑based alternative like almond or cashew butter. The result is a completely vegan treat that retains the same creamy texture.
- Maple syrup (instead of honey) – adds a subtle caramel note.
- Almond butter – offers a slightly milder flavor and a lighter color.
🌶️ Flavor Variations
Explore global flavor profiles by tweaking the filling or the chocolate coating.
Spicy Version
Add ¼ tsp cayenne pepper or a pinch of smoked chipotle powder to the peanut butter filling for a warm, lingering heat that contrasts beautifully with the sweet chocolate.
Mediterranean Version
Infuse the chocolate with a hint of orange zest and sprinkle a few crushed pistachios on top. The citrus brightens the deep cocoa while pistachios add a buttery crunch.
Asian Inspired Version
Mix a splash of soy sauce and a dash of toasted sesame oil into the peanut butter filling, then coat the cups with white chocolate and garnish with toasted sesame seeds. This creates a sweet‑savory umami experience.
⚠️ Dietary Adaptations
Gluten‑Free
All ingredients are naturally gluten‑free. Ensure any packaged chocolate or peanut butter does not contain added wheat‑based thickeners.
Lactose‑Free
Use dairy‑free dark chocolate (most dark chocolate is already lactose‑free). No dairy is present in the filling unless you add a cream topping.
Low‑Calorie
Replace half of the dark chocolate with unsweetened cocoa powder mixed with a small amount of coconut oil to retain the glossy finish while cutting calories.
👶 Family / Kids Version
Kids love extra fun! Add a drizzle of white chocolate on top and a tiny sprinkle of colorful sprinkles. Reduce the sea salt for a sweeter profile and use mini paper liners for bite‑size portions that are easy for little hands.
📦 Storage & Reheating
🧊 Conservation
Refrigerator
- Duration: 7 days
- Recommended container: Airtight glass jar
- Tip: Place a piece of parchment paper between layers to prevent sticking.
Freezer
- Duration: 2 months
- Method: Arrange cups on a baking sheet lined with parchment, freeze solid, then transfer to a zip‑top freezer bag.
- Defrosting: Transfer to the refrigerator overnight; avoid rapid thawing to keep the chocolate glossy.
💡 For optimal texture, let frozen cups sit at room temperature for 10 minutes before serving; this restores the snap without melting the filling.
♨️ Reheating
🔥 Oven (Recommended)
- Preheat to 150 °C (300 °F).
- Place cups on a parchment‑lined tray.
- Heat for 5‑7 minutes, just until the chocolate softens slightly.
- Remove and let cool for 2 minutes before serving.
⚡ Microwave (Quick)
- Place a cup on a microwave‑safe plate.
- Heat at 50% power for 10‑15 seconds.
- Check softness; repeat in 5‑second bursts if needed.
🍳 Stovetop (Optional)
Place a cup in a dry skillet over low heat, covering with a lid for 30 seconds. This gently warms the chocolate without melting the filling.
🍷 Perfect Pairings
🥗 Accompaniments
- Fresh Berry Salad: A mix of strawberries, blueberries, and mint provides a bright, acidic counterpoint.
- Salted Caramel Popcorn: The crunchy, caramelized kernels echo the sweet‑salty theme.
- Light Citrus Sorbet: A scoop of lemon or orange sorbet cleanses the palate between bites.
🍷 Wine & Beverage Matches
- Ruby Port: Its rich, fruity notes amplify the chocolate’s depth while complementing the peanut butter.
- Cold Brew Coffee: The bitter coffee balances the sweetness and enhances the nutty undertones.
- Non‑Alcoholic: Sparkling hibiscus tea offers a tart, floral contrast.
🍰 Complementary Courses
Start with a light citrus vinaigrette salad, move to the cups as a decadent dessert, and finish with a palate‑cleansing espresso shot. For a full‑course experience, serve a roasted butternut squash soup before the cups, allowing the sweet‑savory progression to build.
❓ Frequently Asked Questions
Q: Can I use milk chocolate instead of dark chocolate?
A: Absolutely, but expect a sweeter, softer shell that may not set as firmly. Milk chocolate also contains milk solids, which can affect the snap. If you prefer a milder flavor, use a blend of 70% dark and 30% milk chocolate for balance.
Q: How do I prevent the chocolate from developing bloom?
A: Bloom occurs when chocolate is stored at fluctuating temperatures. Keep the cups in a cool, dry place, and avoid exposing them to direct sunlight or warm kitchens. Tempering properly (or using coconut oil) also reduces the risk.
Q: What if I don’t have a silicone muffin tray?
A: Paper cupcake liners work perfectly. Place them in a standard muffin tin for stability. If you lack both, small silicone molds or even a mini muffin pan can be used; just ensure the cups can be removed cleanly.
Q: My filling is too runny. What can I do?
A: Add a teaspoon of powdered sugar or a bit more peanut butter to thicken. If the mixture is still loose, refrigerate it for 10 minutes before filling the shells; this firms it up without altering flavor.
Q: Can I make these cups ahead of a party?
A: Yes! Prepare them up to two days in advance and store them in an airtight container in the refrigerator. Bring them to room temperature 15 minutes before serving for optimal texture.
Q: How can I make a lower‑sugar version?
A: Substitute honey with a sugar‑free sweetener like erythritol or stevia, adjusting the amount to taste. Use a chocolate with lower sugar content (85% cocoa) and consider adding a dash of extra sea salt to maintain flavor balance.
🎉 To Your Kitchen!
This Chocolate Peanut Butter Cups recipe is a celebration of contrast—rich, dark chocolate meets silky, salty peanut butter, all wrapped in a glossy, snap‑ready shell. Whether you’re crafting a simple after‑dinner treat or presenting an elegant bite at a cocktail party, the technique is straightforward, the flavors are universally adored, and the visual impact is undeniable. By mastering the tempering process and the precise portion scaling, you’ll produce a batch that looks as professional as it tastes.
Give it a try, experiment with the variations, and don’t hesitate to make it your own. Share your photos, tell me about any tweaks you made, and let the community see how you’ve elevated this classic confection.
Have you tried this recipe?
Leave a comment and rating below! Share your creations on Instagram with #ChocolateCupMagic to be featured on our blog.
Chocolate Peanut Butter Cups
Silky dark chocolate shells filled with creamy, salty‑sweet peanut butter—perfect for any occasion.
📝 Ingredients
Chocolate Shells
Peanut Butter Filling
Optional Garnish
👨🍳 Instructions
- 1 Set up a double boiler and melt the dark chocolate with coconut oil, stirring until smooth.
- 2 Coat each paper liner with a thin chocolate layer, tap to remove bubbles, and chill for 5 minutes.
- 3 Mix peanut butter, honey, vanilla, and sea salt until creamy.
- 4 Spoon the filling into each chilled shell, keeping it away from the edge.
- 5 Cover the filling with a second chocolate layer, tap to smooth.
- 6 Sprinkle crushed peanuts (optional) while chocolate is still soft.
- 7 Refrigerate for at least 30 minutes until fully set.
- 8 Pop the cups out of liners and serve at room temperature.
- 9 Store leftovers in an airtight container in the fridge for up to a week.
- 10 Enjoy and share your creations on social media!
🥗 Nutritional Information (per serving)
*Values are estimates based on standard ingredient data.
📚 You Might Also Like
Salted Caramel Chocolate Tart
Matcha White Chocolate Truffles
Espresso Chocolate Mousse


💬 Comments & Reviews
Leave a Comment
No comments yet. Be the first to share your thoughts!