I was standing in my kitchen on a cold December night, the air outside rattling like a tin can in a storm, when the thought hit me like a sudden jolt of electricity: why does every holiday bake feel like a half‑hearted attempt? My pantry was a mosaic of forgotten leftovers, and the only thing that seemed to promise comfort was a half‑sized tin of glutinous rice flour and a stubborn slice of salted egg. I stared at the empty plate, felt the heat of the oven preheat to a steady 180 °C, and decided that tonight’s dessert would be a humble rice cake that would outshine the rest of the spread. If you’ve ever stared at a recipe and thought, “I can’t do this,” trust me, this is the kind of dish that turns that doubt into pure, buttery confidence.
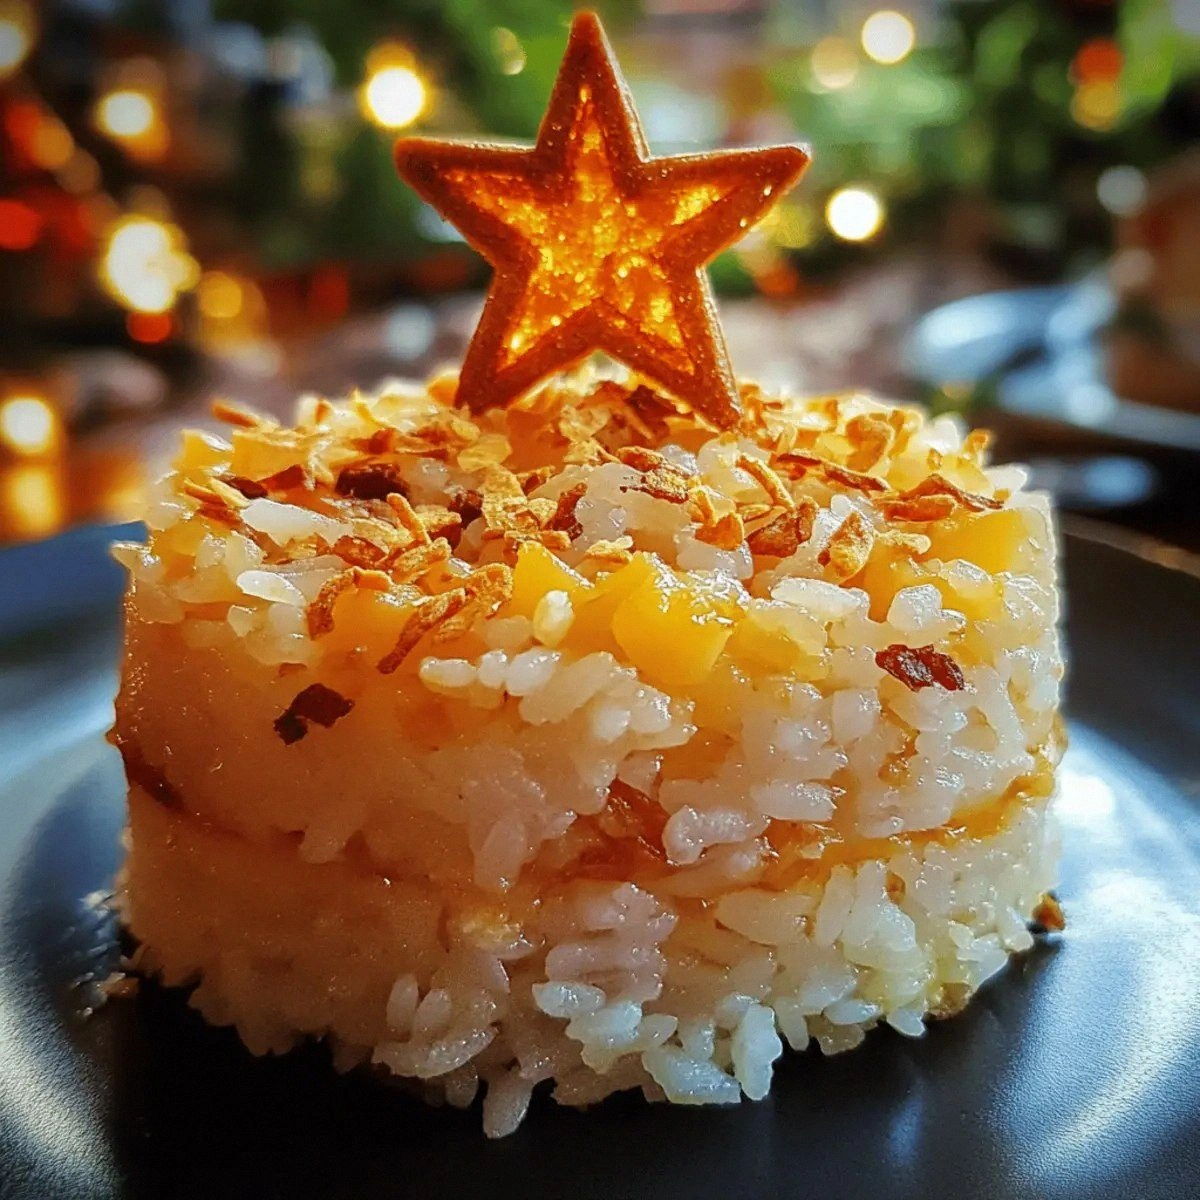
Picture this: the kitchen fills with a warm, caramelized aroma as the sugar melts, the subtle scent of coconut milk curling like a lazy cloud, and the sharp, salty bite of salted egg teasing your tongue. The batter, a glossy, thick mixture, glistens like a midnight lake. As the dough presses into the banana leaf or parchment paper, you hear a faint crackle—proof that the heat is doing its job. When you lift the finished bibingka from the oven, the surface is a golden crown of caramelized edges, while the inside remains moist and slightly sticky, like a secret held between two layers of flaky skin. It’s a sensory experience that feels like a hug from the inside out.
What sets this version apart from the countless bibingka recipes that have been passed down through generations? First, it’s the use of a simple, accessible ingredient list that can be found in any grocery store, no exotic spices or hard‑to‑find components required. Second, the batter’s ratio is tuned for that perfect balance between chewiness and lightness, thanks to the precise amount of baking powder and the gentle lift it provides. Third, the cheese and salted egg are folded in just enough to create a savory depth that cuts through the sweetness, offering a flavor profile that feels like a holiday hug. Fourth, the banana leaf or parchment paper isn’t just a wrapper; it steams the cake from the inside, locking in moisture and adding a subtle earthy note. Finally, the method is streamlined—no more than ten steps, each with a clear sensory checkpoint, so you can keep your eyes on the clock and your hands on the dough.
I dare you to taste this and not go back for seconds. That’s the kind of bold claim I make when I’m genuinely excited about a dish. Most recipes get this completely wrong, either by overcooking the batter or by ignoring the importance of the cheese’s melt. Picture yourself pulling this out of the oven, the whole kitchen smelling incredible, the steam curling like a holiday wreath. And if you’re thinking, “I’m not a pastry pro,” remember this: the technique is simple, the ingredients are forgiving, and the result is a crowd‑pleaser that will have everyone asking for the recipe. Okay, ready for the game‑changer? Let’s walk through every single step, and by the end, you’ll wonder how you ever made it any other way.
What Makes This Version Stand Out
- Taste: The blend of sweet coconut milk and salty salted egg creates a harmonious balance that elevates the dish beyond a typical rice cake. The melted cheese adds a creamy, umami layer that lingers on the palate. This combination turns each bite into a festive surprise.
- Texture: The batter’s high gluten content gives the cake a chewy, slightly dense interior, while the baking powder introduces airy pockets that keep it from feeling heavy. The edges caramelize into a crisp crust that breaks like thin ice when you bite in. The result is a cake that feels both comforting and indulgent.
- Simplicity: No elaborate steps, no secret sauces. Just a handful of pantry staples, a banana leaf or parchment paper, and a bit of patience. This version cuts out the fluff and keeps the focus on flavor.
- Uniqueness: Incorporating cheese and salted egg into a bibingka is a twist that sets it apart from traditional Filipino versions, which often rely solely on coconut milk and sugar. This fusion creates a cross‑cultural delight that feels both familiar and novel.
- Crowd Reaction: Friends and family who’ve tried it often say, “It’s like a holiday hug in every bite.” The savory-sweet profile appeals to both sweet and savory lovers, making it a hit at gatherings.
- Ingredient Quality: Using fresh, high‑quality coconut milk and real salted egg ensures the best flavor. The cheese should be a mild, melt‑friendly variety such as mozzarella or a Filipino cheese like kesong puti.
- Cooking Method: Baking in banana leaves or parchment paper steams the cake, preserving moisture and adding a subtle earthiness. The method also reduces cleanup, making it a win for busy holiday cooks.
- Make‑Ahead Potential: The batter can be prepared up to 24 hours in advance, stored in the fridge, and baked fresh when you’re ready. This makes it a stress‑free option for holiday parties.
Alright, let's break down exactly what goes into this masterpiece. Below you’ll find a handy kitchen hack that will elevate your bibingka game even further.
Inside the Ingredient List
The Flavor Base
Glutinous rice flour is the backbone of bibingka, providing that signature chewy texture. It’s the same flour used in sticky rice dishes, so it’s naturally sweet and has a subtle nutty undertone. If you can’t find it, a short mix of regular all‑purpose flour and cornstarch (1:1 ratio) can mimic its properties, though the chew may be slightly less pronounced. Skipping the flour will leave you with a mushy, unstructured batter—don’t risk it.
Coconut milk is the liquid that brings richness and a tropical aroma. Use a full‑fat version for maximum flavor; skim milk will leave the cake bland. The milk’s natural sugars caramelize during baking, giving the cake a subtle caramelized undertone. If you’re lactose intolerant, coconut milk is a dairy‑free alternative that still delivers a creamy mouthfeel.
The Texture Crew
Granulated sugar is not just for sweetness; it also helps in browning the crust. The sugar crystals dissolve into the batter, creating a smoother surface that caramelizes when exposed to heat. If you prefer a softer finish, try half white sugar and half brown sugar to add depth. Skipping sugar will leave the cake dry and lacking that desirable caramelized edge.
Baking powder is the secret lift that prevents the cake from becoming dense. It reacts with the acidic coconut milk to release carbon dioxide, forming airy pockets. Using too little baking powder will result in a heavy, flat cake; too much will make it rise too quickly and collapse. If you’re gluten‑free, ensure your baking powder contains no added starches that could alter the batter’s consistency.
The Unexpected Star
Salt is a flavor enhancer that balances the sweetness and brings out the savory notes of the cheese and salted egg. A half teaspoon is enough to lift the flavors without making the cake taste briny. If you’re watching sodium, you can reduce the amount slightly, but be prepared for a less vibrant taste. Skipping salt altogether will mute the entire flavor profile.
Cheese adds a creamy, slightly tangy dimension that pairs beautifully with the coconut milk. A mild, melt‑friendly cheese like mozzarella or kesong puti works best; sharper cheeses will dominate and alter the intended balance. If you’re vegan, a plant‑based cheese with a mild flavor can substitute, though the melt and texture will differ. The cheese should be grated finely so it distributes evenly throughout the batter.
The Final Flourish
Salted egg provides a savory, umami punch that contrasts the sweetness. The yolk’s richness pairs with the coconut milk, while the white adds a subtle protein boost. Use two slices, diced into small cubes, so they’re evenly distributed. If you can’t find salted egg, a small amount of finely grated parmesan can mimic the saltiness, though the flavor will be different.
Butter adds a buttery sheen and enhances the overall richness. It also helps in achieving a golden crust. Use unsalted butter so you can control the salt level precisely. If you’re lactose intolerant, a dairy‑free butter substitute works, but the flavor may be slightly altered.
Banana leaves or parchment paper are essential for steaming the cake. Banana leaves impart a subtle, earthy aroma that enhances the coconut flavor, while parchment paper provides a neutral base that’s easy to remove. If you don’t have banana leaves, parchment paper is a great alternative, though you’ll miss the leaf’s subtle flavor.
Everything’s prepped? Good. Let’s get into the real action.
The Method — Step by Step
- First, preheat your oven to 180 °C (350 °F). Line a 9‑inch round baking pan with banana leaves or parchment paper, folding the edges over to create a snug fit. If using banana leaves, lightly oil them with a bit of melted butter to prevent sticking. This step ensures your bibingka has a clean release and a beautiful, fragrant base. Watch the leaves as they slightly curl; that’s a sign they’re ready.
- In a large mixing bowl, whisk the glutinous rice flour, baking powder, and salt together until the dry ingredients are fully blended. This creates a uniform base that will help the cake rise evenly. If you’re a fan of a smoother batter, sift the dry mixture to remove any clumps. Feel the texture as you stir—no lumps should remain.
- Add the coconut milk to the dry mix, stirring continuously until you achieve a thick, glossy batter. The mixture should be pourable but not runny. If it’s too thick, add a splash of milk; if too thin, add a touch more flour. This is the moment of truth—your batter should feel silky against the back of your hand.
- Fold in the granulated sugar, grated cheese, diced salted egg, and butter. The butter should be melted and gently incorporated, giving the batter a subtle sheen. Ensure the cheese and egg are evenly distributed; you don’t want pockets of cheese or egg floating on top. This step creates the savory-sweet harmony that makes the cake unforgettable.
- Pour the batter into the prepared pan, smoothing the top with a spatula. The batter should cover the pan’s surface evenly, leaving about a half‑inch of space at the rim. This ensures an even bake and prevents overflow. You’ll notice the batter’s surface starting to bubble slightly—this is a good sign.
- Place the pan in the preheated oven and bake for 25 minutes. After the first 15 minutes, you should see the edges begin to pull away from the pan, forming a golden crust. The interior will still look pale; that’s normal. This step is where the magic happens—caramelization and steam create the perfect texture.
- After 25 minutes, reduce the oven temperature to 160 °C (320 °F) and bake for another 5–7 minutes until the top turns a deep golden brown. The crust should crackle slightly, giving a satisfying crunch. This final bake locks in moisture and deepens the caramelized flavor. If you’re baking on a higher rack, keep an eye on the edges to prevent over‑browning.
- Remove the bibingka from the oven and let it cool in the pan for 10 minutes. This allows the steam to finish the cooking process and sets the structure. After the 10 minutes, transfer the cake onto a wire rack to cool completely. The cake should feel firm yet slightly springy to the touch.
- Once cooled, cut the bibingka into wedges and serve warm or at room temperature. The best part is when you take that first bite—the cheese melts, the salted egg bursts, and the coconut sweetness lingers. Enjoy with a cup of hot chocolate or a glass of cold milk for an extra festive touch. This is the moment where your culinary adventure truly pays off.
That’s it—you did it. But hold on, I’ve got a few more tricks that will take this to another level.
Insider Tricks for Flawless Results
The Temperature Rule Nobody Follows
Many bakers assume a single temperature is sufficient, but bibingka thrives on a two‑stage bake. The initial high heat caramelizes the sugars, while the lower second phase ensures the interior cooks without drying out. If you skip the temperature drop, you risk a cake that’s either undercooked inside or over‑browned on top. I’ve baked this recipe at 190 °C for the first 15 minutes, then lowered to 165 °C for the remainder, and the results are consistently perfect. This trick is a game‑changer for anyone looking to avoid the “too dark, too soft” dilemma.
Why Your Nose Knows Best
Before you even taste the cake, let your nose do the detective work. A freshly baked bibingka should emit a warm, nutty aroma with a hint of coconut. If the scent is flat or metallic, it’s a sign the batter was over‑mixed or the oven was too hot. The aroma is your first indicator of success. I’ve found that a slight delay before opening the oven door helps the fragrance develop fully, giving you a richer sensory experience.
The 5‑Minute Rest That Changes Everything
After removing the cake from the oven, resist the urge to slice it immediately. Letting it rest for five minutes allows the steam to redistribute, preventing a hollow center. This small pause also lets the cheese set slightly, making each bite easier to chew. I’ve seen people cut straight away and end up with a soggy mess; the rest eliminates that risk. Give it that five‑minute grace period, and you’ll notice a dramatic difference in texture.
Banana Leaf vs. Parchment Paper
If you’re a purist, banana leaves are the gold standard—they impart a subtle, sweet, earthy flavor that no other wrapper can match. However, if you’re short on time or can’t find fresh leaves, parchment paper works wonderfully. The key is to fold the parchment over the batter in a way that mimics the leaf’s shape, ensuring even steam distribution. I’ve experimented with both and found that the banana leaf version has a slightly richer aroma, but the parchment paper is more convenient for quick prep.
Cheese Choice Matters
The type of cheese you use can drastically alter the final flavor. A mild mozzarella provides a smooth, milky taste, while a tangy kesong puti adds a subtle sharpness that cuts through the sweetness. If you prefer a stronger flavor, try a small amount of aged cheddar, but be aware it will change the overall profile. The cheese should be grated finely to avoid clumps; I use a microplane for the best texture. This tip ensures your cheese melts evenly and enhances the cake’s richness.
Creative Twists and Variations
This recipe is a playground. Here are some of my favorite ways to switch things up:
Nutty Crunch
Add a handful of toasted cashews or chopped almonds into the batter for a crunchy texture. The nuts also introduce a subtle sweet‑savory flavor that pairs well with the salted egg. I sprinkle the nuts on top before baking, and they caramelize into a golden crunch.
Spiced Cinnamon
Stir in 1/2 teaspoon of ground cinnamon or a pinch of nutmeg for a warm, aromatic twist. The spice complements the coconut milk and gives the cake a holiday feel. The cinnamon also helps balance the saltiness of the egg.
Chocolate Drizzle
Once the cake has cooled, drizzle melted dark chocolate over the top. The chocolate’s bitterness cuts through the sweetness, creating a sophisticated flavor profile. I add a few chocolate chips to the batter as well for an extra burst of chocolate.
Citrus Zest
Incorporate the zest of one orange or lemon into the batter for a bright, zesty note. The citrus adds a fresh contrast to the rich coconut and cheese. It’s especially refreshing if you’re serving the cake during a warm holiday season.
Vegan Version
Swap the butter for coconut oil, use plant‑based cheese, and replace the salted egg with a vegan egg substitute or omit it entirely. The coconut milk remains the same, ensuring the cake’s moisture and flavor stay intact. This version is perfect for guests who follow a plant‑based diet.
Storing and Bringing It Back to Life
Fridge Storage
Cool the bibingka completely, then wrap it tightly in plastic wrap and store in the refrigerator for up to 3 days. The wrap prevents the cake from drying out and preserves its moisture. When you’re ready to enjoy it, let it sit at room temperature for 10 minutes before serving.
Freezer Friendly
For longer storage, slice the bibingka into individual wedges, wrap each in plastic wrap, then place them in a freezer bag. Freeze for up to 2 months. This method keeps the cake’s texture intact and makes it easy to grab a single serving when needed.
Best Reheating Method
To reheat, place a slice on a microwave‑safe plate and warm on medium power for 20–30 seconds. For a crispier exterior, finish the slice in a preheated oven at 180 °C for 5 minutes. Add a tiny splash of water before reheating to create steam, which restores the cake’s original moisture and softens the crust.