Love this? Pin it for later! 📌
A soul-warming, protein-packed twist on the classic white chicken chili that will become your new favorite comfort food.
My Chili Love Story
Every winter, without fail, my family begins the great chili debate. My husband campaigns for his smoky beef brisket chili, the kids beg for their favorite sweet potato turkey version, but me? I hold out for this creamy, luxurious white chicken chili that I've been perfecting for nearly a decade.
I first tasted white chicken chili at a ski lodge in Colorado, where the altitude was high, the temperatures were low, and this bowl of creamy, white-bean-studded comfort was the only thing standing between me and total exhaustion. One spoonful and I was hooked – but when I asked for the recipe, the chef winked and said it was a family secret. Challenge accepted.
What followed was months of experimentation in my tiny apartment kitchen, testing different combinations of beans, proteins, and aromatics. I wanted something that delivered serious protein (because ski days require fuel!), maintained that gorgeous creamy texture without being heavy, and packed enough flavor to make taste buds dance. After countless batches and very willing taste-testers (thanks, neighbors!), this version emerged as the clear winner.
Now this chili has become my signature dish for everything from game-day gatherings to meal-prep Sundays. It's the recipe friends request when they're under the weather, the one I make in double batches before busy weeks, and the bowl I crave when the weather turns crisp. The combination of tender chicken, creamy white beans, and aromatic spices creates something that's both comforting and energizing – like a warm hug that also happens to fuel your day.
Why This Recipe Works
- Protein Powerhouse: With 35 grams of protein per serving, this chili keeps you satisfied for hours thanks to chicken breast and three types of beans.
- Creamy Without Heavy Cream: Greek yogurt and blended white beans create luxurious texture without the heaviness of traditional cream-based soups.
- One-Pot Wonder: Everything cooks together in a single pot, making cleanup a breeze and allowing flavors to meld beautifully.
- Meal Prep Champion: Tastes even better the next day, freezes beautifully, and reheats like a dream for up to 4 days refrigerated.
- Customizable Heat Level: From mild to wild, you control the spice level with adjustable jalapeño and chili powder amounts.
- Nutrient Dense: Packed with fiber, protein, and essential nutrients while being naturally gluten-free and easily made dairy-free.
- Restaurant Quality: The secret ingredient of lime juice and fresh cilantro added at the end brightens everything and elevates it from home cooking to restaurant-worthy.
Ingredients You'll Need
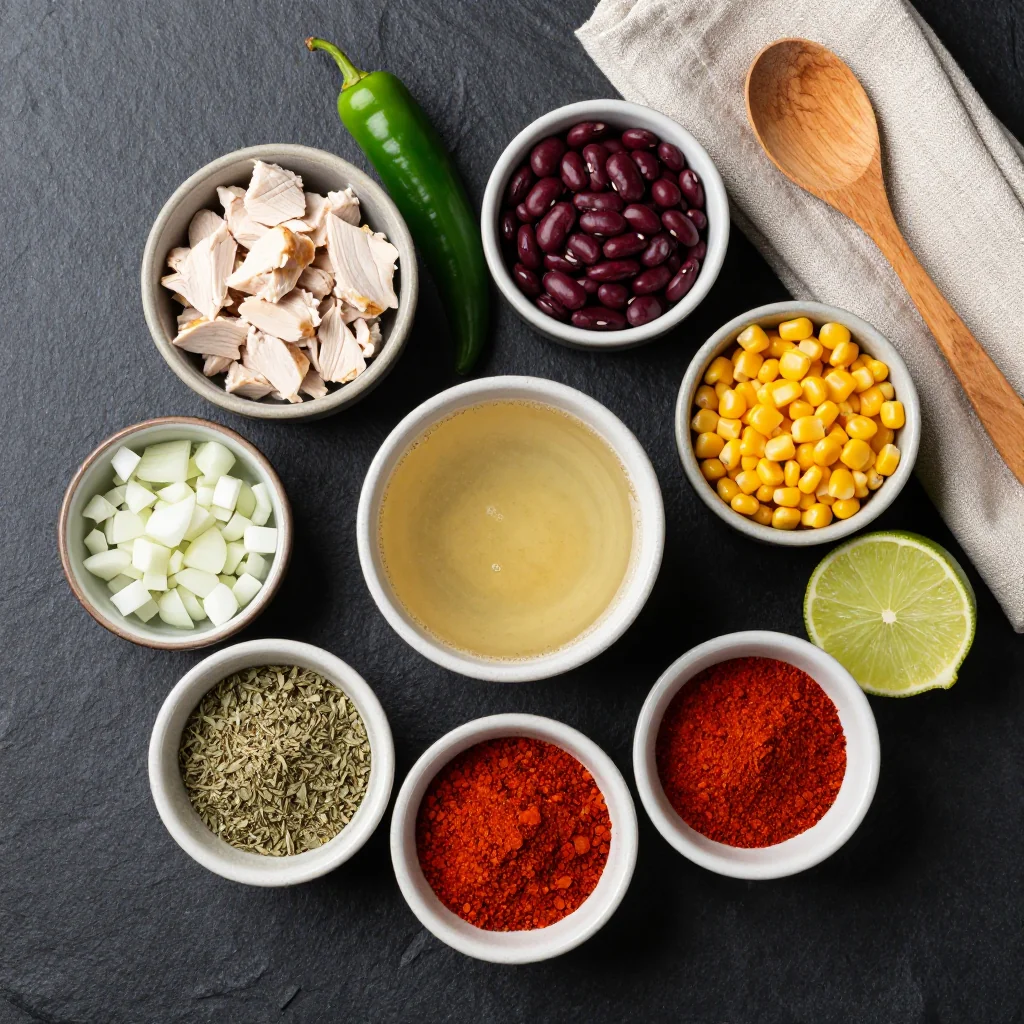
Great chili starts with quality ingredients, and I've learned through trial and error which components make the biggest impact. Let's break down what you'll need and why each ingredient matters:
Chicken Breast (2 lbs, boneless skinless): The star protein of our show. I prefer chicken breast for its lean protein content, but thigh meat works if you prefer darker meat. Look for plump, pale pink chicken without any gray spots or strong odor. Pro tip: partially freeze the chicken for 20 minutes before cutting – it makes dicing much easier and more uniform.
Great Northern White Beans (3 cans, 15 oz each): These mild, creamy beans are traditional for white chili for good reason. They're larger than navy beans but smaller than cannellini, with a tender skin that holds up well to simmering. Always rinse canned beans to remove excess sodium and the starchy liquid. If you're cooking from dried, you'll need about 1½ cups dried beans, soaked overnight.
Cannellini Beans (1 can, 15 oz): Adding one can of these Italian white beans creates textural variety and extra creaminess when some are blended. They're slightly larger and creamier than Great Northern, almost melting into the chili as it cooks.
Green Chilies (2 cans, 4 oz each): These mild, roasted peppers add authentic Southwest flavor without overwhelming heat. I prefer the fire-roasted variety for their smoky depth. Don't drain them – the juice carries amazing flavor. If you can't find canned, roast 3-4 Anaheim or poblano peppers yourself.
Chicken Broth (6 cups, low sodium): The foundation of our liquid. Always choose low-sodium versions so you can control the salt level yourself. Homemade broth is incredible here if you have it – the difference in flavor is remarkable. Vegetable broth works in a pinch, but chicken really provides the best flavor foundation.
Onion (1 large, sweet or yellow): The aromatic base that builds flavor from the ground up. Sweet onions like Vidalia add natural sweetness that balances the heat, while yellow onions provide more savory depth. Dice it finely so it melts into the chili rather than standing out as distinct pieces.
Garlic (6 cloves, minced): Because six cloves is the correct amount of garlic in any recipe calling for garlic. Fresh is non-negotiable here – the powdered stuff won't provide the same pungent, aromatic quality we want.
Jalapeño (2-3 peppers): Control your heat level with the amount and preparation. For mild chili, use one pepper, remove all seeds and membranes. For medium, use two peppers, remove half the seeds. For hot, use three peppers with seeds intact. Always taste your peppers first – heat levels vary dramatically.
Spice Blend (ground cumin, oregano, smoked paprika, coriander): This quartet creates the complex, layered flavor that makes this chili special. Toast whole spices and grind them fresh if you have time – the difference is noticeable. Smoked paprika adds incredible depth that regular paprika can't match.
Greek Yogurt (1 cup, full-fat): Our secret weapon for creaminess and protein. Full-fat yogurt won't curdle when added to hot liquid like non-fat varieties might. Let it come to room temperature before stirring in to prevent curdling. For dairy-free, substitute with coconut cream or blended cashews.
How to Make High Protein White Chicken Chili That Warms Your Soul
Prep and Season the Chicken
Pat chicken breast dry with paper towels – this helps it brown properly instead of steaming. Cut into ¾-inch cubes, keeping pieces uniform so they cook evenly. In a medium bowl, toss chicken with 1 tablespoon olive oil, 1 teaspoon salt, ½ teaspoon pepper, and 1 teaspoon of the cumin. Let it marinate while you prep the vegetables – even 15 minutes of seasoning time makes a difference in flavor development.
Build Your Flavor Base
Heat 2 tablespoons olive oil in a heavy Dutch oven over medium-high heat until shimmering. Add diced onion and cook 4-5 minutes until softened and starting to turn golden at the edges. Add minced garlic and jalapeño, cooking 1 minute more until fragrant – your kitchen should smell amazing right now. This is where we're building the aromatic foundation that will permeate the entire dish.
Toast Your Spices
Push the onion mixture to the sides of the pot and add remaining spices (2 teaspoons cumin, oregano, coriander, and 1 teaspoon smoked paprika) to the center. Let them toast for 30-45 seconds until fragrant – you'll smell them bloom and become more complex. Stir everything together, coating the onions with the spiced oil. This crucial step unlocks the essential oils in dried spices, intensifying their flavor exponentially.
Brown the Chicken
Add the seasoned chicken to the pot in a single layer. Let it sit undisturbed for 3-4 minutes to develop a golden crust – resist the urge to stir constantly. Once nicely browned on one side, stir and continue cooking 2-3 minutes more. The chicken doesn't need to be cooked through at this stage; we're just developing flavor through the Maillard reaction. Those browned bits (fond) stuck to the bottom of the pot? Pure flavor gold.
Deglaze and Add Liquids
Pour in ½ cup of the chicken broth and use a wooden spoon to scrape up all those beautiful browned bits from the bottom of the pot. This process, called deglazing, lifts all the concentrated flavor and distributes it throughout the chili. Add the remaining 5½ cups broth, green chilies with their juice, and drained Great Northern beans. Bring to a gentle boil, then reduce heat to maintain a steady simmer.
Simmer and Develop Flavors
Cover partially and let simmer 25-30 minutes, stirring occasionally. This is where the magic happens – flavors meld, chicken becomes tender, and the broth transforms into something extraordinary. If it looks too thick, add more broth; too thin, let it simmer uncovered. Taste and adjust seasoning with salt and pepper. The chili should be thick enough to coat a spoon but still spoonable.
Create Creamy Texture
Ladle 1½ cups of the chili (including beans and broth) into a blender. Add the drained cannellini beans and blend until completely smooth. This creates a creamy base without adding heavy cream or flour. Stir this puree back into the pot – you'll notice the chili immediately becomes thicker and more luxurious. For extra richness, blend in 2 tablespoons of Greek yogurt here.
Finish with Brightness
Remove from heat and let cool for 2-3 minutes – this prevents the yogurt from curdling. Whisk in the room-temperature Greek yogurt until completely incorporated. Stir in lime juice, chopped cilantro, and adjust seasoning one final time. The lime juice is crucial – it brightens all the warm, earthy flavors and adds a fresh dimension that makes the chili taste alive rather than heavy.
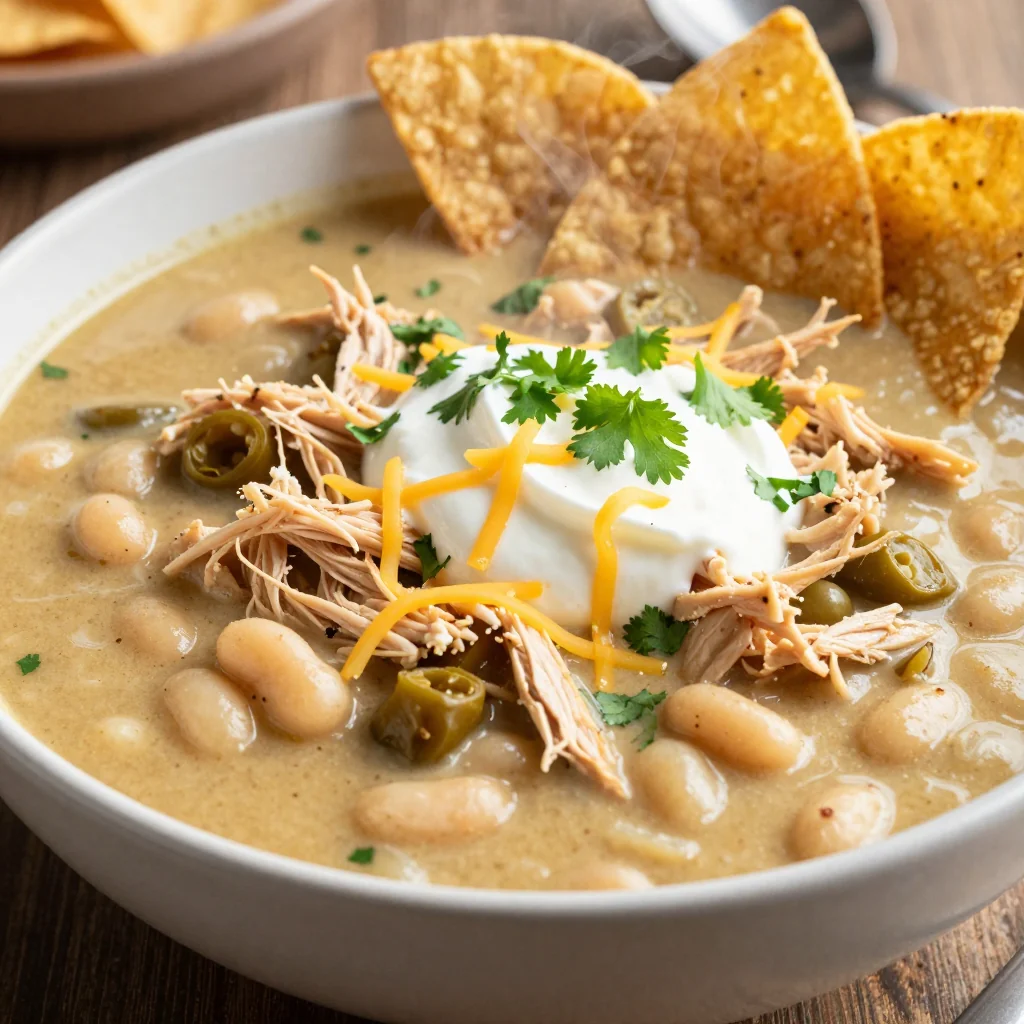
Serve and Garnish
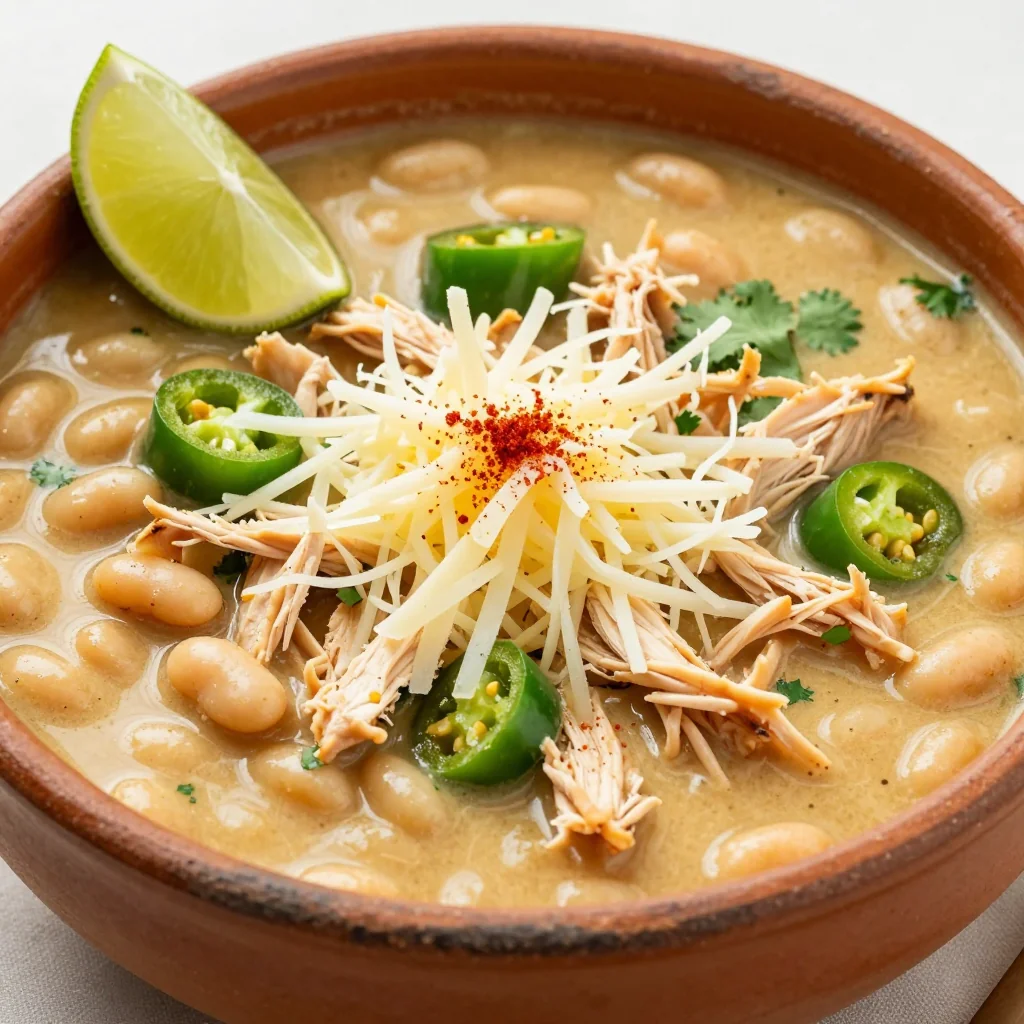
Ladle into warm bowls and let everyone customize their toppings. I set out bowls of diced avocado, shredded cheese, additional Greek yogurt, lime wedges, fresh cilantro, and crispy tortilla strips. The contrast of hot chili with cool, creamy toppings is what makes this dish truly special. Don't skip the garnishes – they add texture, temperature contrast, and layers of flavor that elevate the entire experience.
Expert Tips
Time-Saving Shortcuts
Use pre-cooked rotisserie chicken and reduce simmering time to 15 minutes. Add it after blending the beans so it doesn't overcook and become stringy.
Heat Control
Remove jalapeño seeds and membranes with a spoon under running water – the oils can burn your skin. Wear gloves if you're sensitive to capsaicin.
Cool Before Storing
Let chili cool completely before refrigerating to prevent bacterial growth. Divide into shallow containers for faster, safer cooling.
Revive Leftovers
Add a splash of broth when reheating – the beans continue absorbing liquid as it sits. A squeeze of fresh lime juice brightens day-old chili.
Temperature Matters
Use a kitchen thermometer – chicken is done at 165°F. Overcooking makes it rubbery, especially when reheating leftovers.
Flavor Boosters
Add a parmesan rind while simmering for extra umami, or stir in 2 tablespoons of cream cheese with the yogurt for extra richness.
Variations to Try
Vegetarian Powerhouse
Replace chicken with 2 cans of chickpeas and 1 cup of quinoa. Add them after blending the beans for protein-packed vegetarian version.
Green Chile Chicken
Add 2 roasted and diced poblano peppers and substitute ground coriander with 1 teaspoon of coriander seeds toasted and ground.
Slow Cooker Version
Add everything except yogurt and lime juice to slow cooker. Cook on low 6-7 hours or high 3-4 hours. Stir in yogurt and lime before serving.
Lightning-Fast Version
Use rotisserie chicken, canned beans, and pre-minced garlic. Sauté aromatics, add everything else, simmer 15 minutes, blend, and serve.
Storage Tips
Refrigeration
Store cooled chili in airtight containers in the refrigerator for up to 4 days. The flavors actually improve after the first day as they meld together. Always reheat to 165°F, adding broth if needed to restore consistency.
Freezing
Freeze in portion-sized containers for up to 3 months. Leave ½-inch headspace as liquids expand when frozen. Thaw overnight in refrigerator or use the defrost setting on your microwave. Add the yogurt fresh after reheating for best texture.
Make-Ahead Meal Prep
Double the recipe and freeze half in family-sized portions. Divide into individual containers for grab-and-go lunches. The chili reheats beautifully in the microwave or stovetop, making it perfect for busy weeks.
Frequently Asked Questions
Absolutely! Use the sauté function for steps 1-4, then add everything except yogurt and lime juice. Cook on high pressure for 12 minutes, natural release 10 minutes. Stir in yogurt and lime before serving. The chicken stays incredibly tender this way.
For milder, use just one jalapeño with all seeds removed, or substitute with green bell pepper. For spicier, leave seeds in 2-3 jalapeños, add ½ teaspoon cayenne, or include a diced serrano pepper. You can also serve with hot sauce on the side for heat-lovers.
Yes! Thighs add richer flavor and stay more tender. Use 2½ lbs boneless skinless thighs, trimmed of excess fat. They'll need 5-10 minutes longer cooking time. The higher fat content makes the chili even more luxurious.
Sour cream works beautifully and provides similar tanginess. For dairy-free, blend ½ cup soaked cashews with ½ cup water until smooth, or use coconut cream. The cashew version adds protein while maintaining the creamy texture.
Perfect for parties! Make up to 2 days ahead – the flavors actually improve. Store the yogurt-lime mixture separately and stir in when reheating. Keep it warm in a slow cooker on the 'warm' setting for up to 4 hours, stirring occasionally.
High Protein White Chicken Chili That Warms Your Soul
Ingredients
Instructions
- Season chicken: Toss chicken pieces with 1 tablespoon oil, 1 teaspoon salt, ½ teaspoon pepper, and 1 teaspoon cumin. Set aside to marinate.
- Sauté aromatics: Heat remaining 2 tablespoons oil in Dutch oven over medium-high heat. Cook onion 4-5 minutes until softened. Add garlic and jalapeño, cook 1 minute.
- Toast spices: Add remaining cumin, oregano, coriander, and paprika. Cook 30 seconds until fragrant.
- Brown chicken: Add marinated chicken in single layer. Cook 3-4 minutes without stirring, then stir and cook 2-3 minutes more.
- Simmer: Add ½ cup broth to deglaze pot, scraping up browned bits. Add remaining broth, green chilies, and Great Northern beans. Bring to simmer, partially cover, and cook 25-30 minutes.
- Blend for creaminess: Blend 1½ cups chili with cannellini beans until smooth. Return to pot.
- Finish: Remove from heat, cool 2-3 minutes, then whisk in yogurt, lime juice, and cilantro. Season to taste and serve hot.
Recipe Notes
For meal prep, freeze individual portions without yogurt. Add fresh yogurt when reheating. This chili thickens as it sits - thin with broth when reheating.